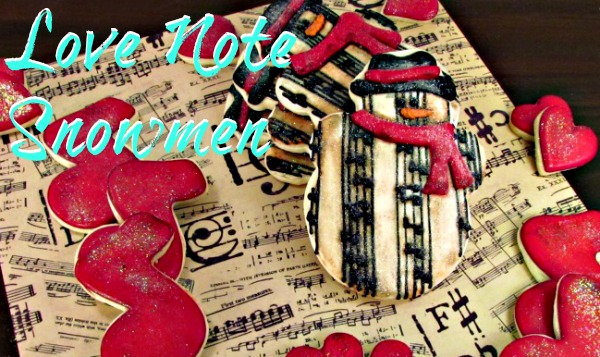
Love Note Snowman Cookies
One of my favorite movies of all times is “Shop Around the Corner.” It stars Margaret Sullavan and James Stewart. You might recognize the remake movie, “You’ve Got Mail.” I think I like it because it is set in a time where people wrote letters. Even though James and Margaret did not know who they were writing to until the end of the movie, it was still magical. There is something about getting a handwritten letter especially if it is from your sweetheart.
I am not romantic enough to write sweet love letters so I did it my way, cookie style!
 I saw so many Christmas ornaments this year that were made from sheets of music and I liked it so much that I wanted to give it a try. These cookies might look hard to make but they aren’t. You just have to start!
Supplies for Love Note Snowman Cookies:
Icing
White Outline
White Flood
Red Outline
Red Flood
Black Outline
Black Flood
Orange Outline Icing
Brown Flood Icing of the antiquing
White Disco Dust
2 Paint Brushes
Let’s Create:
 First, with the white outline icing, outline the snowman’s body.
Next, with the black outline icing, outline the hat.

With the white flood icing, flood the snowman.
 I am going to show you how to do the music lines on this circle cookie with red paper behind it so you can see it a little better. Now for a quick tip, when I get a little distracted I sometimes flood more than I should and my icing oozes over the edge. It is easy to fix. I use the flat end of my handy dandy little Boo Boo Stick and remove the oozy icing. Now you have a good cookie again.
 Now we are ready to add the lines while the body is still wet. I used a 0 PME tip but you can use a1. The goal is to make them as straight as you can but remember, there are going to be broken lines. See mine beside the big arrows? We can hide them with the music notes so take your time but don’t stress.
First of all watch this video by One Tough Cookie on how to pipe a straight line. Isn’t she good!
 Now we are going to take one picture at a time (or watch the video again! haha).
Touch the tip to the edge of the cookie and gently squeeze as you lift the tip away from the cookie keeping your eye on the spot where you want to end the line.
 See the line floating in the air? Resist the urge to hold the tip close to the cookie.
 If you break a line you can fix it by carefully going over it. On this project, if it is a small break you can cover it with a music note later.
 This broken line was a little big so I added a small line to connect the pieces and smoothed it out with my Boo Boo Stick.
 As you come close to the end keep applying gentle pressure but lower the tip closer to the cookie until your tip is touching the cookie.
 You need to make 5 lines for each row of notes (I am not a music person so I have no idea what the lines are called). Leave some space between each group.
Let this dry for several hours or over night.
 Now you are ready to make the notes. I have no idea what these notes are but in my head this is the greatest love song ever written or my cat walking across the piano keys (if I had a piano or a cat).
All you have to do is decide where you want the notes ( or need to hide blobs of icing or broken lines like I am doing in this picture) and make a dot with a stick on the right side and end it with a little flag. Make as many as you want BUT DON’T put them on the face. The eyes will look like notes and you don’t want his face to look all messy.
CONGRATULATIONS!! YOU DID IT!!! THE HARD PART IS OVER!!
Now lets have some fun!
 Next, flood the hat brim and top with the black flood icing. Let this dry for about an hour or so.
With the red outline, outline the red on each end of the hat then flood with the red flood icing.
 Next, add the eyes with the black outline icing or you can add royal icing transfer eyes.
Then, add the nose with the orange outline icing. Just make a squiggley line.
With the red outline icing, outline the scarf.

Now you can flood the scarf with the red flood icing and let this dry overnight.
 Next, thin down the brown flood icing like this. When you get it the right consistency paint it on the entire snowman. You should only work with one at a time because it will dry fast. Remember, don’t use a lot of water because water is the enemy of Royal Icing. If the black icing smears a little it is ok for this project. It will just add character.
 Now dip the dry paint brush into the disco dust and tap the brush over the snowman. This brush will not touch the cookie at all! Think of it as disco rain. Sprinkle until you get the amount you want and let the little guy dry. If you pour the Disco Dust on him you will not see all the hard work you have done. It will cover everything so use the brush.
 This technique will work on any snowman so have fun and make some.
I am going to try to work on making time to write some letters to friends and family. It really does make people feel good to know you took the time to think about them. I am off to buy some stationary and stamps!
Happy Creating,


Wow what a great idea for a theme. I love them!
Thanks Trisha! The sheet music ornaments I saw at Christmas are adorable. I am going to buy some for next year:)
What a wonderful job. I am a sucker for antique music sheets. However, I also like the snow(music)man before he was antiqued just as well. Great Job!
Thanks Tammy! I had a hard time trying to decide if I wanted to antique them but since it was the original idea I decided to go for it. You could do them either way:)
Lisa, I absolutely *ADORE* these! Great job! 🙂
Thanks Nicole:)
As always, so original and so cute!! You give great hints that will really help people. I wish your blog had been around when I was starting out! :0)
That is so nice Tracy! I am glad you WERE around when I started!! You were the first person who talked to me!! I am so grateful!
I’m still loving the antiqued effect! These are so cute and classy looking. The sheet music idea is super orginal too. Very nice Lisa!
You are so sweet Johnna! Thank for commenting:)
Lisa – these little snowmen make me want to sing!! (I still don’t know where to sign up for e-mail LOL) I have ALOT to learn about the computer!
These are absolutely adorable. I love sheet music. Good job!!
Absolutely darling Lisa – love the “antiquing”!! You are doing such a great job on your blog!
Would love a turtorial on how to use a 0 pme! Like the consistency of the icing and how you get it to not clog. Any time I use anything smaller than a 1.5 it clogs and doesn’t one out straight.
Thanks for the suggestion. I was planning on doing that tutorial soon so it is good to know you are interested. 🙂
The antiqued effect is amazing. I love it!
I love these!!!! The tutorial is awesome too….
Beautiful work! You are amazing.
These are so fabulous!! I don’t know how I missed them last year! I love, love the way they look!! What a great idea!
Love these! Will make them for my daughters music teacher. Did u hand cut the snowman or is this a snowman cutter?
Hi Asmita!
I never even thought of giving these to a music teacher. What a great idea!
To make him, I just used a simiple snowman cookie cutter. I think any snowman cutter would work. I just wanted one with a hat.
Hey Lisa–always a HUGE fan! What kind of Disco Dust do you use? I only like to use the edible dusts–is edible luster dust the same as disco dust? Thanks!
Hi Lauren!
I really wish Disco Dust was FDA approved cause its a bummer that it isn’t. I used it on cookies before I really realized it was not intended to be consumed. Now I make my own version. You can find the recipe and tutorial here: http://thebearfootbaker.com/2015/03/sparkle-dust/
It’s not the same but at least it is a bit shiny and we know its made with FDA approved ingredients. If you make it in the coffee grinder, you can make the pieces as small as you like.
Hope this helps,
Lisa