Customize White Balance
How to Customize white balance. Does that sentence scare you? Well it shouldn’t. I can show you how simple it is to have beautifully colored photos in a few simple steps. You will never have to worry about a blue or an orange cast again. An inexpensive gray card is all you need. You will save yourself a lot of time editing photos.
 Aren’t these cookies beautiful? My good friend Callye aka Sweet Sugar Belle made them. She was actually taking these photos while we were talking on the phone. She mentioned her pictures looked blue and she was frustrated. I told her what I am about to tell you and she said if I lived closer she would hug me because she was so happy.
Do you see the blue cast on the first photo. I told her how to set the custom white balance and then she took the second picture. It made a drastic difference. These photos are not edited at all. Imagine how nice your photos will look and how much extra time you will have instead of editing the blue cast out of your pictures.
How to Customize White Balance:
This is a Canon T3I and you may need to refer to your camera manual to set your white balance.
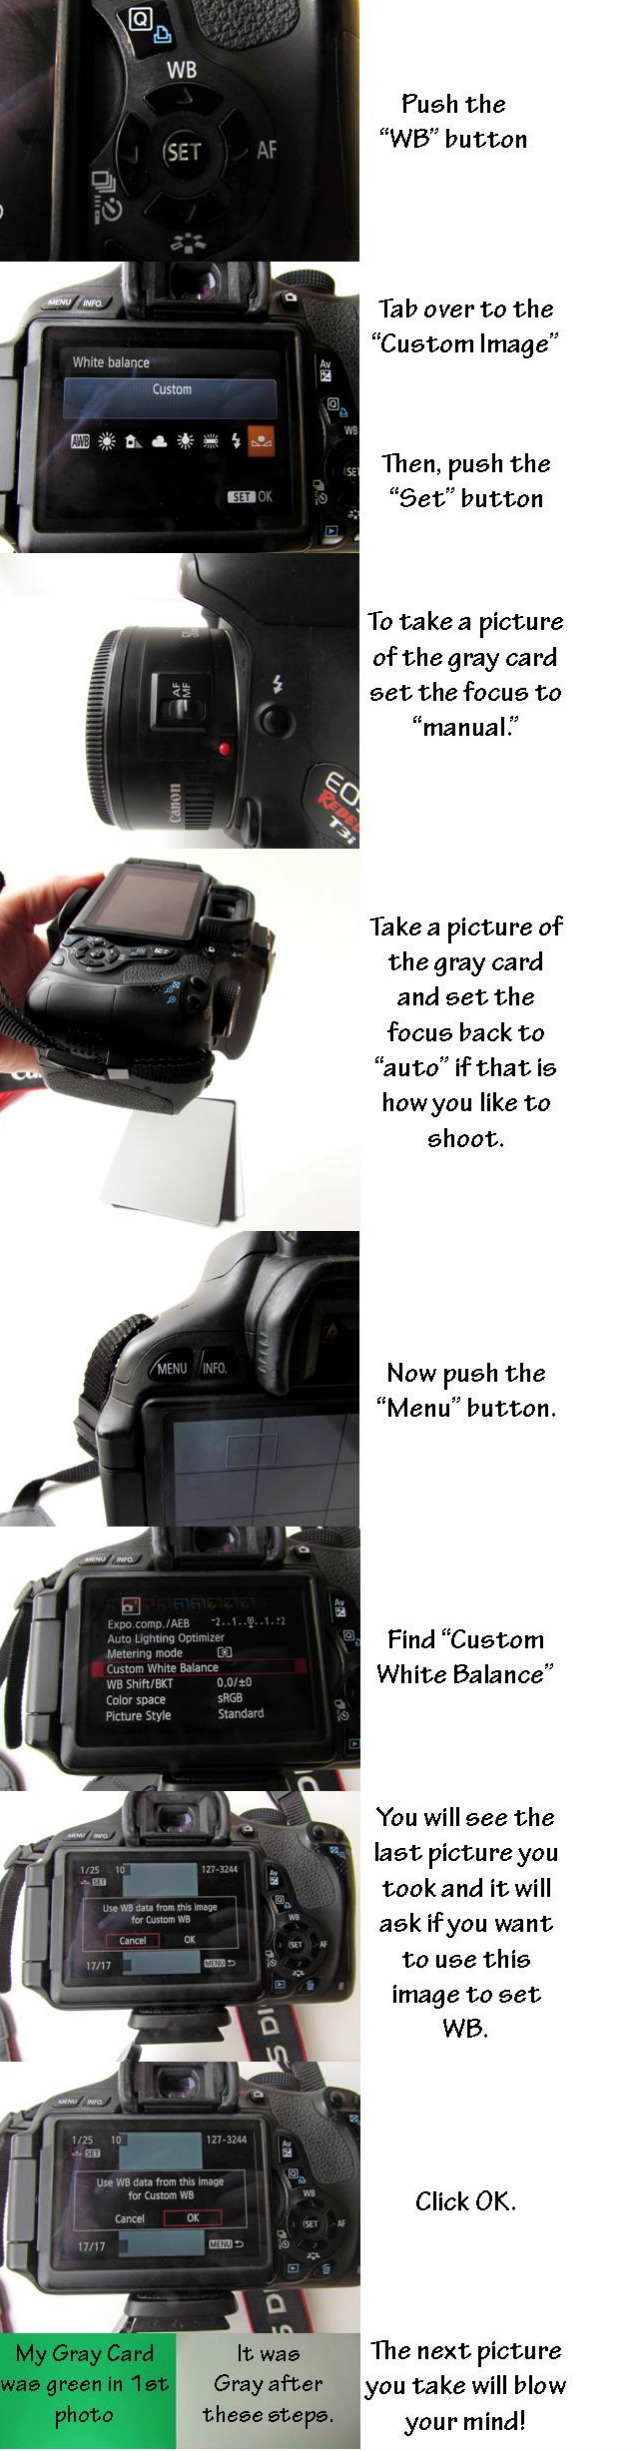 When you customize white balance your pictures will be the right color. If you change light, you will need to repeat these steps. I know the first few times you set it, you will be a little nervous but, don’t be. You will be able to do it like a pro before you know.
Here are a few more photography tips you might enjoy:
Confessions of a foodie bride: Light vs Dark
Edible Perspective: Photography 101
Taylor Takes a Taste: Food Photography Lighting
Custom White Balance
Remember:
“Gray Card, don’t leave home without it!”
Customize white balance before you begin taking pictures so the colors are true.
If the light changes, you need to repeat the steps and re-set it.
Happy Creating,


Thank you so much for such a helpful tip sheet. I will be anxious to use this info. Those plaque cookies are just beautiful.
Pinned! Thanks!
I need to get one of those gray cards. I’m not sure why I’ve been procrastinating, it would sure speed up my post-editing process. That’s for the tip and walking us through how to do it, Lisa!
I am eternally grateful for this tip! Life changing!
This is new for me…..and I appreciate it so much. I can’t wait to try it. Thanks Lisa! 🙂
I first need a gray card…then a new camera…then I need to come live with you! 🙂
Save room for me … I will arrive shortly after The Partiologist 😉
Awesome tip, Lisa!! 🙂
I love how this is truly “white balance for dummies”! Step by step, super clear. Thanks Lisa!!
Soooooooo, how do we convince you to turn your camp into a photo class for the week? And then well be convincing you to have a cookie camp next! Oh and a blogging camp and a……..
….and how do I get a grey card?
I’m butting in…but only because y’all are both good friends. You can order them on Amazon Liz. I’ve ordered two. I ordered one when Lisa told me to, but I thought my camera was different and far it away. Them one day she made me slow down and learn what she was trying to teach me (this tip) and after she blew my mind I ordered the other. I use this tip every time I shoot now!
Amazon is a great place to get them and they are between $8-$10. I also ordered something that a wonderful reader suggested. It is free and I just got it in the mail. I will take some pictures with it this week and update the post on where you can get it for…yes, FREE!!!!!
I am embarrassed to say that I have taken 2 college level digital photography classes, and although they go over custom white balance with a gray card, I still couldn’t figure out how to properly do it. I would set filters to try and deal with the light but still have to go in and fiddle with the color balance to get it just right. Your steps are just what I needed. This is fantastic!!! Perhaps also, we should remember that it would be prudent to do this white balance trick in the particular light you are shooting in. Inside vs. outside; shady vs. bright light, etc. Thanks!!!
Hi Jeanne,
I am so glad this helped you. I use my gray card several times during one cookie shoot. The light here is bright one minute and shady the next. It makes is very difficult to take a great picture with the use of a gray card.
I hope you enjoy this tip as much as I do. 😉