How to Make Leaf Cookies

September 23rd where are you? That’s the first day of autumn and I can’t wait because I need the vibrant beautiful colors autumn brings. Orange, yellow and that deep red mixed with the cool crisp autumn air makes me the happiest woman on earth. Have you noticed the magazine covers at the grocery store? They are sucking me in like a moth to a flame because they are full of colors and are so cleverly placed by the registers so they get me every time.
I can’t take it any longer because the anticipation is killing me because I need to make fall things like pumpkins and mums and colorful leaves falling to the ground when the wind blows. Hurry up September 23rd so I can share my leaf cookies with you.

No matter how hard I try I can’t make autumn arrive any faster, but I can make fall cookies to help put me in the mood. Sure these cookies are so easy to make but oh man you won’t believe how fun it is to make them. I mean you know the song that says dance like no one is watching, well these will let you decorate like you are a kid! Oh so FUN!
How to Make Leaf Cookies:
(may contain affiliate links)
Recipes:
- Leaf Cookies-sugar cookie recipe
- Royal Icing
Royal Icing:
- Thick Brown Icing in a piping bag with a #2.5 or #3 decorating tip
- Thin icing (almost like water) in the following colors:
- Yellow
- Orange
- Red
- Brown
Tools:
- Bowl to shake off the excess icing
Optional
- Airbrush gun with brown AmeriMist Airbrush Color
How to Make Leaf Cookies:

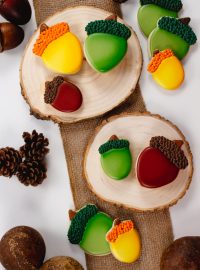
- Begin by making the veins on the leaves with the thick brown icing and let it dry for about an hour.

- While the veins on the leaf cookies are drying, mix the colors for the leaves. The icing in this picture is too thick. It needs to be really thin, almost like water but a little thicker.

- Once you have your colors mixed and the veins have dried, hold the leaf cookies over the bowl and pour icing onto the leaves.

- Add different colors to make the pattern you want. If you don’t know the pattern that is all right, just put some icing on the cookie.

- Shake off the excess icing into the bowl. The more you shake the cookies the more the icing will come off and reveal the veins you piped earlier. They will look like they are slightly raised and add some character to them.

- Can you see the veins?

- Let the leaves dry for a few hours.

- Next, airbrush the edges of the cookies brown to give them an aged look.

- If you want to see this in action, you can watch the video. It won’t take long I promise!
Shaking the icing off of the cookies made me feel like I was a little kid playing in my grandmother’s kitchen. There was something so free about creating these unique patterns on the leaves by applying thin icing to the cookies and shaking off the excess. It was fun but you know me, I made a mess so be warned to cover the surface you are working on really well. I hope you make them because you will have a blast!
These cookies were inspired by SweeAmbs little ice cream cone cookies. Aren’t they cute!
Bear hugs,


What an awesome technique, Lisa! Loved watching the video to see the leaves taking shape! You’re amazing!
Amber @ SweetAmbs made those little Ice Cream Cone cookies and I fell in love with the technique! She is so smart. 😉
I’ll have to check them out!
Beautiful cookies. I am anxious for fall too. I can hardly wait to try this technique. Thanks for sharing.
Hey, we can be “Fall Friends” and send each other pictures of how nature changes things in the fall! LOL Maybe we can start a club and I can mail you a box of real leaves!! 😉
Yes I love fall that much.
Gorgeous!
Messy…………i LOVE it!!! 🙂