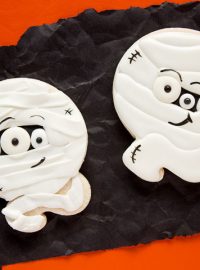
How to Make a Spooky Mummy Cake with Video
I can’t remember the last time I had this much fun during the Halloween season. I’ve made so many fun treats and I don’t want to see this season end because I want to keep making cute and creepy things like this spooky mummy cake. It is spooky and scared me so bad the other day I literally screamed out loud! Want to hear the story?

How to Make a Spooky Mummy Cake
I made this guy and placed him in the freezer and then I started feeling really bad that day. I don’t know if it is one of the worst colds I have ever had or the flu, but I felt bad. So I ended up taking two days off to chill (literally chilling) and trying to feel better. Well, on the third day I made some cookie dough and wanted to place it in the freezer before I cut out my shapes and when I opened the freezer door, I screamed!
It was like someone was sending me an evil message or something. Needless to say, I took the spooky head out of the freezer and placed it on the counter to thaw so it wouldn’t freak me out again.
Supplies list:
(may contain affiliate links)
Cakes:
- 2 Round Cakes and 1 Dome Cake that is the same width-Use your favorite box cake mix or recipe of your choice
- Cake board the size of your cake
Frosting:
American Buttercream Frosting – You will need two batches for this cake in the following colors:
- White
- A small amount of black for the eye area
Tools:
- Eye Balls – If it is too close to Halloween to order them, you can make them out of Fondant or Oreos
- Piping Bag and Decorating tip #789
- Offset Spatula
- Cake Turntable
- Airbrush System with brown AmeriMist Color
Spooky Mummy Cake:
Enjoy the video!
Let’s get started!

Bake your cakes and let them cool. Wrap each layer and place in the freezer for about 15 minutes.
Then, place one layer on a cake board and add some frosting. Make sure the cake and layer are flat so your cake will stack evenly.
Here is more information on how to dirty ice a cake.

Next, add the second layer of cake and frosting.

Remember to make sure each layer is level.

Next, add the dome. You might be wondering what that circle is in the middle of the cake. When you bake a thick cake the middle doesn’t bake as fast as the center so you may need to use a Heating Core & Rod to help it bake evenly. All you need to do is place it in the middle of the cake, pour the batter in the pan and place some of the batter in a heating core. Bake the cake and let it cool. Remove the center and place it into the cake. No frosting needed.
Trim the top of the cake and add some frosting.

I love the shape of this cake. It looks like a Minion!

Cover the cake with frosting.

Now comes the dirty icing part. There is a video at the end of the post that will show you how fun and simple it is to dirty ice.
Place the cake in the freezer for about 15 minutes to help the icing get firm.

Next, add the black frosting to the eye area and place in the plastic eyeballs. If you don’t have plastic eyes you can use Oreos or fondant eyes. If you are using fondant or Oreo eyes, be careful to keep them clean when you are adding the mummy’s wrap.

Okay, confession time. I had to dirty ice the cake a second time because I hit the side of it as I was placing it in the freezer. So it looks a little different but it is the same cake.
Place the mummy cake onto the cake platter you want to serve him on. Add some duct tape the cake turntable and place the cake platter on the tape. This will hold your mummy cake in place while you wrap and airbrush him.

Next, place a layer of American buttercream frosting on your mummy cake. This is a base layer so if you miss a spot when you are adding the wrap, you won’t see the cake.

Next, start wrapping the cake. Use tip #789 and start adding one wrap at a time. I wanted mine to be messy so it looks more rustic than perfect.
Think about how a mummy would be wrapped. Add the wrap in different directions and lengths.
In the video, you will see how messy I am as I add the wrap. It is good to be messy and free when you make this cake. If you mess up a spot, use the offset spatula to remove the icing and fix it by adding more wraps. It is that simple!

Tip #789 has two sides one of which is smooth and the other has teeth. I like to use them both to make it look more unique, but hey, this is your mummy cake so you can do whatever you want to this little guy.

Now it is time to add the airbrushing. I can honestly say that airbrushing this cake is the most fun I have ever had when making a cake. Seriously FUN!
I love this mummy cake even though he scared me half to death. He is cute and for sweet revenge, I ate his face! Revenge never tasted so good!
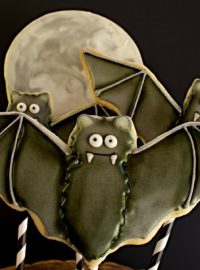
More Fun Halloween Treats:
Halloween Marshmallow Pops
Halloween Rice Krispie Treats
Fondant Spiders
Monster Smoothies
How to Make Fondant Fingers
Bear hugs,


Lisa, this is so creepy (in a good creepy kind of way) no wondered it scared you. I love how you airbrushed it!
Thanks Kim! The airbrushing was so much fun. Have you ever airbrushed a cake?
Such a cute cake! I LOVE your bat. Did you make it yourself? Share, please!
I love that you took revenge on the cake for scaring you by eating its face. You crack me up!
His face was good Janis! LOL
I picked up the bat at a local craft show a few years ago. I want to take it apart and see if I can figure out how to make them for next year. If I can come up with an easy version I will share a tutorial with you. 🙂
Eek! Scared me too..it does look amazingly real! I hope you’re feeling better..and I’m one that believes cake makes everything better! 🙂
Thanks Karen! I am feeling much better today.
I have made a new rule for the holidays, no more cake heads in the freezer! LOL