Edible Ladybug Decorations & Templates
I was very excited to make these edible ladybug decorations because it was a suggestion from one of you. I love making things that interest you. So I will ask again, what royal icing transfer do you want? Be sure to leave me a comment and I will do my best to make it for you.
 I wanted to make edible ladybug decorations so the icing would not bleed during the storage process. Black and red can sometimes be hard colors to control. They seem to take on a life of their own and so by using candy beads or nonpareils, you can use one color of icing and reducing the chance of bleeding.
Supplies & Templates for Edible Ladybug Decorations:
Small Sprinkle Ladybug Template
Small Ladybug Template
Large Ladybug Template
Red outline icing
4 mm black beads
Black Pearls by SweetWorks (I got mine at Hobby Lobby)
 Begin by preparing the templates like I did here.
If you want to see a video about icing consistency click here.
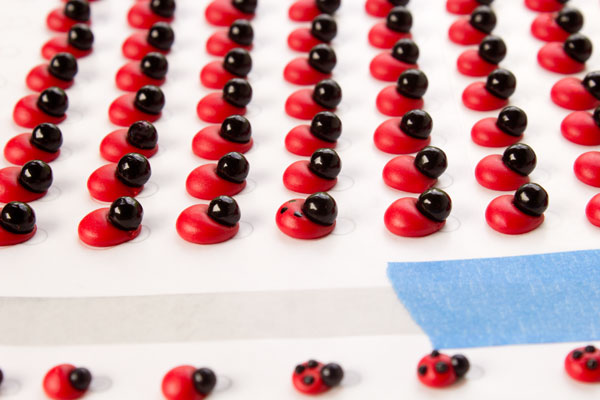
Then, with the red icing, fill in the body of the edible ladybug decoration. Use the smaller circle as a guideline on where to place the head (bead or candy) while the icing is still wet. Let the icing dry completely before adding the dots on the back.
 Now as I made the first round of these I though I was being very smart by adding some really tiny nonpareils for the dots on the back but, as I was adding them one at a time with my candy tweezers, I realized it was taking forever and decided to try something different.
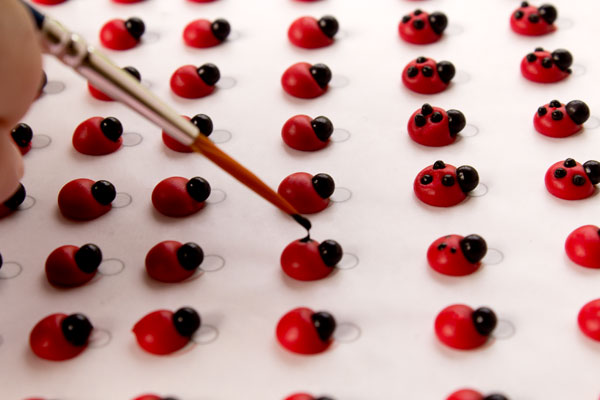
Then, I grabbed a paintbrush and it worked much butter but, the dots were not perfect circles. They looked more like footballs and I was really sad.
 Next, I grabbed my handy dandy little BooBoo Stick and realized the dots were really small. It would work great for yes but not the dots on the back of the ladybugs.
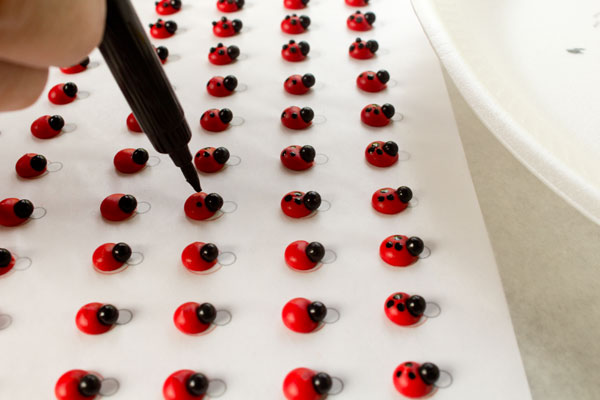 Finally I found something that worked really well. My black AmeriColor Black Pen that had dried up. Yep, you heard me correctly. I accidentally left the lid off of my pen and it got all dry. It was OK because it was old anyway.
Are you wondering what in the world I am talking about? How did I make black dots with a dry pen. I will show you. 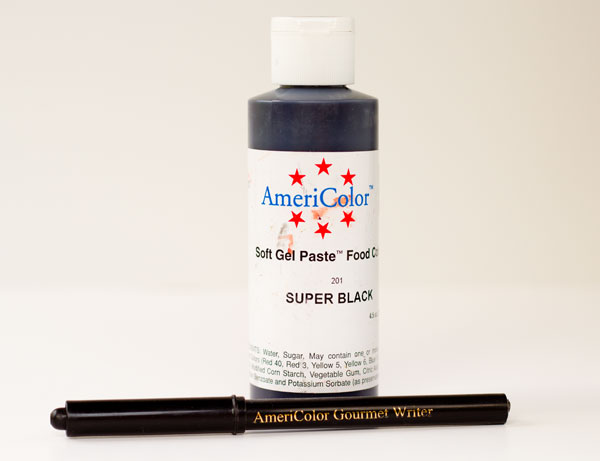 Well, here is how I did it. I dipped my old dried AmeriColor pen into some AmeriColor Soft Gel Paste and then dotted it onto the back of the ladybugs. It worked perfectly and was fast. Perfect circles without using candy tweezers to pick up one bouncing nonpareils at a time and placing it on the back of the ladybug before it dried.
I hope you enjoy these edible ladybug decorations and remember, please leave me a comment letting me know what else you would like me to make.
For information on how to store royal icing transfers, click here.
Happy Creating,


How cute are those?! I don’t have a suggestion, but I’d love to know what you cookiers consider “staples” to have on hand. All I have stored and ready to drop in are flower “centers.” Thanks for being so generous with all of us newbie-cookiers.
Hi Claudia! I think every cookier is different depending on what they make the most. My royal icing transfer staples are, eyes, flowers and flower centers, ribbon roses in all colors and sizes, hearts, bows, and solid white dots that can be used for pearls or eyes.
Hope this helps!
Thanks for taking the time to answer! I cannot get over how fun this cookie adventure has become. I am so grateful to you and the other talented cookie pros for being willing to take the time and make the effort to teach us all the things it must have taken many years and many tears to figure out and master.
So so cute, I love your tutorials! Thanks for always sharing with us..
You are very welcome Kris!
Very cute and so great to have around! I made some ladybug RI transfers last fall and they made for really cute cookies! I especially loved them on mini cookies. If you want to check ’em out, here’s the post 🙂 http://www.makemecake.me/2012/10/30/mama-baby-ladybug-cookies-for-saras-baby-shower/
Thanks for the link Michelle! Those ladybug RI transfers are so cute in the cookies and I love the pink!
Shut the front door Lisa! Those are so stinkin’ cute I can barely stand it! You are one smart cookie.
My request? Hello Kitty bows that fit the Wilton cutters! Huge time saver! Or do you think they’re too specific? They sure would be cute.
Hello Kitty bows are great idea. I will add it to the list 🙂
P.S. If today wasn’t my first workday of the week, I would have been pestered you about Template Tuesday. And you know this! It was totally worth the wait.
*pestering* …darn phone!
Another great template…love this idea!
Thanks Terri! 😉
SO cute, Lisa! I’ve left the tops off of my pens before – so frustrating 🙁 As for other transfers, maybe some simple frogs? I LOVE frogs and now that the weather is getting warmer, we’re getting them on our windows/doors. I just love little frogs!! 🙂 I’m weird like that!
Awesome suggestion Jennifer. Frogs would make a great RI Transfer 🙂
I love how these ladybug RI transfers have great dimension to them. What I found really useful in this post was your trial-and-error with the dots on the back. I love the pen & food gel idea! Thanks for sharing the process on how your creative mind works. 🙂
I believe in the saying, “If at first you don’t succeed, try, try again.” I don’t give up very easy:)
Aawww… little bitty cutie pie lady bugs! Great timing on these…. they would come in handy for all kinds of summertime treats!
I used the sprinkles on ice cream last night and I felt special! LOL It is a simple way to make things a little cuter.
There’s just something about sprinkles that being an extra smile to everday things. I find myself throwing them on my oatmeal sometimes! 🙂
I would never though about using them on oatmeal! Great idea!
Adorable!
Thanks Nessa!
Seriously cute!!! thanks for taking the time to provide a tutorial.
You are welcome Elizabeth!!
Adorable! I love that you were able to use your dried-out food color marker in such a useful and efficient way. Taking colors bleeding into account was also particularly genius. Thanks for another great template!
You are welcome Aida. I live in a humid climate and bleeding icing sometimes messed up my designs so I work on new ways to prevent it.
How incredible cute! When I had a ladybug party awhile back these would have been perfect! You should have seen how I made ladybugs out of fondant – took forever and didn’t even turn out cute!
And guess what???? I’m leaving for Nashville tomorrow morning! Yep, my two girls and I are heading out for a girl trip! Wish Knoxville was a little closer – I had to google it to see how far. Anyway – if you hear someone got kicked out of the grand ol opry, that will probably be me! LOL 🙂
I can imagine how long that took Kim. When I was using the tweezers to add the dots to the back, I was frustrated because it was taking FOREVER! LOL
I wish I didn’t have plans this weekend or I would drive to Nashville and see you!! Have fun with your girls and don’t get bounced out of the Grand Ol Opry! Hehehehe
CUTE! CUTE! CUTE!
Thanks Paula! You are CUTE! CUTE! CUTE!
Your timing is perfect! I want to make cookie graduation cookies for my niece (whom I call Kaiti-bug) and I was trying to figure out how to work in a mini ladybug. Thank you for all your wonderful tutorials! I love them.
Awe! You have a Kaiti-bug! How cute!! I would love to see how you incorporate this into her grad cookies. Would you send me a picture?
Your ladybugs are darling! Did you add the dots wet on wet or did you let the ladybugs dry completely before adding the dots??? Thanks for Sharing!!!
Hi Joycie,
I let them dry overnight before I added the dots on the back. I will add that detail to the post. Thanks 🙂
You are a genius! I have 2 pens that are almost dry … I knew there was a reason that I kept them 😉
I couldn’t bring myself to throw away that pen. They cost so much I wanted to find a way to use it again. This worked pretty well for dots. You could also trim it for smaller dots.
These are as cute as can be! I love all of your do-ahead decorations!
Thanks Sue! It is a great time saver and a good way to add a little dimension to a cookie:)
These are SO precious! I like how you explained all the techniques you tried that DIDN’T work. I think it’s just as useful to know what won’t work as what will. Great post! : )
As usual, cutest things ever!
I need bees similar to this for something this summer and I couldn’t believe how hard it was to find. I ended up finally finding sugar bees at layercakeshop, but if only I could master royal icing I could just make my own!
Hi Lisa,
Incredible… always sharing fantastic work with us! and I know it takes a LOT OF WORK to do these posts… the piping, then stopping to take the pic, adjusting the lighting, etc… so THANK YOU a million times!!!
I would love to see you make bees and also baby faces… that would be adorable. Perfect for baby shower cookies!!!
Thanks!
Lol…I always laugh when I remember your ladybug invasion. I could live with that if they were like these 🙂
Haha These would be better then the real things!
I was wondering if you could do some music note themed sprinkles. Quater , Eighth Notes, G clef, Treble clef those sorts of things, or flute shaped. My daughter will be graduating in 2014 and we have looked everywhere for tiny sprinkles with music themes or notes. We have found sugar lay ons, too big. We want them for cookies dipped in white chocolate. I have family in England and they found some edible “paper like” notes but they are too big. I have a friend in Japan that has looked also to no avail. Your various sprinkle templates are adorable!
I will work on it for you. Thanks for the suggestions 🙂
Thank you so much. Our daughter is going to double major in flute performance and music therapy, so the classical nusic note theme will be a wonderful touch if we can get it worked out!
Love your designs! Would u have an elephant transfer for a cupcake topper?
I will add it to the list and make it for you:)
I’d love a monster high skull with the bow template. How do you make a template? I’d love to learn!
Hi Michelle,
I have a program on my computer that helps me design them. You could always find a Google image you like and make multiple copies. Let me know if you need help.
Hi Lisa,
Could you give me the recipe for the red icing please! I am going to make these to put on cupcakes for my nieces birthday party! Thanks!
Sure Carla! Here it is: http://thebearfootbaker.com/2011/12/antonis-royal-icing/
How did you get the icing red? Did you use soft gel paste?
I use AmeriColor Super Red Soft Gel Paste and you can find it here: http://www.karenscookies.net/Super-Red-Soft-Gel-Paste–45-oz_p_1256.html
Hi. thank you so much for your site! 🙂 Can you please tell me what size tip to use? I’m making the lady bugs to put on cupcakes.
Thanks so much!
Hi George Ann,
I used a #2 tip for the ladybugs. 🙂
First….I just love your templates, I have just used the music notes, what a time saver THANK YOU. I was wondering if your beads ever run, I recent bought some from Wilton for eyes on a sun, looked beautiful, when I got up the next morning my suns had been punched in the eye. I managed to hide that with long eye lashes!!! The ones you recommend do they run??? Thanks in advance 🙂
Hi Claire, I feel your pain! I hate when my sun get punched in the eye! LOL
I wish I had a magic answer that would stop all your bleeding issues but, I don’t. I can say the edible beads I use don’t bleed often. I have only had one set that did. When using beads I make my icing a little thicker so it will help reduce the risk. I hope this helps you in some small way.
Hugs!
THANK YOU THANK YOU so much Lisa for getting back so quickly, much appreciated. I will try that, I think it may have been because the icing was flood so of course has more water. I will definitely try these Ladybug transfers for cake pops and cookies so cute, so I have to have them because…..well we all need transfers in our lives. Also will make the icing much thicker. Have a great day, by the way love your eyes today!!!!!
Claire :))
I have noticed that thicker icing is better when you add things like edible pearls and tranfers. It is like a girdle, it helps keep things in place! LOL I am glad you liked the eyes. I have a ton of transfers comming your way! 🙂
Hey lisa, I think those are sooo cute! I am doing my daughter’s 1st birthday party in lady bugs and for party favors I think these would be perfect. I was curious would you send me a message on fb I would really like to ask you a couple of questions about these plz and thank you! my facebook name is Shinndiah Followill add me as a friend and send me a message would like to ask you a couple of questions.
Hi Shinndiah,
I will send you an emial. I don’t always get messages on FB.
I tried making these and had some success. Do you have a tutorial on how to make the body of the ladybug? Mine don’t look like yours. It was very helpful to have all the links to helpful hits and videos.
Hi Karen,
The body is a circle. Just pipe a circle and then add the head.Let it dry and add the dots to the back.
Oh wow, these are so cute, what an excellent idea!
These are adorable and I am going to try and make these for my granddaughters birthday if I can find the edible paints.
Hi Marie,
You can use food safe markers or you can find food gel colors at Walmart, Hobby Lobby, Michael’s, Joann’s and cake supply stores. Look for Wilton or AmeriColor Food Gel Paste. 😉
Hi Marie
I just finished making these awesome ladybirds – thanks so much for sharing. The black dots don’t seem to be drying and I’m worried they will smudge…Did it take a while for them to dry? Thanks in advance! Nicci
Hi Nicci,
They should dry. Anytime you use food gel colors on dry icing it will take a little time to dry. You can try placing them in front of a fan so it will speed up the process.
Hello, do you sell these? I have a party coming up and am interested in learning more about just buying them as I don’t have time to do myself. Please email me. 🙂