How to Stencil Cookies with Royal Icing-Video

When it comes to decorating cookies, sometimes we need to look for something that makes decorating simple, but will still give us a pretty design. Using royal icing to stencil cookies is a great way to add texture and patterns to make your cookies unique.

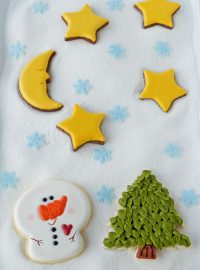
Have you ever stenciled cookies with the same icing you used to outline and flood the cookies? It is a quick way to stencil cookies without spending all day mixing icing colors and the look is subtle and classic. The only suggestion I can offer is to make sure you mix enough to complete all the decorating. During the decorating process it seemed as if the yellow icing evaporated in thin air and the problem was, I didn’t have any more AmeriColor Gold on hand to make more. I used Ivory and Lemon Yellow and got it close enough to finish this set. You can learn from my mistake and make sure you have enough before you begin.
How to Stencil Cookies with Royal Icing:
(may contain affiliate links)
Cookie Cutters:
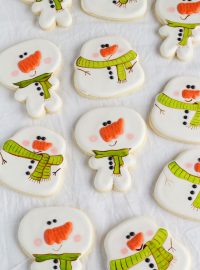
- Snowman
- Large Snowflake
- Small Snowflake
- Large Star
- Small Star
- Mitten
Icing Colors:
- The following colors are 15 Second Icing in a Piping Bag Fitted with #2 Decorating Tip and the colors are AmeriColor Soft Gel Colors:
- White
- Lemon Yellow with a drop of Ivory, but the base of the cookie is AmeriColor Gold
- Turquoise
- Light Gray- White Icing with a drop of black
- Darker Gray-white with a drop or two of black
- Red-AmeriColor Super Red with a drop of Chocolate Brown
Thick icing:
- White Icing in a piping bag fitted with a #21 decorating tip. This is used for the fur on the mittens.
Tools:
- Stencil Genie
- Turkey Lacer or BooBoo Stick
- Snowflake Stencil for Snowman, Trees, and Snowflake cookies
- Star Stencil for Stars and Mittens
- Stencil scraper or spatula to scrape the icing across the stencil.
Here is more information on how to outline and flood a cookie with royal icing if you need a little help getting started.
How to Stencil Cookies with Royal Icing-Video
Here is a little video for you to watch. As you are watching, watch how the snowflake stencil is too small for the snowflake cookie. If that happens to you, wait for the royal icing to dry and then stencil the area it didn’t cover the first time around.
Outline and flood:

- Outline and flood the snowman with the white icing.
- Let it dry completely.
- Place one side of the Stencil Genie over the cookie. The Stencil Genie has different thicknesses on each side, use the one that best fits the thickness of your cookie. For this snowman, the thin side worked best.
- Next, place the stencil on the Stencil Genie and add the other side.

- Next, add some royal icing on the top of the snowflake stencil.
- Use a spatula or a stencil scraper to pull the icing across the stencil making sure all of the stencil holes are filled.
- Slowly lift the stencil off of the cookie by lifting straight up or by lifting one side off at a time.

- Remove all the excess icing off the side of the snowman cookie so the edges are clean.

- Let the icing on the cookie dry for a few hours before you package or stack them.
If you are making all of the cookies in this set, repeat these steps for all the other designs.

I’m not sure about you, but I love the classic look of cookies stenciled with the same color as the base color. Not to mention the fact that you don’t have to mix colors or spend extra time washing dishes.

If you are out in the snow today, be careful and stay warm. Decorating cookies is always a fun way to warm up after you’ve made a few snowmen and snow angels!
Bear hugs,


Hello Lisa…..love these, they look so elegant with the same color stenciled. I have such a problem with using royal icing to stencil, you make it look so easy, I will try again. Snowed in at the moment in MD. Hope you got my picture of the Coffee Pot at Christmas. Take care. Keep warm. Claire x
I am snowed in too Claire. It’s a perfect time to decorate isn’t it?
I didn’t get your coffee pot cookie picture! Bummer! Will you please resend it? I just checked the spam folder and everything. I am really sad now!
Hello Lisa, thanks for the quick response, sorry for my late response 🙂 I sent it to your FB page. Where is the best place to post it? I remember your picture you posted last year of your beautiful home all snowed in. What state are you in? Keep warm. XXX
Hey Claire,
I will look on FB and see if I can find it. I can’t wait to see your coffee posts. Seeing what you all make is one of my favorite parts of blogging!
I am in Tennessee and I love it here! How is your weather now? Has all the snow melted? It looks like your temps are going to reach 50 degrees next week! YEAH!
Perfect timing with this post! I have to stencil 12 globe (world) cookies tomorrow for a baby shower and am a bit nervous. I haven’t stenciled very many cookies with RI. I did make my own stencil for the globes though, using my Cricut Explore 🙂 Thanks for your tutorial!
Hi Anne!
Good luck making the “World” today! I hope it turns out perfectly for you! Making the stencil on the Cricut is brilliant!!
Will you send me a picture of your cookies? Email to lisa@thebearfootbaker.com I would love to see them!
Hey, Lisa!
Your cookies look so elegant! What a great way to take them to the “next level”.
Using the same color as the base to do your stencil work has taken what could have been just another tray of “cute cookies” and turned it into a tray of “show-stopping classy cookies”. Great job! 🙂
Using the same royal icing color to flood and stencil is my “lazy” way of decorating. Sometimes you just don’t have time to mix a lot of icing colors. LOL
Also, you don’t have to worry about the colors bleeding together so it is a win, win way to decorate! 🙂
Lisa, I love the color on color stenciling. Another great tutorial; thanks for sharing.
Hi Joan!
How are you? I just visited your blog this morning and your confetti cookies are so CUTE! They make life happy!
Hi There
Have never done any icing with Royal Icing and have only stenciled on unbaked cookies using cinnamon/sugar mix.
Can you stencil, with royal icing, on a baked, plain cookie? That is a cookie that doesn’t have a royal icing ‘base’.
Thanks very much
Hi Barb,
Sure you can! The only issue I can imagine is if the cookie isn’t flat when you try to use the stencil. Sometimes cookies will rise as they bake so that may make it a little harder. I use a fondant smoother to flatten my cookies when I remove them from the oven so the surface is flat and perfect or designs.
Here is a tutorial that will show you what I’m talking about:
https://thebearfootbaker.com/2012/03/flatten-my-cookies-and-not-my-hair/
Lisa
Lisa
Thanks for that link. What a great tutorial!!
And to be sure, I have already ordered my fondant smoother!
Thanks again