Royal Icing Consistency – What You Need to Know
One of the hardest things I’ve had to do like a cookie decorator was to learn how to make royal icing, and then learn how to make “the right royal icing consistency” for decorating my cookies. I think that is the question we’ve all asked. What is “the right consistency” for my royal icing? How do I make it so my cookies look smooth and professional every time I make them?
That my friend isn’t an easy question to answer.

When I began decorating, I asked several cookie decorators how to make the perfect royal icing consistency. When I looked into their eyes I saw the same look I had when trying to figure out how to perfect mine. Then I realized, it isn’t something we can tell each other or help each other with a few sentences or simple words. It’s not because we don’t want to help each other, it’s because there isn’t just one perfect royal icing consistency. Why is that you ask?
It’s because humidity plays a big part in how the icing behaves. Humidity can cause the royal icing to be runny and not allow it to dry in a timely manner. It can cause the colors of the royal icing to bleed together hours after it has dried. If one little drop of grease or oil gets in the icing it can cause the icing to dry with spots or it can cause it not to set well or dry hard. It could be soft and we all know that’s not what royal icing is supposed to do.
So you see, helping each other learn how to make ‘the perfect royal icing’ isn’t something we don’t want to share. It’s just hard because we don’t know where you live and what the humidity is like at your house. So please don’t take offense to anyone that can’t answer your questions. Maybe they don’t have the words or they don’t want to confuse you.
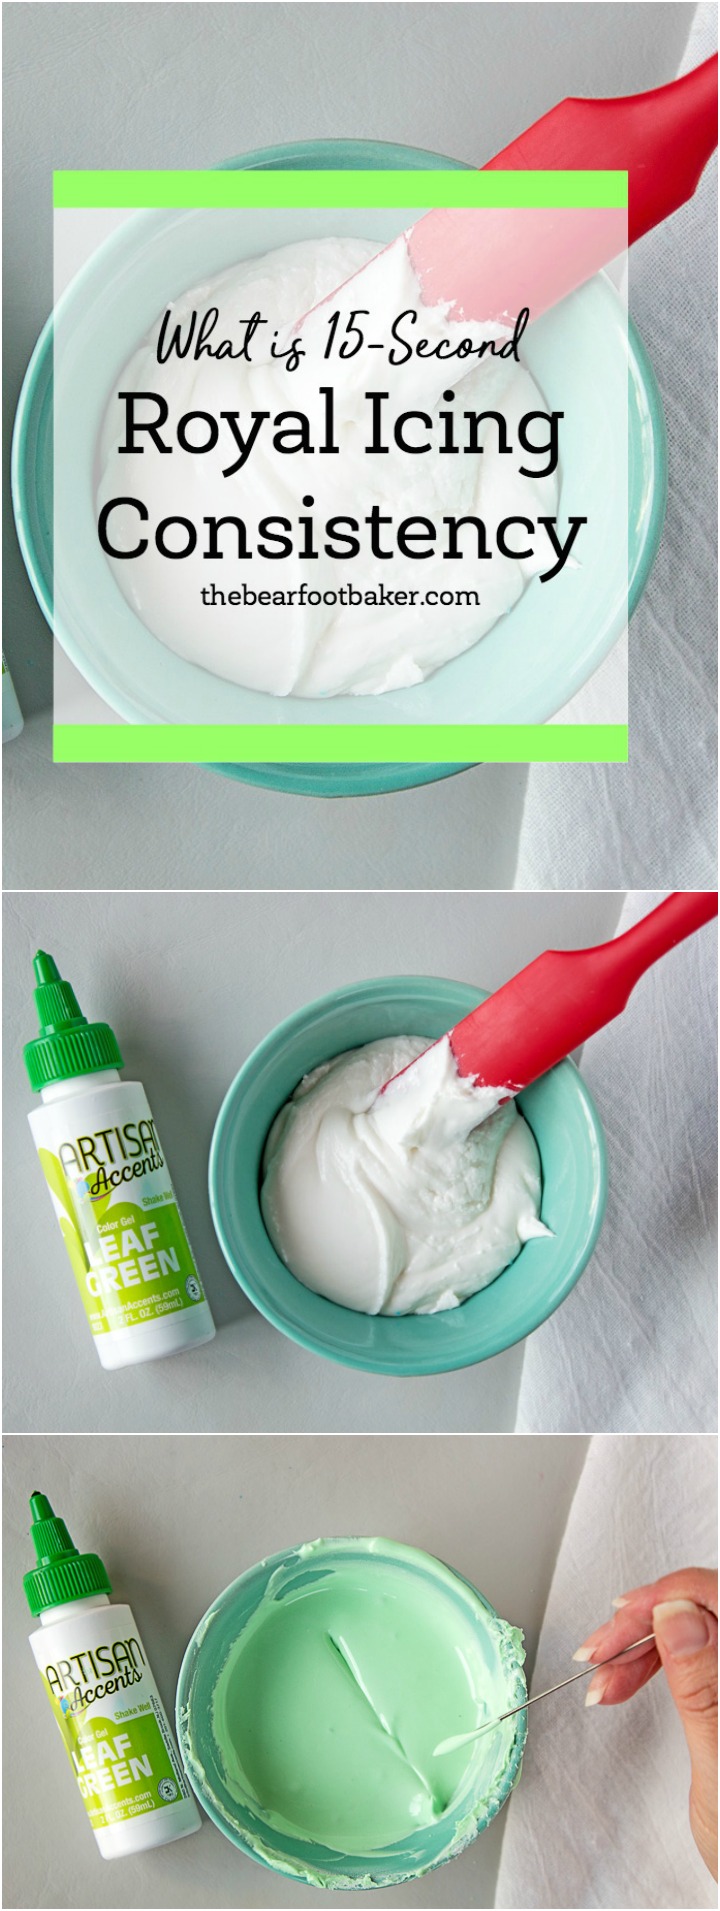
What is 15-Second Royal Icing?
If you’ve followed my blog, then I’m sure you’ve seen the words ’15-Second Icing’ in the cookie supply list. I only use one royal icing consistency unless I’m doing something that needs a thick or thin icing. So if you follow along and want to find your perfect royal icing consistency, you might find a few tips here that will help you out.

First things first. I make super thick icing when I make a batch. I do this for a few reasons.
- It’s humid here! Wait…no it’s not! What is going on? Is it humid or isn’t it? Well, it’s both. Some days the humidity is awful and other days there isn’t any humidity so consistency with royal icing isn’t the only thing I’m trying to solve at my house. LOL Don’t worry, I’m not going to share an episode of Dexter’s Laboratory showing you how I’m going to control the weather or anything. Instead, I will make my royal icing behave!
- When I make my royal icing thick it lasts longer before it starts to separate.

- Color your royal icing before you thin it. Now I’m not going to tell you this is what you have to do, but it works for me. When I thin down the royal icing before I add the food gel color it dries lumpy on the cookies. Weird isn’t it? So I always add the food gel color first and then the water.

- Once you add the food gel color, mix the icing well.

- It should look like this. You know how Dairy Queen will bring you one of those ice cream drink things and they flip the cup upside down for a few seconds to show you it won’t fall out of the cup? The same goes for this royal icing. It should stay on the spoon without falling off for a few seconds.

- Here comes the fun part. Use a spray bottle filled with water to thin down the royal icing.
- Spray the icing and stir in the water.
- If you need the icing to be thinner, spray it a little more and give it a good stir.

- Do this until you think you have 15-second icing.

- Wait. What do you mean you don’t know what 15-second icing is? We can fix that right now!

- Before you begin decorating with royal icing you must first get it the right consistency. The best way to do that is to do a little test to see how fast the icing will smooth out if you drag something like a knife or in my case a turkey lacer through it.
- Place a small amount of royal icing in a bowl and mix with your food gel color.
- Then, pull a turkey lacer (or knife) through the center of it.
- Count one one-thousand, two one-thousand, three one-thousand until you reach fifteen one-thousand.
- How long did it take for the line to smooth out and disappear? Was it at nine one-thousand? Was it at twelve one-thousand? If it was at anything but fifteen one-thousand you need to continue working on it.
- Add a little more water and repeat the steps above. You want the line the turkey lacer made to disappear completely when you reach 15-seconds.
That’s all there is to 15-Second Icing!
But let’s say you need your icing to be ten-seconds. Repeat the steps above, but this time, stop when you get to ten-seconds. EASY!

- I know, I know. You all have a question. What happens if you add too much water and your icing is only at seven one-thousands? That means you have 7-second royal icing consistency. Don’t panic! Just add a little bit of powdered sugar to the icing and mix it until there are no lumps.
- Then repeat the turkey lacer test until you reach 15-second royal icing.
Royal Icing Consistency – What You Need to Know

Now that wasn’t very hard, was it?
If you want 10-second royal icing consistency or 15-second royal icing consistency this is a good way to test it. I think it’s brilliant and no, I didn’t think of it. I think decorators have been doing this since the beginning of time and I’m thankful they shared it with the rest of us.
Let me know if you have any questions.
Bear hugs,


Lisa I always love your blogs. I believe in getting a recipe from someone who lives in your area that you know is a good decorator. I used the first person who taught me how to decorate cookies. Second, i have found confidence works well. If you assume it will work, and let go of the problems it all works out. This lesson was taught to me one day at a class with Arty McGoo. She made the icing and after about half an hour into decorating my icing wasn’t working right. I traded bags with Arty. It worked perfectly for her and after a while mine was again misbehaving. Some of it was a hot flash, but it was also confidence. Now I assume it will work and if it doesn’t, so what. I’m a much happier decorator.
Thank you for sharing your wonderful tips. They are always so helpful.❤️❤️
I am going to print this out! LOL I, too, struggle with the right consistency. Thanks so much for the tips and I’ll use a turkey lacer next time. Maybe that’s the trick. : )
Thank You for your great instructions!! I always had issues with my Royal Icing getting “craters” when it dried when I thinned it with water. I found if I use Pasteurized Egg Whites instead of water, it dries much smoother.
I recently tried a heat gun (the kind used for sealing gift baskets) to “set” the icing between steps/colors which worked GREAT and made decorating much faster!
You are amazing! Thank you for your dedication and help to make us all better cookiers! I appreciate the time and energy you put into you blog and all the valuable info you give us! Thank you from the bottom of my heart!
Thank you for all your help! Cookie decorating is a skill that improves each time you use the skills, your advice is VERY helpful!
Just wondering, do you use your 15 second icing to outline as well? If so, is the only difference between flood and outline is the tip size?
Hi Andrew,
I use 15-Second icing consistency for both. Now I use tipless decorating bags most of the time and I don’t cut the tip any larger. I cut the tip once and then I outline and let it dry for a few minutes and then I go back and flood it. The outline holds the flood icing in place so it doesn’t matter what size tip you outline and flood with. You just want to create a border to hold the flood icing on the cookie.
How large do you cut the tip?
It depends on what I’m doing. I start by cutting off a very tiny piece. If it’s not enough I cut a little more until I get it the size I want.
Hope this helps!
Hi, I am a beginner, only at it for a couple of months. I thought I had the icing consistencies down pat but now your saying that you only use 15 second for both outlining and flooding. My embarrassing question is when you switch between colors, how do you stop the icing from oozing out of your bag when your done with that color? I was having a hard time pointing my tips in the upward position, then tried putting them on a paper towel, they ran out everywhere, what a mess, haha. Then I see these stands that they sell, that’s really confusing to me, I guess I should check that out. Thank you in advance.
Hi Janet,
I love The Cookie Countess Piping Bag Tip Clips. It will keep your royal icing in the bag! lol
Here is the link:
https://www.thecookiecountess.com/products/piping-bag-tip-clips?_pos=1&_sid=d46d6a25a&_ss=r
Why do you only use 15 second icing?
Hi Jana,
I love 15-Second Consistency because you can use it to online and flood your cookies. Mixing one consistency is great because that means you get to decorate quicker instead of spending all your time mixing the icing.
However, I do love outline consistency and I find myself using it more often these days. The key to decorating cookies is to find a consistency you like that works for you. If it’s one consistency then go for it. If it’s an outline and a flood consistency they go for it.
Find what you like and you will be comfortable decorating.
Do you use 15 min icing for letters and just a small tube like a #1?
Hi Sherrie,
My favorite piping tip size for letters is a PME #1.5 tip. A lot of people cut off the tip of the piping bag and don’t use a piping tip. I’m practicing that now! LOL Hopefully I’ll have some new tutorials on how to do that soon.