How to Make Easy Modeling Chocolate
Have you ever made modeling chocolate? Most recipes contain only two ingredients so it really isn’t hard to make, but there are a few things that you need to know that’ll help you be successful. Modeling chocolate is great for making characters and decorations for cakes, cupcakes, and cookies so it’s great to have a recipe you can work with.

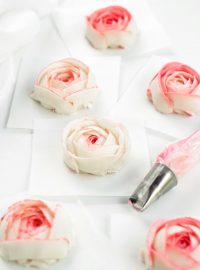
Modeling chocolate may be a little scary if you’ve never used it, but I promise, it’s friendly and a great medium for decorating. You can use it for sculpting faces, making arms and legs, it’s way easier to get rid of a seam than fondant, make flowers, bows, and do just about anything with it.
You can also mix it with fondant to make it more stretchy so you can do even more things with this great tasting chocolate. Fifty percent modeling chocolate mixed with fifty percent fondant is a great mixture that will allow you to do a lot of things you’ve wanted to do. It’ll make all those little characters you’ve dreamed about come to life.
Modeling Chocolate Supplies:
(may contain affiliate links)
Candy Melts- you don’t have to temper candy melts
Corn Syrup
How to Make Easy Modeling Chocolate
Ingredients
- 10 ounces of Candy Melts
- 2 ounces of corn syrup
Instructions
- Place the candy melts in a microwave-safe bowl and begin melting it in 30-second increments stirring well in between each one. If you see small lumps, keep stirring until they are smooth.
- Warm corn syrup in the microwave for about 10 seconds and add it to candy melts.
- Fold the corn syrup into the candy melts with a spatula and be careful not to over mix. A good rule of thumb is to mix it about 20 times with the spatula and no more than that.
- If you over mix it the modeling chocolate will become oily and we don’t want that.
- Pour the mixture onto a piece of plastic wrap. I like to make mine thin by pushing out the mixture until it’s flat so it will cool off faster.
- Let it sit for about 45-minutes to an hour.
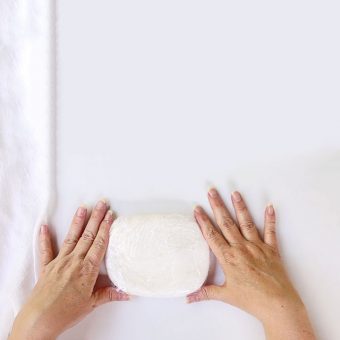
- Knead it until it’s smooth. You may need to break it into smaller pieces so you’ll be able to knead it because its very hard. If you feel any lumps, squeeze them with your fingers and keep kneading it.
- Here is the fun part, re-wrap it in the plastic wrap and let it sit on the counter overnight.
- Knead the chocolate into a moldable clay and place it in plastic wrap. Store it in an airtight container.
Let’s begin by melting the candy melts. You can melt it on the stove in a double boiler or in the microwave. I chose to use the microwave for this tutorial. It’s quick and easy, but don’t let me stop you from using the stove if that’s how you like to melt it.
Just be careful and don’t burn the candy melts. If they burn you can’t save them. You need to toss them and start over.

- Place the candy melts in a microwave-safe bowl and begin melting them in 30-second increments stirring well in between each one. If you see small lumps, keep stirring until they are smooth. It usually takes me about 2 1⁄2 – 3 1⁄2-minutes to melt mine.
- When the candy melts are melted, warm the corn syrup in the microwave for about 10-15 seconds and add it to candy melts.
- Fold the corn syrup into the candy melts with a spatula and be careful not to over mix. A good rule of thumb is to fold the mixture together for about 20 times and no more than that.
- If you over mix it the modeling chocolate will become oily and we don’t want that. If you do overmix don’t panic. You can recover it and I’ll discuss it in an upcoming tutorial.
- Pour the mixture onto a piece of plastic wrap.
- Fold one side of the plastic wrap over the modeling chocolate and use your hand to push out the mixture until it’s flat. I like it flat because it will cool off faster.
- Let it sit for about 30-45-minutes.

- After 30-45 minutes, pick up the plastic wrap with the modeling chocolate. It should be firm but you should be able to bend it.
- You’re ready to knead it until it’s smooth.
- You may need to break it into smaller pieces so you’ll be able to work with it. If you feel any lumps, squeeze them with your fingers and keep kneading it.
- If it feels dry and crumbly, you can use a little shortening to help smooth it out. Don’t use too much, a little goes a long way.

- Here is the fun part, re-wrap it in the plastic wrap and let it sit on the counter overnight.
- When you wake up in the morning knead the chocolate into a moldable clay and place it back in the plastic wrap.
- Store it in an airtight container or a Ziploc freezer bag.
- When you’re ready to use your chocolate it will be hard so you’ll have to knead it again. Overworking it will make it soft so pay attention to how soft it’s getting. You may need to let it rest and firm up for a few minutes and then get back to your creative sculpting.
The only thing you need to know is how not to over mix it. Keeping it simple is the way to go.
Modeling Chocolate Video:

I’m making a video and tutorial now on how to color the modeling chocolate and how to fix it if you overwork it. So stay tuned and we’ll work on making cute cookies, cupcakes and cake decorations!
How to Color Modeling Chocolate – It’s So Easy
Bear hugs,


Thanks, this is something I’ve wanted to try! How long can you safely store it, and still be good to use?
I will have to make this soon! Thanks for the tutorial Lisa!
Is the measurement for the syrup fluid ounces, and for the chocolate by weight?
Hi Shannon,
Here is the food-scale I use.
The weight is 10 ounces of chocolate and 2 ounces for the corn syrup.
Hope that helps.
How do you store the modeling chocolate? Do they need to be refrigerated?
Hi Tin,
I usually keep my modeling chocolate in an air-tight container and it keeps for weeks. I will admit I’m not a cake decorating expert so you might want to ask a cake pro. They’ll have much more information than I do.
Good luck!
Lisa