How to Make Spooky Ice Cream Cookies
Every fall I walk through stores and look at all the new and classic Halloween characters and designs that line the shelves. I try to imagine how people dream up fun things like Frankenstein and his bride as wedding cake toppers or a mirror with a skeleton climbing out of the front. Some of the stuff is really cute and some of it’s really creepy. I decided to jump on the creepy side today and make Spooky Ice Cream Cookies.

With a little white royal icing and airbrushing, you can make a platter full in no time.
Supplies for How to Make Spooky Ice Cream Cookies:
(may contain affiliate links)
Recipes:
Sugar Cookie Recipe
Royal Icing Recipe
Cookie Cutter:
Any Ice Cream Cookie Cutter that you like.
Royal Icing Colors:
(15-second Royal Icing in disposable decorating bags)
Tan- Mix a little Americolor soft gel paste food color Lemon Yellow, Ivory, and touch of Warm Brown
White
Tools:
Airbrush System- The Cookie Countess Airbrush System or Artfully Designed Airbrush System
AmeriMist Warm Brown airbrush color
Turkey lacer
Food Safe Marker
Paper and pencil to make the pattern.
- Bake the ice cream cookies and let them cool completely.
- Next, make a Half-Batch of Royal Icing unless you feel like you need a full batch. A half-batch works well on smaller sets of cookies.

- This design will work with almost any ice cream cone cookie cutter. It doesn’t have to be exactly like this cutter. The key is making your patterns and we’ll get to that in a minute.

- Outline the ice cream cookie cone with the tan royal icing.
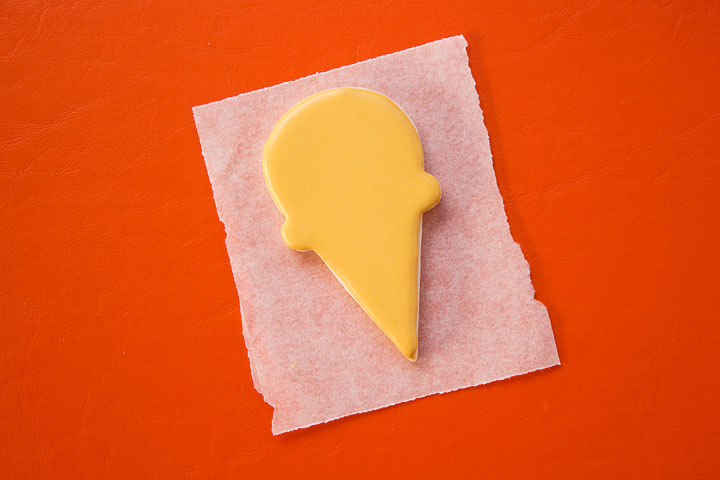
- Flood the cookies and let them dry completely.

- To make the skull face pattern all you need to do is trace the cookie cutter onto a piece of paper and cut it out.
- Draw the eyes, nose, and mouth on the cutter the way you want it.
- Cut off the skull head and cut out the eyes and nose.
- Place the head on the soon to be spooky ice cream and draw the mouth with the food safe marker. Don’t worry about the eyes and nose. We’ll add them in a minute.
Doing the pattern this way will give you a template that will make all of the cookies look the same. It’ll take a few minutes at first, but it makes the process so much easier.

- Now its time to make the lines on the spooky ice cream cone. Pipe them on with the tan icing and let them dry for a few minutes.
Funny story: I didn’t wait for the lines to dry for a minute and I blew one of the little lines across the table. TRUE STORY! It’s true what they say, patience is a virtue!
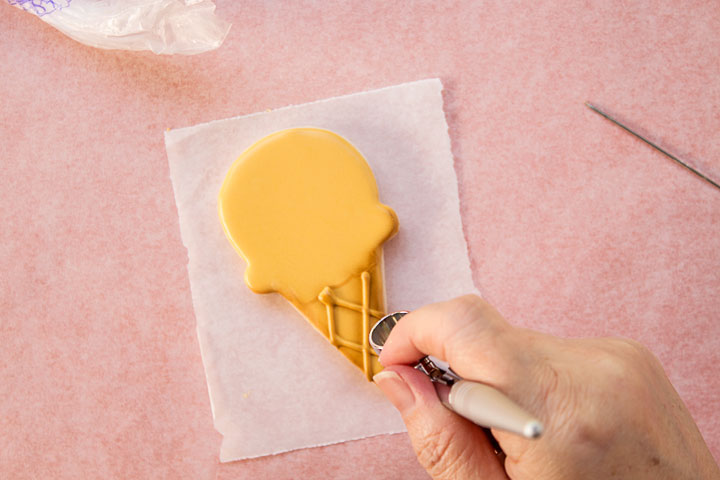
- Once the lines have ‘settled’ on your cookies airbrush them with the brown airbrush color.
- Airbrush the sides of the cone.
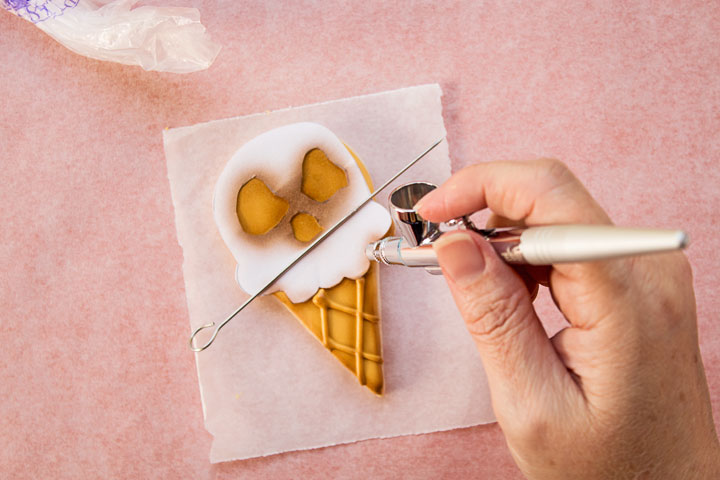
- Place the spooky ice cream skull on the cookie and place something on top of it to hold it in place while you spray the pattern on the cookie.
- If you want your skull to have sparkles in his eyes (I think it makes him look a little more creepy) you can spray a little white or silver Jewel Dust while the airbrush color is wet. This is totally optional so do what makes you happy.
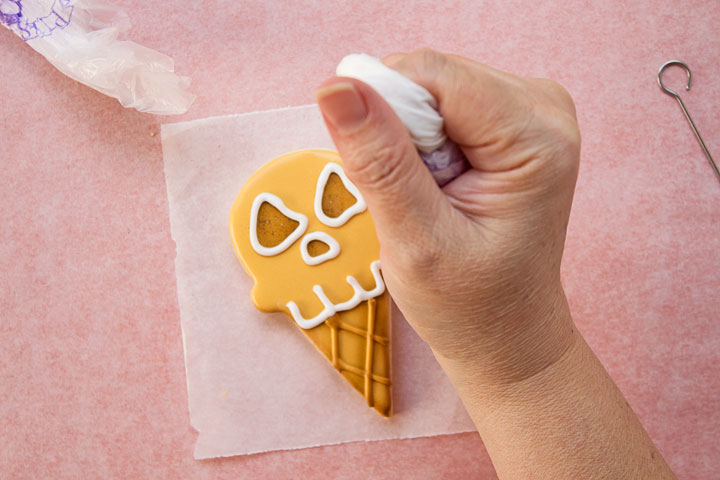
- Now it’s time to make the face. Outline the teeth, eyes, nose, and his head with the white icing.
- Let it dry for a couple of minutes.
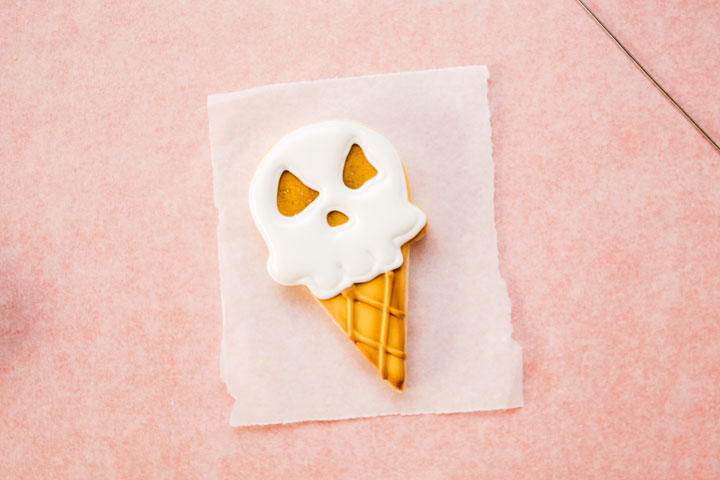
- Next, flood the spooky ice cream with the white royal icing. If you want the teeth to look separated don’t over flood them so they’ll have a little definition when they dry.

- Once the royal icing has dried a little you can airbrush the edges, eyes, and nose with the warm brown airbrush color.
- Don’t forget to add a couple of drop of white royal icing to the cone so it looks like the spooky ice cream is dripping. It’s a creepy effect!
How to Make Spooky Ice Cream Cookies Video
Here you go! Here’s a video so you can see this little guy get airbrushed and become spooky for his big Halloween night. It’s kind of like prom for monsters.
These guys aren’t as great as Frankenstein and his bride on top of a wedding cake or even a skeleton climbing out of a mirror, but I’m sure he will give you a little chill this Halloween. Who knows, maybe he’ll give you a few memories if you decorate them with your kiddos.
Bear hugs,


these are so awesome Lisa!!
I am in love with this cookie design! They are so cool.