Happy Earth Day Cookies You will Love
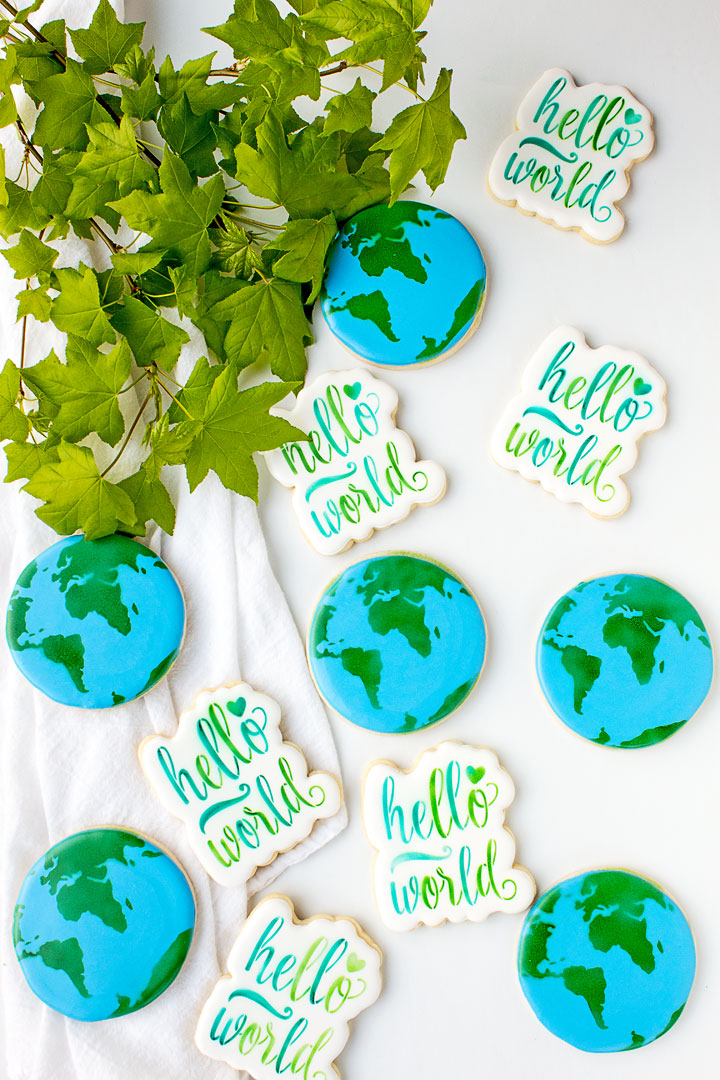
Happy Earth Day Cookies You will Love should have been posted yesterday because yesterday was Earth Day! Well, it’s been a while since I’ve completed a blog post in one day, but guess what? I did it! The cookies are done, the pictures are taken, downloaded, edited, and then I got some sleep. Then, I had to do a little work this morning and decided I’d share this with you even though I’m a day late.
Since my surgery, I’m behind on blog comments, Facebook comments, and Instagram comments. I’m working on catching up and I appreciate all of you giving me the time to do so. Hopefully, I’ll catch up with your love and support because you all are amazing!
Now let’s make some Earth Day Cookies!
Supplies for Earth Day Cookies:
(may contain affiliate links)
Recipes:
Sugar Cookie Recipe
Royal Icing Recipe
Cookie Cutters:
3 ½” Circle Cookie Cutter: This is the size that was used to make these cookies. If you use a different size circle cookie cutter make sure it will work with the stencil you have.
Hello World Cookie Cutter from The Cookie Countess
Royal Icing Colors:
(These gel colors are The Countess Gel Colors)
True Blue Gel
Gourmet Green Gel
Whipped White Gel
Stencils:
World Map Stencil from Artfully Designed Creations
Hello World Stencil from The Cookie Countess
Airbrush System and Airbrush Colors:
The Cookie Countess Airbrush System
The Cookie Countess Airbrush Colors: True Blue and Gourmet Green
Tools:
Turkey Lacer
The Cookie Countess Stencil Scraper – 3 pack
Fan-I learned from Sweet Sugarbelle to dry my cookies in front of a fan so they dry a little quicker and they’ll dry with a shine. Thanks, Callye!
Optional:
Cookie Turntable Swivel for Cookies
Mini mat
Stencil Genie
Earth Day Cookie Video:
Happy Earth Day!
Earth Day Cookies:
- Begin by baking some circle cookies. You can also make some royal icing. I made True Blue by using The Cookie Countess True Blue Gel color. I also made her Gourmet Green but I decided to airbrush the green on instead of using royal icing with the stencil. The airbrush was so simple and it’s fun to use. So to wrap this up, if you airbrush the cookies you’ll only need blue and white royal icing. If you don’t use the airbrush, you’ll need blue, green, and white royal icing.
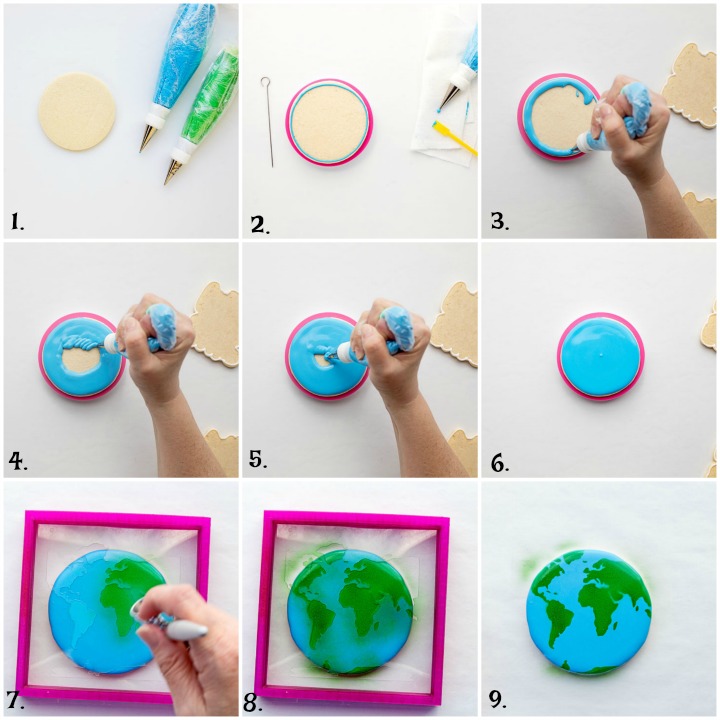
- You need to watch the video I made for y’all because I’ve found a new way to outline a circle cookie with royal icing. Basically, you place the circle cookie on the cookie turntable and secure your arm that holds the piping bag on the table. Then you turn the cookie turntable as you let the royal icing fall onto the edge of the cookie. I love this new trick! I get cookies that look great because this is the way I’m outlining them. You can watch the video to see how I do it!
- Now it’s time to flood the earth cookies. Again, there is a little tip in the video.
- Flood the earth until you fill the entire earth with that True Blue icing color.
- Keep going! You’re almost there!
- You can use a turkey lacer, Boo-Boo Stick, or a toothpick to pop any icing bubbles or to help make the icing smooth. Now place it in front of a fan so it will dry a little faster and it’ll have a nice shiny surface. If you don’t place it in front of a fan or in a dehydrator it will probably dry with a mat finish. Let the cookie dry completely. Or you can do like I did and take a chance on letting them dry for a few hours before you airbrush them. It worked for me so I know it can work for you. Just be careful and gentle.
- Place your World Stencil into a Stencil Genie or hold it in place with magnets. then airbrush the with The Cookie Countess Gourmet Green Airbrush Color. Place a drop or two into your airbrush and lightly spray the stencil with the land. Make it look like the earth.
- If you need to add more then one coat of airbrush color, take your time. Do it in two light layers instead of one thick layer. Trust me, it will look much better! One thick layer will cause the airbrush color to bead up or look rough. Two coats are much better and the cookie will look nice and clean.
- You’re done creating the world cookies so let the airbrush color dry.
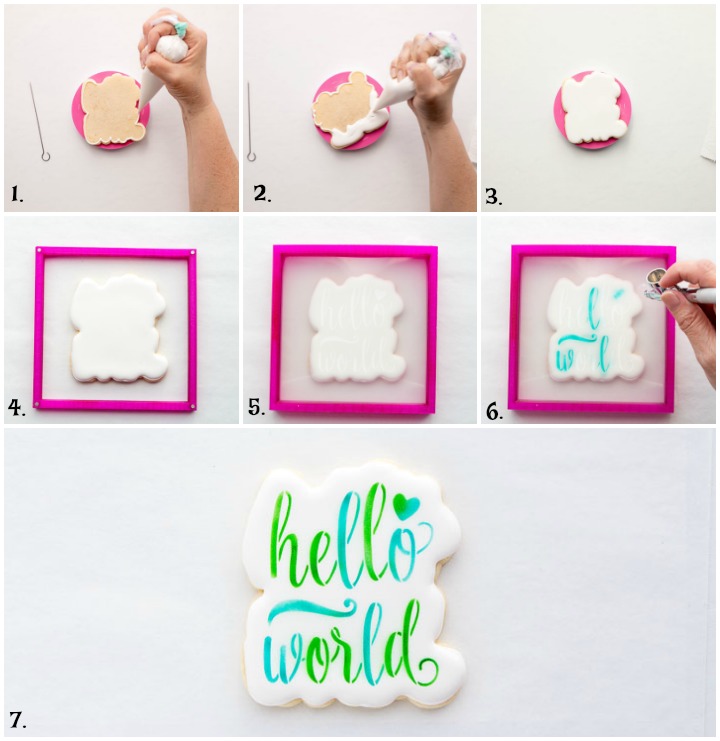
- Outline and flood the Hello World cookie with white royal icing. In case you’re wondering, this cutter and stencil are from The Cookie Countess. The World Stencil is from Artfully Designed Creations. These cookies go perfectly together!
- Let it dry completely or let it dry enough so you can stencil on it.
- Place the stencil in the Stencil Genie over the cookie.
- Place the stencil over the cookie and on the Stencil Genie. You can use magnets if you don’t have a Stencil Genie but airbrushing your cookie works well when the stencil is held into place.
- Place the top on the bottom to secure your stencil. Decide what colors you want to be airbrushed blue and what you what to be airbrushed green. Add a drop of that color in your airbrush gun and gently spray the stencil. Once you finish, clear the color out of your gun and add the next color.
- To remove the Stencil Genie lift it straight up so when you look down, you should have a very beautiful cookie! Let it dry completely.
Like I said before I’m late with the is tutorial. I think it’s okay because I think some of you will be interested in these stencils and the Hello World Cookie Cutter. Earth Day is great and I know all of you creative cookie decorators will make these stencils look amazing for other sets of cookies because you all are out of this world!
Bear hugs,






Hello world could be used for a baby shower! Or even graduation but that may be a bit cheesy.
A baby shower would be so cute with hello world! What a great idea Sarah!
Absolutely loving these! ❤️❤️❤️❤️
I am definitely saving this idea for next year!
That awesome Lisa! Tag me in a photo! 😉
It’s Earth day everyday! Love these cookies and I’m so glad to see you’re feeling better. Joan
I’m feeling so much better Joan! Thank you for caring for me and loving me! You’re so sweet!