How to Make Simple Heart Ice Cream Cone Cookies
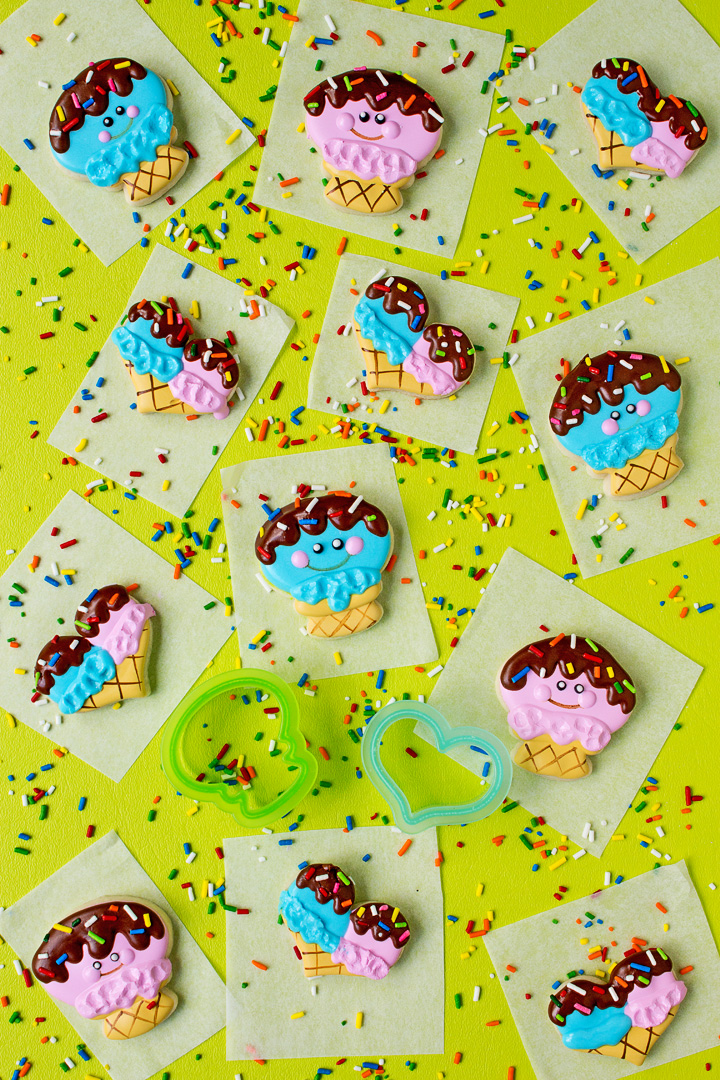
The other day you may have seen some mini little ice cream cone cookies here on the blog. You may have noticed there were some Mini Heart Ice Cream Cone Cookies in the first picture. I told you I’d share those cute little heart cookies with you and here they are. The mini cookies are so fun to make and I’m loving the sprinkles!

This cookie wasn’t my idea. It was inspired by an image I saw on Instagram and I’ve looked hard to find it, but I can’t! You were my inspirations and I’m so sorry I can’t find you!
Supplies for Simple Heart Ice Cream Cone Cookies:
(may contain affiliate links)
Recipes:
Sugar Cookie Recipe
Royal Icing Recipe
Cookie Cutters:
Skull/Scarecrow Cookie Cutter from Sugarbelle’s Mini Cookie Cutter Set
Royal Icing Colors:
(This royal icing is 15-second icing in decorating bags with #2 decorating tips and there is a bag tie at the top of the bag. You can use decorating bags, bottles or tipless bags.)
Ivory mixed with a tiny touch of brown
Blue
Pink
Brown
Tools:
Turkey Lacer
30/0 Script Liner Paintbrush or any detailed brush you use for painting cookies. Here’s one at Hobby Lobby and here’s one at Michael’s. Or you can get a set with a four brushes Sizes 20/0, 10/0, 5/0, 0 from Amazon.
Edible Art Edible Paint Yellow and Brown-Use one part brown and two parts yellow.
Fondant Sugarcraft Ball– you can use this to smash the royal icing or you can use your finger.
Optional:
Cookie Turntable Swivel for Cookies and the Minimat
Fan to dry your cookies so they’ll dry nice and shiny! Just place the decorated cookies with the wet icing in front of the fan and once the icing is dry they’ll look nice and shiny.

- Once you’ve made your cookie dough, baked your cookies, and make your royal icing, it’ll be time to decorate.
- Then, Outline and flood the cone with the ivory-colored royal icing and let it dry.

- Next, outline and flood the pink ice cream and let it dry for at least 20 minutes.
- Outline and flood the other side of the ice cream blue because everyone knows two different flavors of ice cream is the best snack ever!

- Paint the lines on the cone with a mixture of brown and yellow Edible Art Edible Paint and let it dry. A 30/0 Script Liner was used to paint these lines but if you don’t have one any detail brush should work. You could also use royal icing if you use a very small tip or cut a very small hole in a tipless bag. Use whatever you think you’ll like because decorating cookies is a lot of fun!
- Let the cookies dry for about an hour.
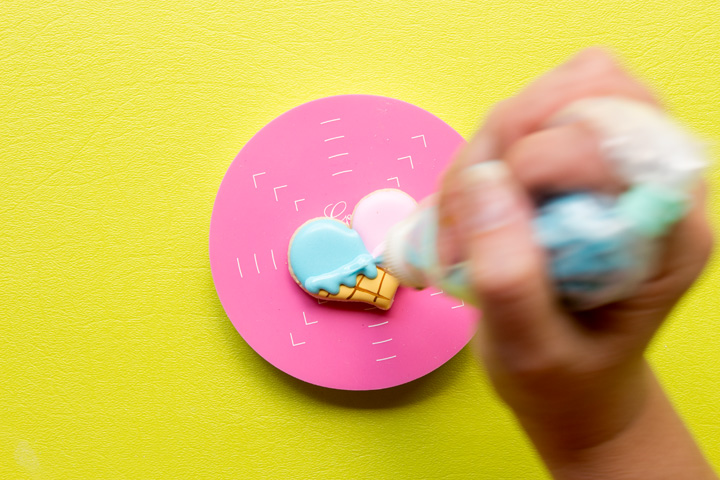
- Add a layer of blue icing at the bottom of the ice cream where the blue icing touched the ivory icing. Do the same thing on the other side with the pink icing so it will look like a real ice cream.
- Let it dry until it forms a crust.

- While you’re waiting on the ice cream layer to form a crust, pipe some brown icing on the top of each scoop. While the royal icing is wet, add some sprinkles with food tongs or gently sprinkle them.

- Once the icing has formed a crust, use the ball tool or your finger to smash it.
- You’re all done!
How to Make Simple Heart Ice Cream Cone Cookie Video
These mini cookie cutters of Sweet Sugarbelle’s are little cookie cutters that will inspire your imagination. They’re darling and I hope you’ll get to decorate some soon because they’re so darn fun! Share a picture or tag me if you’re making some because I’d love to see what your making!
I hope you get a chance to make these mini little cookies because I’m totally loving them! The sprinkles look cute on the cookies and it’s fun adding them one at a time, but it does take a little bit of time to add them. Mini’s are some of my favorite cookies to bake and they’re adorable!
Bear hugs,


You are having so much fun with those mini cookie cutters!
Making cookies would be a luxury!
Today I’m up to my ears with making /freezing pesto from my overzealous planting of basil!
And the freshly picked white peaches are begging to be made into sorbet.
I love your work!
Hila!
This are the cutest even before they are finished! All the best!