How to Make Fun Royal Icing Acorn Transfers for Your Sugar Cookies
Have you ever made acorn royal icing transfers? I hope so, but if you haven’t guess what? Here are three free royal icing transfers so you can get started. If you have looked on Instagram lately I’m sure you’ve seen all the amazing things people are doing with parchment paper and royal icing. As I look my mind is going wild! I have so many things I want to make with you all and I hope you’re ready.

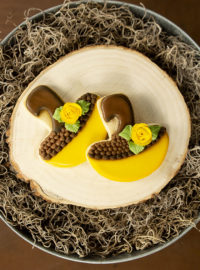
Let’s start with these fun royal icing acorn transfers.
Recipes:
- Sugar Cookie Recipes– You don’t need cookies for this tutorial yet but I thought I’d share a link to my sugar cookie recipe just in case someone is looking for a good sugar cookie recipe.
- Half a Batch of Royal Icing Recipe
Royal Icing Colors:
- Orange- Americolor Orange Soft Gel Paste Food Coloring
- Green- Americolor Electric Green Soft Gel Paste Food Coloring
- Purple- The Cookie Countess Positively Purple Gel Icing Color
- Turquoise- Americolor Soft Gel Paste Food Coloring
- Totally Brown- The Cookie Countess Gel Icing Color
FREE Acorn Royal Icing Transfers:
FYI: I printed two of each pattern below because I wanted to use one to make the acorn nut and stalk and the other to pipe the cupule of the acorns to add after the stalk and nut dried. Its a simple way to get texture on your acorns. The link below will take you to The Cookie Network where you can sign up and print your royal icing transfer patterns. I hope you sign up becuase I have a lot of FREE royal icing transfers I’ll be adding each week.
Tools:
- Tipless Piping Bags
- Parchment paper that is cut into long rectangles or squares large enough to cover each acorn.
- PME #1.5
- PME #2
- Turkey Lacer
- Parchment Paper or Super Clear Cello Bags 4.25″ x 6.5″ (100 pcs) from Truly Mad Plastics
- Painter’s tape
- Reusable Piping Bag Ties
- Piping Bag Tip Clips
- Foam Board- You can find them at the Dollar Tree and you can cut four pieces a little large than a piece of paper. It’s a great lightweight background to use for your royal icing transfers. If you want to learn more about it you can find it my Simple Lemon Royal Icing Transfer Tutorial.
How to Make Fun Royal Icing Acorn Transfers for Your Sugar Cookies Video
Enjoy the video!
Let’s begin!
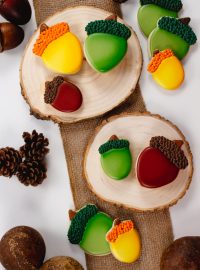
Different people use different consistencies of royal icing when they make transfers. For these, I used an outline consistency because I knew adding parchment paper would make the royal icing move and I didn’t want them all to merge together. If you’re not sure what I’m referring to check out the blue acorns in the first and last photo.

- Begin by printing out your royal icing transfer patterns and taping them to your foam board. If you don’t have foam board, find a flat surface you can use for the foundation.
- Tape your cello bags over the patterns.
- Mix your royal icing and get started.
- Pipe the stalks with the brown royal icing.
- Pick whatever color you want and start piping the nut of the acorns.
One thing to remember when making royal icing transfers is your icing will dry fast. If you plan on adding parchment paper to create different textures you need to work on a few at a time and cover them quickly before the royal icing starts to crust over and dry.
A little parchment paper goes a long way:

- While the icing is wet cover it with a rectangle (or individual squares) of parchment paper. I use a stencil scraper to gently push the parchment in place and to help make the icing smooth. Be careful not to press too hard or your acorns will connect as mine did.
- Continue until you have all the acorns covered.
- Let the acorns that look like little pumpkins dry completely.
- Use the other sheet you printed (match the sizes up with the acorns you’ve made) and cover it with a cello bag. Pipe the cupule brown and cover it with parchment paper. You can use a smooth piece of parchment paper or crinkle it to add texture. I love it both ways so you do whatever makes your heart happy.
- Let everything dry completely.
Time to put it all together:

- Once the transfers have dried remove the parchment paper.
- Now add a little royal icing to connect the stalk and the nut.
- Place one of the cupules you’ve made on the wet brown icing.
- Let them dry completely then gently remove them from the cello bag.
Check out the blue acorns. My royal icing was flood consistency and it didn’t work very well on these transfers. If you look at them long enough I bet you can think of some fun and creative ways to decorate with them.
I can’t wait to see how you all make and use your acorns. Tag me on Facebook and Instagram. I’d love to share your images with everyone if you’d allow me to do so. Happy decorating and I hope to see your cookies soon.
Bear hugs,


Hi ,LISA It was quite inetresting to make with your idea and i enjoyed a lot while making cookies and had so much of fun.
Thanks, Patricia! I’m totally addicted to royal icing transfers!
Bear hugs!