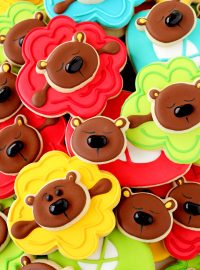
How to Make Cute Little Bear Sugar Cookies with Royal Icing
I hope you’re ready to make some cute little bear sugar cookies with royal icing because these guys are a lot of fun! They will work great for birthday cookies or just a cookie for any day of the week. If you add a few sugar cookies that look like chocolate chip cookies you’ll be ready for a fun little cookie party! I’m so excited I can ‘bearly’ stand it!
Supply List:
(may contain affiliate links)
Cookie Cutter:
- Bear Cookie Cutter- The Cookie Countess, The Flour Box, or if you have one from Sweet Sugarbelle
Royal Icing Colors:
- Black- Tuxedo Black by The Cookie Countess- Outline and flood consistency
- White- Outline Consistency Bright White by AmeriColor
- Tan outline and flood consistency – I like to use AmeriColor Ivory
- Brown- Totally Brown by The Cookie Countess- Outline and flood consistency
Royal Transfer Eyes:
Pick the size you want. Here are some small, medium, or large ones for you to choose from. Make them a few days before you make your bear cookies. Follow this Candy Eye tutorial to see how to make them ahead of time.
- Small Candy Eye Royal Icing Transfers
- Medium Eye Royal Icing Transfers
- Large-Eyes Royal Icing Transfers
Tools:
How to Make Cute Little Bear Sugar Cookies with Royal Icing Video:
Enjoy the video!
Let’s Decorate Some Bear Cookies:

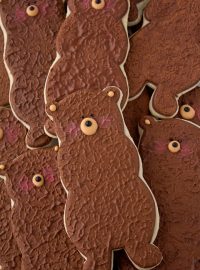
- Begin by drawing the ears with the food-safe marker.
- Next, add a little tan outline consistency royal icing to the inside of the ears and tap it with the dry paintbrush. This will make the ears look like they have fur inside them.
- Use the black outline consistency royal icing to outline the face and ears.
- Add the flood consistency icing on the outer edge of the ears.
Time to flood and add the face:

- Next, flood the face area and let it dry for a while. We are going to add the next layer of icing next and we need the surface to be good and dry so we don’t poke holes in our cute little bears’ faces.
- It’s time to add the tan snout. Pipe a circle and flood it. You can make it as big or as small as you’d like. I personally like to mix it up when I make a set so it looks like each bear is different.
- Let it dry until it forms a crust before you add the black nose.
- Now it’s decision time. You can add the eyes now or wait until after you add the fur. I did it both ways, but I had to remove an eye because I got icing on it. You will see how I did that if you watch the video. From now on I’ll add the eyes after I add the fur to the cute little bear sugar cookies.
- It’s time to add the fur. I know a lot of people don’t use decorating tips, but I like them in situations like this one. If you don’t want to use a tip just snip the tip off your decorating bag and pipe some fur. I placed the tip to the cookie and squeezed it as I pulled the bag away from the cookie. Repeat over, and over, and over, and over… you get the idea. If you want to see this in action be sure to watch the video.
- If you didn’t add the eyes before you will need to add the now while the icing is wet.
Let’s Add some Finishing Touches:

- Pipe the nose with the black royal icing. If you use a thicker black icing the nose will look like it stands out away from the snout for acute effect.
- Now pipe a white line on the nose and a dot to each eye. You’re done!
All Done!

Aren’t these guys cute? You can add a few chocolate chip cookies as a few extra cookies because all bears will eat a good chocolate chip cookie. If you want to see how to make them you can use my tutorial How to Make Sugar Cookies that look like Chocolate Chip Yeti Cookies. The only difference is the cookies with the bears are circles and not Yeti’s. But wouldn’t yetis and bears work well together? I’m not sure, but in cookie land, I think they’d be friends!
I hope you get a chance to make some bear cookies because they are really fun and simple. I’ll be back soon with more decorated sugar cookies!
Bear hugs,


Cute little bear sugar Cookies looks amazing, interesting and delicious. after seeing this my childeren couldn’t stop themselve to eat. really great idea to make things interesting.