Make Some Happy Little Snail Cookies with Royal Icing
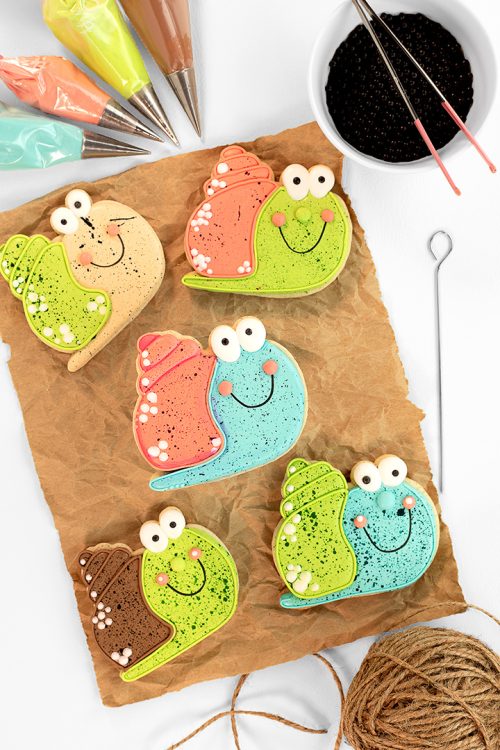
Do you like snails? Have you ever eaten a sail before? I can honestly say I had never eaten a snail until I made these snail cookies. The thought of eating a snail was something really different for me, but these happy little snail cookies changed my mind. They’re cute, they’re fun, and they’re sugar cookies. What’s not to love?
Let’s make and eat some fun snail cookies.
Supply List:
(may contain affiliate links)
Recipes:
Cookie Cutter:
Royal Icing Colors:
Keep your bottles of food gel colors handy because you will use them to splatter the snails and the shells. Trust me. You’re going to have fun with this step.
- Turquoise- AmeriColor
- Pink- Tiny amount of AmeriColor Tulip Red
- Bright White- AmeriColor
- Black Royal Icing Outline Consistency for the dot in the eyes or you can use a 4mm Black Sugar Pearls at Country Kitchen Sweetart
Tools:
- Food safe marker
- Turkey Lacer– You can use a Thingamaginie, 2 in One Tool, Scribe Tool, or a toothpick to help even out the royal icing and to help pop any and all air bubbles.
- Paintbrush
- Paper towel
- Paint palette– You can also use a plate, paper plate, or anything that will hold the food gel color while you dip your brush.
- Parchment paper
Make Some Happy Little Snail Cookies with Royal Icing Video:
Enjoy the video!
Let’s Decorate:
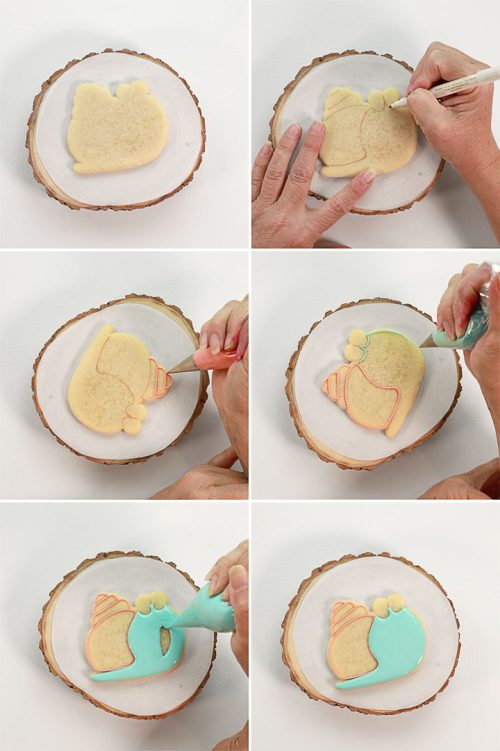
- Draw the pattern on the snail cookie with a food-safe marker.
- Mix your paint colors.
- Outline the snail and the shell with the royal icing.
- Flood the snail’s body and use a turkey lacer, scribe tool, or toothpick to pop any and all air bubbles.
- Outline the shell and let this dry until the icing forms a crust.
Tip:
- If you place the cookie in front of a fan it will help the royal icing dry with a nice shine.
It’s Splatter Time:
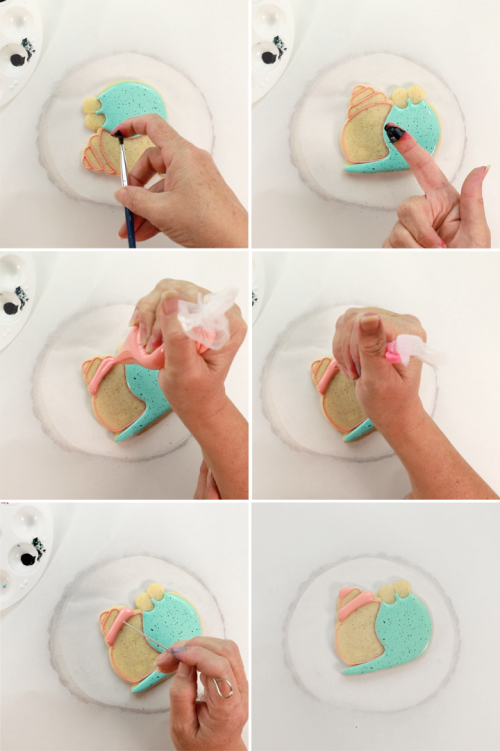
- Let’s add some splatter to that cute little snail cookie. Whatever food gel color you used to make the royal icing for the snail’s body, use it to add a little drop to a paper plate or paint palette.
- Dip the brush in the water and tap it on a paper towel.
- Next, dip the damp brush into the food-gel color and splatter the color on the cookie. If you need to see this in action watch the video. You’ll see how simple it is to achieve this speckled look.
- As a bonus, you can see what this technique will do to your finger if you don’t wear a food-safe glove. That’s right. As you see in the second image above your finger will look very colorful for a while. UGH!
Let the Splattering BEGIN!
- Splatter as much or as little as you want. It’s your snail! Just be careful. If you look at the snail with the tan body in the top photo you will see lines on its face. This happened because I didn’t wipe the tip of my paintbrush before I splattered it. It isn’t a bad thing, but the speckles look better than the unexpected lines. Don’t get me wrong, the cookie was consumed and there were no complaints.
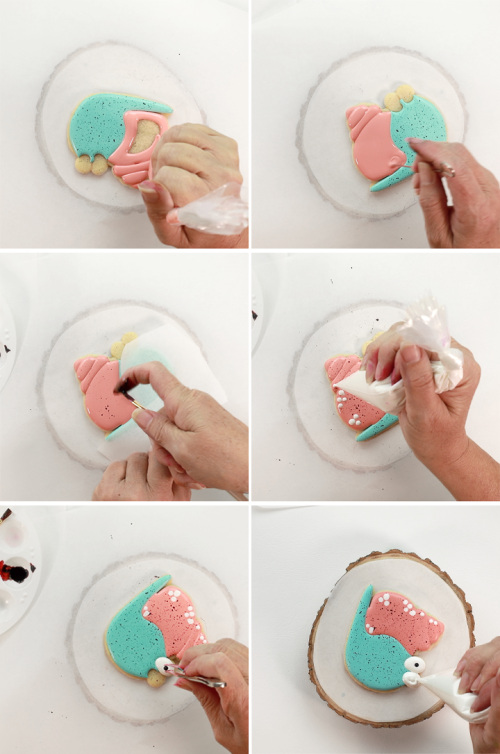
- Now it’s time to flood the sections of the shell. If you flood every other section and let it dry until it forms a crust they will look like separate sections on the cookie. If you don’t wait, the royal icing will all run together and look like one shape. I personally like the individual-looking sections better.
- Once the first sections of the snail cookies have dried enough to form a crust flood the remaining sections.
- Use a few pieces of parchment paper pieces to lay on the snail’s body.
- Use a brush to splatter more food-gel color on the shell.
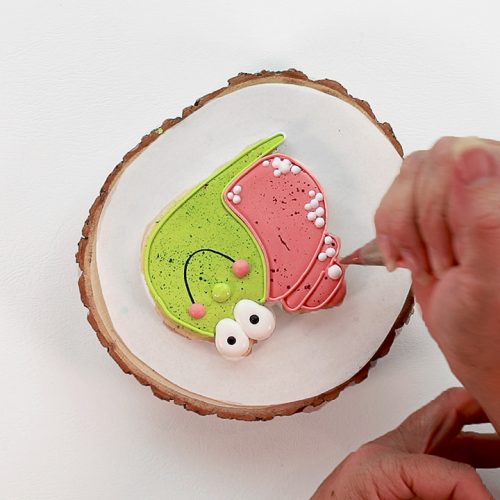
- Add white royal icing dots to the shell. Add as many or as few as you’d like.
Add the eyes:
- Next, pipe one white eye. while the icing is wet you can add an edible black sugar pearl or you can add a drop of black royal icing.
- Let it dry until it forms a crust. Repeat the process for the second eye.
- It’s time for the last few steps. Add an outline around the snail’s body and shell.
- Paint a smile with the food-gel color.
- Pipe pink dots on the sides of the smile.
- Add a nose if you want or you can skip this part.
Guess what? You’re all done! If you’re like me and have never eaten a sail you can eat one now and make it official! It’s not escargot, but it’s close enough.
I hope you enjoy making snail cookies part of your cookie world. I’m so happy I found this snail cookie cutter at Killer Zebra’s. She has some beautiful, fun, and unique cutters and stencils. If you have time you should go visit her site and tell her you’re going to eat a snail. Well, a snail cookie.
Bear hugs,





These are adorable!