Frankenstein Face Cookies
This post may contain affiliate links.
I don’t know why but, I am all about Frankenstein these days. I don’t know if it is silly little grin or that big old cut with the stitches that makes me love him so much. Whatever it is, it inspired these Frankenstein Face Cookies made with a flip flop cookie cutter. They are super simple and you only need to make two colors of icing.
 Well, you only need two colors of icing if you use a few of my favorite decorating tools. Yep. You guessed it. Royal icing transfers. They are my favorite because they make my life easier. When I want to make a cookie like this Frankenstein face cookie, I just go to my cabinet and grab a jar of teeth and eyes. That sounds kinda weird doesn’t it? Well, I guess it isn’t weird if we are making Frank. He was built after all!
Supplies for Frankenstein Face Cookies:
Flip Flop Cookie Cutter – any size will work
Green 15 Second Icing in a piping bag fitted with a #2 tip
Black 15 Second Icing in a piping bag fitted with a #2 tip
Royal Icing Eyes– I used one large and one medium for each Frankenstein Face Cookie
Royal Icing Teeth – This template has both teeth together but, you can pipe only one from each set like I did.
Royal Icing letter “T’s” – I didn’t provide a template for these because they are so simple. All you have to do is pipe a few gray capital “T’s on some wax paper a few days before you make these cookies. Let them dry and pop them off when they are completely dry.
 When I said this cookie is simple, I wasn’t joking!
Begin by outlining the face with green icing. Be sure to make some zig zags for the hair line and make an underbite for his bottom lip.
If you want, you can use your airbrush gun to outline his face with green airbrush color while the icing is wet. You may also want to add some green where you will place his eyes to add some character. I made a few that were airbrushed and a few that were not airbrushed. It is totally up to you how you make your Frankenstein Face Cookies. If you want to information on airbrushing, click here.
While the icing is wet, add the royal icing transfers. Add a bolt, a medium and large eye and two teeth. Let the cookies dry completely. (I took the picture before I added the bolt. Just pretend it is there to make me happy! LOL)
 Now it is time to add a few “Frank” details to help make this guy read for Halloween.
With the black icing, add an unibrow, stitches, a half circle around the blot and a line for the mouth.
 Next, outline and flood the hair with the black icing and let the cookies dry overnight.
 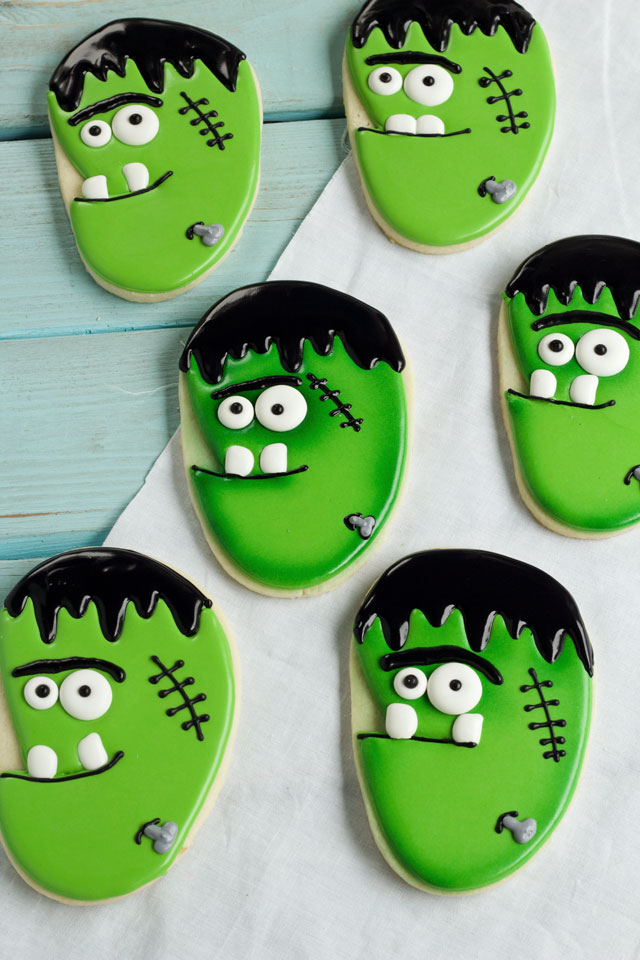 I think this cookie would be perfect to make with the kids. You can make the royal icing transfers ahead of time so they can make the face the way they want. If you do have a Halloween cookie decorating party, send me some pictures. I would love to see what you all make!
Frankenstein Treats:
Frankenstein S’More’s
Simple Frankenstein Cookies
Frankenstein and His Bride Cupcakes
Little Monster Cookies
Funny Frankenstein Cookies by Sweet Sugar Belle
Frankenstein Cookies by Munchkin Munchies
Mrs. Frankenstein Cookies by Munchkin Munchies
Rectangular Frankenstein by Make Me Cake Me
Bear hugs,

ja,ja,ja….. Son preciosas y muy originales. Gracias por compartir
Thank you Wendy!
I love the way you airbrush!! Not just around the edges…. but behind the eyes. And I would literally never think to airbrush while the icing is wet!
These guys are so goofy, I can’t help but giggle! 🙂 Tx for the shout, too, Lisa! xo
These are so cute!! Frankie’s underbite cracks me up. Thank you for your awesome tutorials, Lisa!! xo Tricia