How to Make Stunning Buttercream Ranunculus with Video
I’ve always heard that practice makes perfect and I’d love to make perfect buttercream ranunculus. Have you heard that practice makes perfect? I always believed in it as a kid, but as I got older I realized it isn’t necessarily true. Take these flowers for example. If we make them using the wrong technique, chances are we’re always going to make them wrong. If we learn to make them the correct way, we will practice making them the right way and end up with beautiful buttercream flowers.
What I want you to take away from this tutorial is this, “Perfect Practice makes Perfect!” Take some time and learn to do things the right way and you’ll be able to create anything you can imagine!

Say it with me, “Perfect Practice makes Perfect!” I promise you, with the right buttercream recipe and decorating tips anyone can make beautiful buttercream flowers.
Stunning Buttercream Ranunculus:
Supply List:
(may contain affiliate links)
Recipes:
Frosting Colors:
- White
- Pink made with white frosting and a very small amount of AmeriColor Super Red
Tools:
- You can use a variety of tips to make this flower depending on what size flower you need. You can use tip #61, #121, #122, or #123. These buttercream flowers were made with the #122 tip.
- Parchment Paper Squares-Cut parchment paper squares that are a little larger than your flower nail.
- Decorating bag
- 3″ Flower Nail-I like to use a big flower nail for these. This one is 3″ wide and it’s perfect for making large buttercream flowers.
- Decorating Bag Ties
Buttercream Ranunculus Video:
Here’s a video for you. Watch how the petals are piped. Remember, you want to build the petals up more than you want to build them out towards the end of the flower nail.

- Begin by making a good buttercream frosting. If you need a recipe you can find mine here, Crusting Buttercream Frosting Recipe.
- Next, tint a little of the frosting pink.
- Cut the tip of the decorating bag so the end of tip #122 is sticking out of the bag.
- Use a butter knife or an offset spatula to make a line of pink frosting inside the bag from the narrow side of the tip all the way up the bag. Don’t go all the way to the top because the frosting will push out of the top and fall all over the place as you try to pipe your flowers. You need to make the pink line so the tip of the flowers will be pink and the rest of the flower will be white but don’t stress a nice clean perfect line. Just do the best you can and the flowers will look amazing!
- Fill the rest of the bag with the white frosting and push it down to the tip.
- Twist the top and use a decorating bag tie to keep the frosting inside the bag so it doesn’t come out of the top of the bag as your piping.

- Add a small amount of frosting to the top of the flower nail.
- Place a parchment paper square and press it into the frosting.

- Begin by making a cone with the narrow side of the tip pointing up. The wide end of the tip doesn’t need to touch the nail but hold it close as you pipe the cone while gently turning the flower nail. Don’t worry, I have a video for you at the end of this tutorial that will show you exactly how to make this gorgeous flower.

- Once you have the cone, pipe 4 petals around it. Start at the base of the cone and pipe the petal to the opposite side of the flower without covering the center.

- When you pipe the petals, make a small rainbow shape with the tip of the piping bag.
- Start at the bottom, squeeze the bag with gentle pressure.
- Continue the pressure as you make the arch of the rainbow shape while turning the flower nail.
- Continue pressure as you bring the arch to the bottom of the flower.
I hope that makes sense, but as I said before, I have a video so you can see it in action.

- The idea is to make the buttercream ranunculus taller, not fatter. When you pipe a rose, you start with a cone and work your way out to the edge of the flower nail. Since the #122 tip is rounded, it allows you to make the flower taller which will make it look like the petals are in a tight circle. Build up and out slightly.
- When piping the petals, begin the new petal by placing the tip next to the back of petal you just piped. You want to start the new petal in the center of the previous petal. You don’t want all the petals to be perfectly lined up, so by starting at the center of the previous petal, you will give the flower a natural look.

- Repeat and make another row of petals the same way. Pipe the little rainbows without covering the center of the flower.

- As you can see the side of this flower looks a bit messy, but that’s okay, it is supposed to look this way right now.

- Continue piping the petals until you get the flower as wide as you want.

- When you get the flower the width you want, pipe some longer petals around the flower but don’t arch the rainbow as high. This will give your flower a nice finished look.
Now make a batch of frosting and pipe some buttercream ranunculus over and over until you get the technique down. Don’t give up if the first few flowers look a bit wonky. You should have seen the first few I made. Yuck! Don’t give up though because you can learn to make these with a little practice. Then your flowers will be gorgeous!
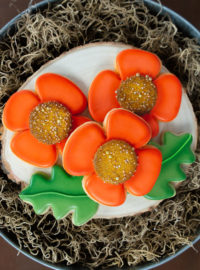
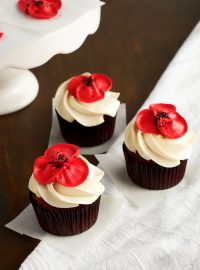
You will be making amazing cakes covered in beautiful buttercream flowers before you know it so just practice. Oops! I mean “perfect practice” them! While you’re at it, you can perfect practice making some buttercream poppy flowers to add to your collection.
Bear hugs,


Those are beautiful! I love them.
Thanks Gabby! 😉
Thank you for the tutorial. I am more of a visual learner.
Me too Brenda! Thats why I try to make videos. I love watching things in action! LOL
Thank you for the tutorial Lisa!
Thank you Annarella! 🙂
Lisa, Beautifully done! Thanks for sharing your technique. The pink edges look so pretty on this flower. Have a great day!
Hi Joan! How are you doing?
When I first started making cakes this was one of the first things I wanted to learn. Who knew it was as easy as putting frosting on the inside of the bag! LOL
Those are some perfectly practiced and piped flowers, Lisa. Gorgeous! 🙂
Thanks Janis!
I am working on buttercream hydrengas for you so stay tuned! 😉
This is going to sound crazy, but when I pipe ranunculus (or should I say, my version of renunculus), I keep an image of bandages in my head. These are beautiful, Lisa. Great video, as always.
Bahahaha! Bandages are a perfect way to think about ranunculus. I love your brain Gail!!!
These are great. Love your tutorial. But how do you get them off the paper square and onto the cake?
You place them in the freezer for about 30 minutes while you frost the cake. Remove a few flowers at a time and remove the parchment paper square off the back of each one as you place them on the cake. If you remove all of them from the freezer at once they will thaw really fast and be hard to work with.
Thank you
Lisa,
A very good explanation in doing Ranunculus flower, also your video is good, thank so much of
Sharing . Keep up.
Thank you Lisa?. Love this video.
So nice thanks for sharing your ideas with us & those are so beautiful
Could you do this with royal icing?
Hi Summer,
I’m sure you could. Just make sure the royal icing consistency is thick and you may need to wait in between layers so it doesn’t lose its shape. I’m hoping to try it soon. If you do will you let us know how it turns out?
Thanks for the tutorial. I’m hoping to make a flower cake for my daughter’s birthday but need to practice first. I was wondering how far in advance I could make the flowers? Can I store in the freezer? What’s the best way to do this? Thanks!!
Hi Brianna,
You can place buttercream frosting in the fridge for 4-5 days or in the freezer for up to three months. Here is an article from The Kitchn that talks more about it.
https://www.thekitchn.com/bakers-tip-what-to-do-with-leftover-buttercream-168061
Your video only shows a snipnof the process before it switches to a different video.
I’m so sorry about that Kat!
I think it is fixed now. Thanks for letting me know!!!!