How to Make Super Simple Flower Cookies
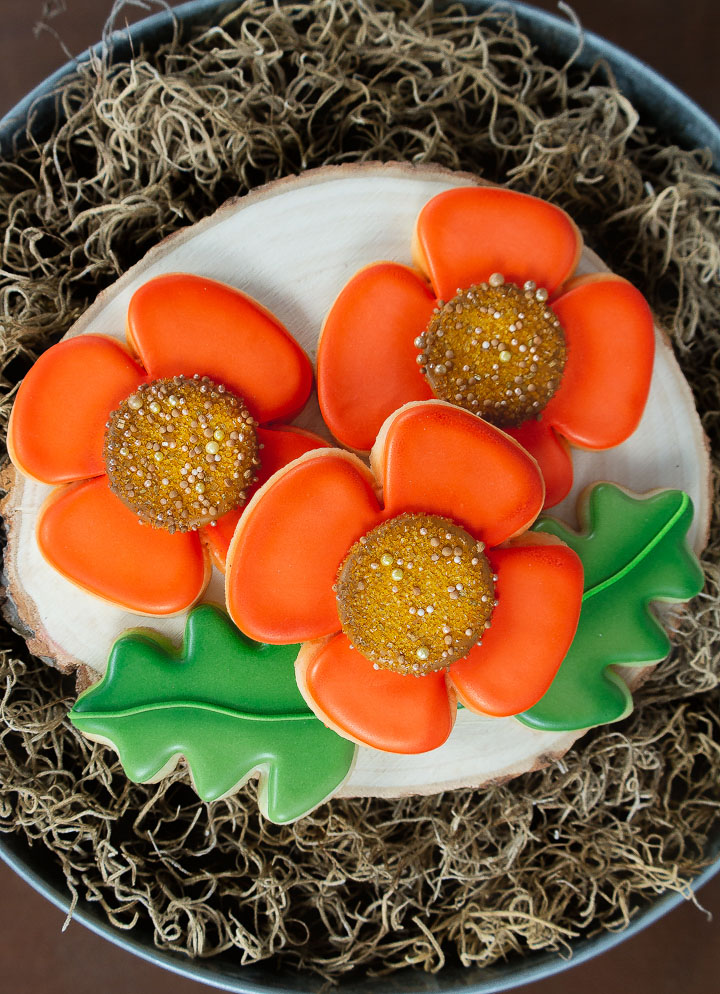
Super Simple Flower Cookies make me very happy because you don’t have to spend several hours decorating to get a pretty cookie. These cookies are proof of that because you outline, flood, and airbrush, and add a simple royal icing center and you’re done. You should make some royal icing transfers for the center so you’re always ready for a super-fast set of cookies.
Make the centers in different colors so you’ll have them ready for any order. Use your imagination for the centers and keep them close by just in case you get a phone call with someone desperate for cookies by tomorrow morning! If you make the centers in advance, you’ll be ready for this challenge and your cookies will be gorgeous and look as if you spent hours and hours making them! We will be the only ones who actually know how quickly these cuties can be made.
How to Make Super Simple Flower Cookies Supply List:
(may contain affiliate links)
Recipes:
Cookie Cutters:
Royal Icing Colors:
- Tangerine Dream – The Cookie Countess– If you’re like me you’ll need an outline (thick) and 15-Second Flood Consistency for the flower.
- Ivory- Americolor- 15-Second Consistency for the center of the flower.
Royal Icing Transfer:
Airbrush System:
Airbrush Colors:
Tools:
- Turkey Lacer
- Tipless decorating bags from Truly Mad Plastic, Flour Box Bakery, or The Cookie Countess
Optional:
- Cookie Turntable Swivel for Cookies and the Mini Mat
- Fan to dry your cookies
How to Make Super Simple Flower Cookies Video:
Super Simple Flower Cookie Tutorial:
- Begin by baking your sugar cookies and let them cool completely so when you decorate your royal icing won’t melt off the sides.
- Let’s talk about royal icing consistency for a minute. I’ve mixed things up over the years and sometimes I only used 15-Second Royal Icing Consistency, but lately, I’ve started using decorating tips for outline and details because I seem to have a little more control over the lines. You need to do what works for you. If you need a tip, use it. If you can use a tipless bag and get the results you want, do it. If you need outline consistency icing, make it. If you can do it all with 15- Second Consistency, go for it. This is your cookie and your workspace so do what works for you. Now I feel better saying that out loud! Back to regularly scheduled programming in 3, 2, 1…
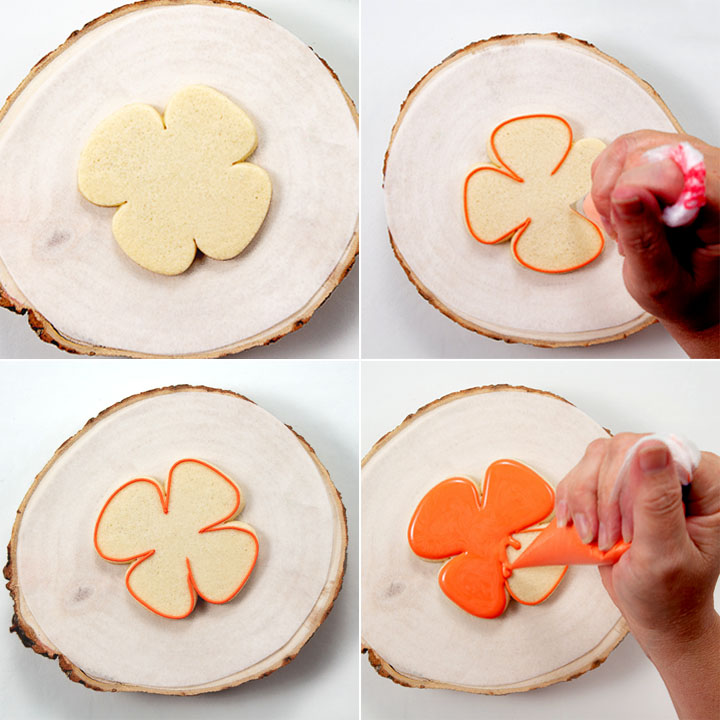
- Let’s begin by outlining our cookies. If you have issues with your icing sinking in the middle as it dries you should watch the video above. It has a decorating tip that will help you make cookies that dry with a nice flat surface.
- After you outline your cookies use the 15-Second Flood Consistency to flood it. If these cookies are for a last-minute order, let the surface dry for about 20 minutes before you begin airbrushing them. You can airbrush while the icing is wet and I do that sometimes just for fun. I like watching the royal icing dance. Put on some fun music and you can have a fun little decorating party even if you’re all by yourself!
Airbrush Super Simple Flower Cookies:
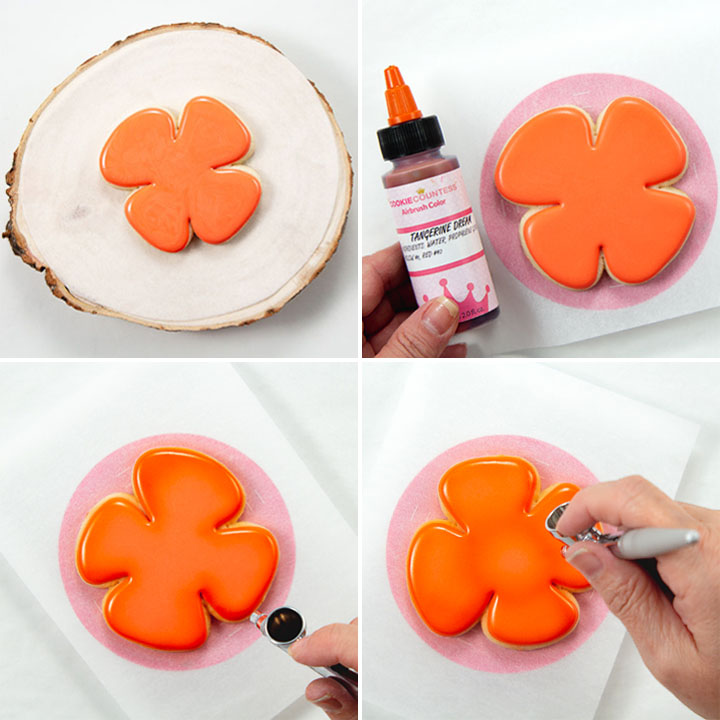
- Do you have an airbrush system? I’m asking this because you can get some really pretty cookies with a little bit of effort. Airbrushing the edge will totally take your cookies to a new world of gorgeous! I don’t want you to get one if you don’t want to, but if you’re on the fence you should really think about it. I think it’s totally worth the investment and if you have any questions email me and I’ll do my best to answer them for you.
- One thing about airbrushing and using The Cookie Countess Food Gel Colors and Airbrush Colors is she takes the guesswork out of things for us. If you purchase Tangerine Food Gel Color you can also get the Tangerine Airbrush Color and they work perfectly together. That’s what happened here because we made tangerine-colored royal icing and used the tangerine airbrush color. Before you know it you’ll have yourself a pretty cookie without questioning everything you do. It’s that simple!
- Simply spray the edge of the cookie and then do a light spray over the top so it will blend everything together. Perfect!
Royal Icing Transfer Flower Center:
- Here is your FREE Large Circle Royal Icing Transfer Pattern. Patterns like these are good because you can use your leftover royal icing and make circles in all different colors. This is a great way to use leftover icing and be ready whenever someone needs cookies fast.
- Print the pattern and tape it to a piece of foam board or the back of a cookie sheet.
- Cover it with wax paper and tape it into place so it won’t slide around while you pipe the circles.
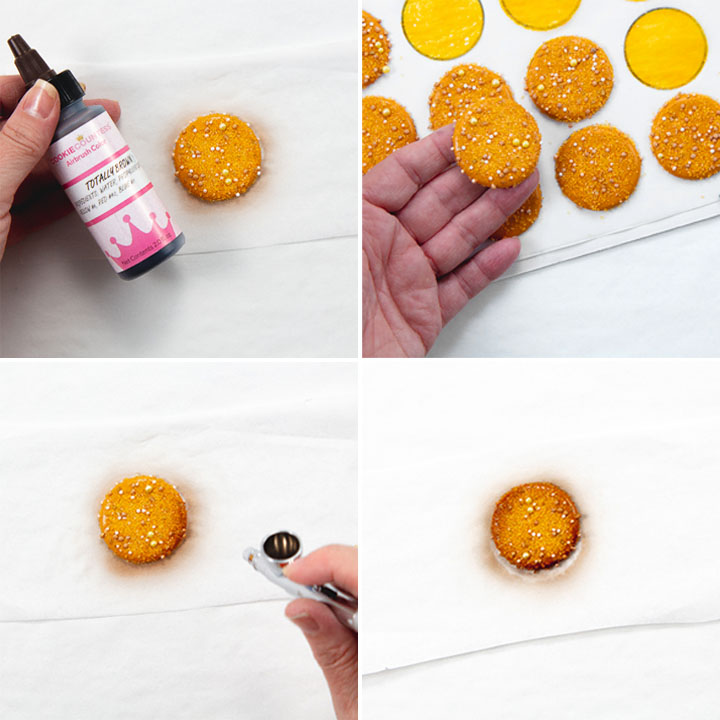
- Mix some sprinkles and sanding sugar that match your colors and then pipe the circle with your royal icing.
- Sprinkle the wet circles with your sugar mixture and let it dry completely. This may take eight to twelve hours depending on humidity.
- Once the circles are completely dry, carefully remove them from the wax paper. Please make extra because royal icing transfers can break pretty easy so more is better.
- Pipe a dot of royal icing in the center of the cookie so it’ll hold the royal icing transfer in place.
- Place the flower center on the wet icing and gently press it so it will attach and dry in place.
- Let the cookie dry completely.
I told you these Super Simple Flower Cookies were simple, didn’t I? I’m working hard to finish the editing on this dream set I’ve been talking about. I’ll share the rest of the cookies with you soon so stay tuned!
Bear hugs,





Fantastic and i really loved your creativity, loved your inserted images as well…i will try to make it few days later…Thanks for sharing….!