How to Make Simple Scarecrow Cookies with Video
You know what? I can’t tell you how many times I’ve mentioned on this blog that fall is my favorite season. That’s why I was so surprised that I hadn’t made scarecrow cookies. Really? What’s wrong with me? What have I been doing all these years?
Thanks to Sugarbelle, that’s all about to change. I must have seen the future and knew she was going to make an adorable scarecrow cookie cutter. It’s like I convinced myself to wait for her design. Her cutter is beyond cute! Do you have one? When I went to Michael’s they only had two scarecrow cutters left on the shelf so I bought them both. Do you know what that means? I am going to give it to the lucky winner.
Thanks, everyone for entering the contest. I will host a few more between now and Christmas so stay tuned!
**CONTEST CLOSED**
The winner is Christine Stephens who said, “Absolutely adorable! The face is so cute! Thank you for sharing!”
Congrats!!! I just sent you an email Christine with instructions on how to claim the cookie cutters.
Recipes: Supplies for Simple Scarecrow Cookies:
Tools and Cutter:
- Sweet Sugarbelle’s Scarecrow Cookie Cutter
- Sweet Sugarbelle’s Sunflower Royal Icing Accents
- Food Safe Marker
Royal Icing Colors:
- 15 Second Royal Icing in the following colors:
- Flesh – Americolor Ivory
- Dark Brown- Americolor Warm or Chocolate Brown
- Orange – Americolor Electric Orange
- Black -Americolor Super Black
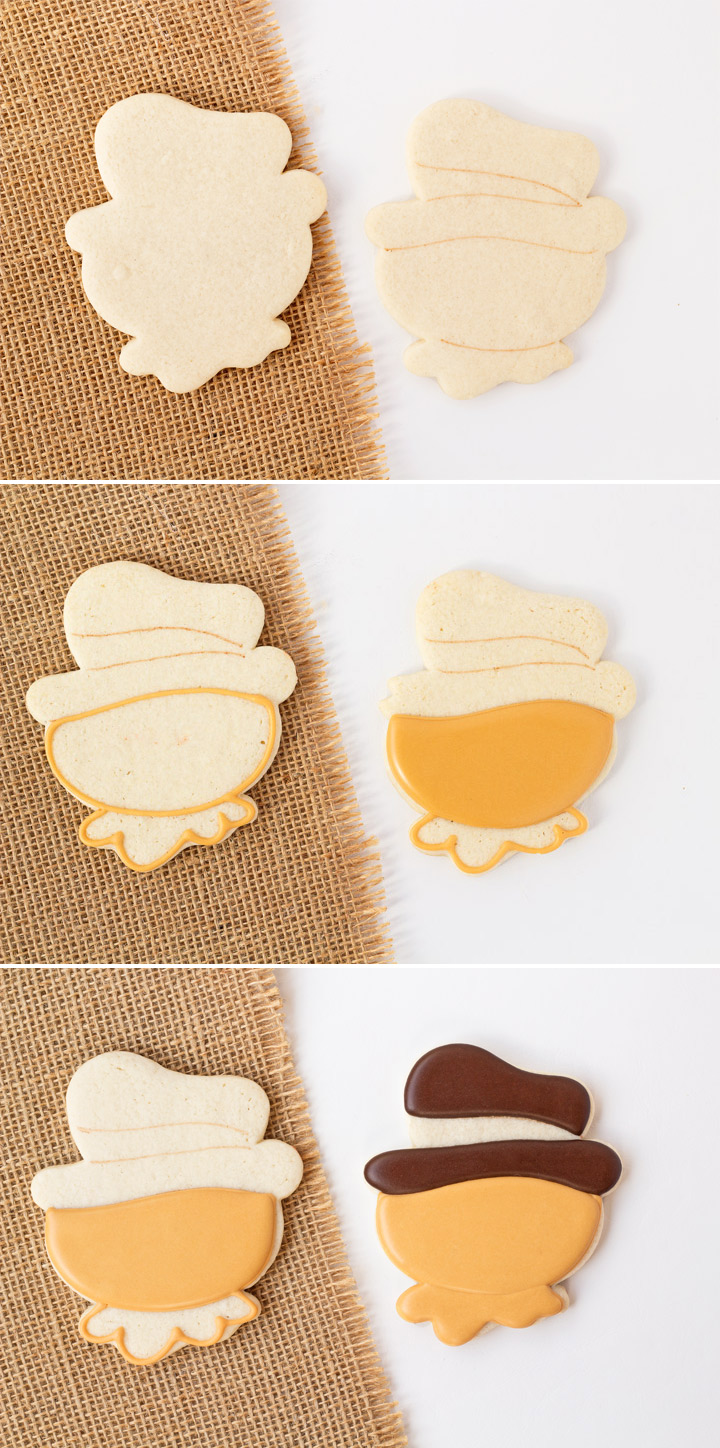
- Begin by drawing the hat with the food-safe marker.
- Outline the face and neck area with the flesh color.
- Flood the face and let it dry for 10-20 minutes.
- Outline and flood the hat with the brown royal icing.
- Flood the neck area and let the cookies dry completely.
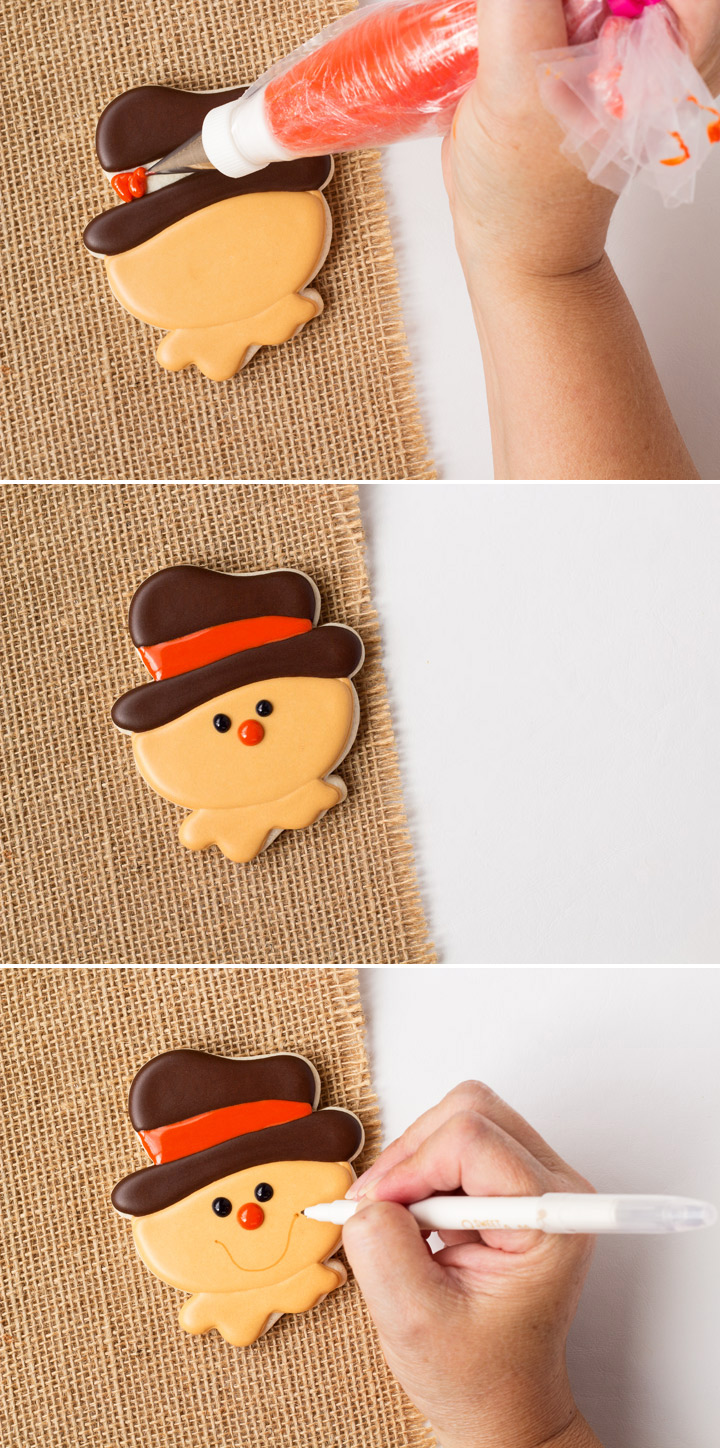
- Once the royal icing dries add the orange band to the hat.
- Add the eyes and the nose.
- Use a food-safe marker (or you can paint) a smile. If you choose to paint the smile, use a touch of ivory food gel with a touch of water and a detail brush.
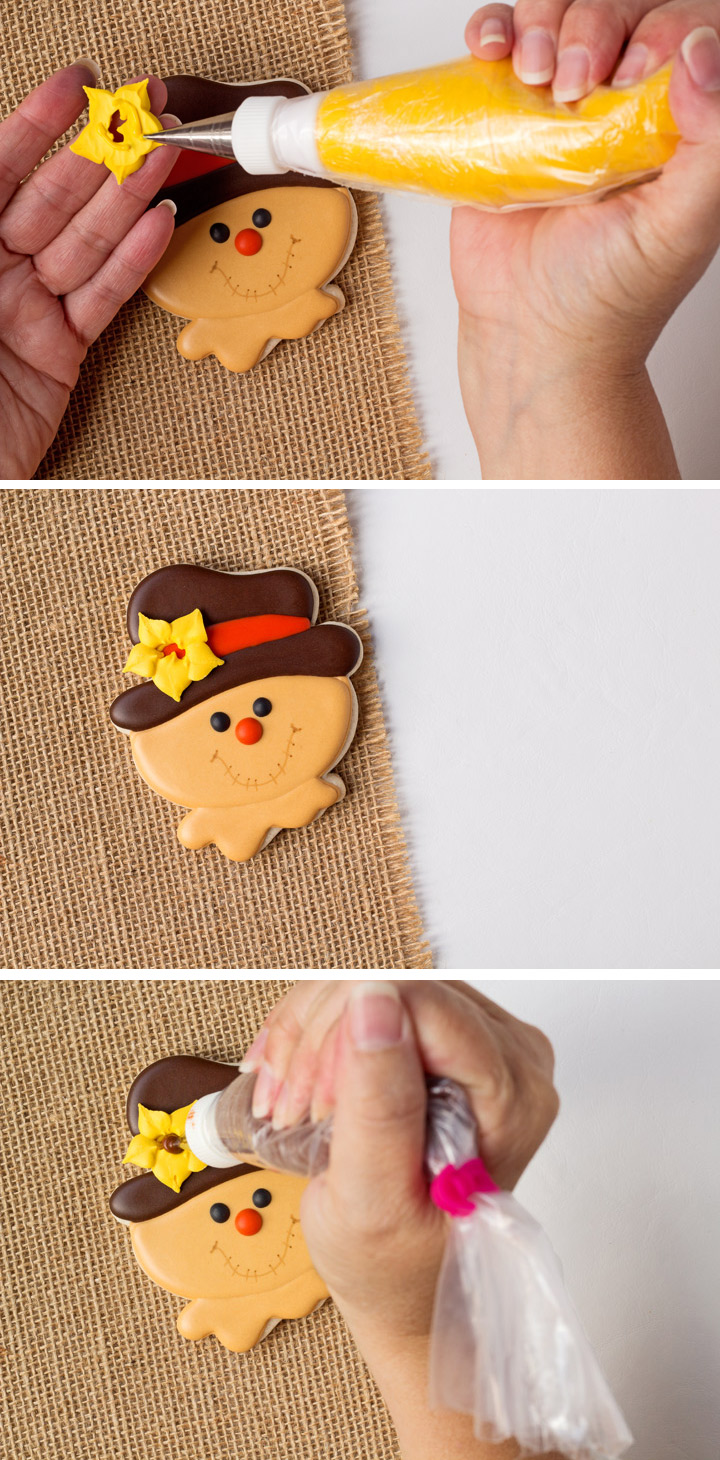
- Sugarbelle has a tutorial showing how to make sunflower royal icing accents and since we’re using her cutter, I thought we should use her sunflower on the hat.
- Since I have humidity issues, I decided to make the flower petals on the wax paper and wait to add the center. It helps prevent bleeding issues.
- Attach the flower with yellow royal icing and then add a brown dot in the center.
- Now all you have to do is let it dry.
How to Make Scarecrow Cookies Video:
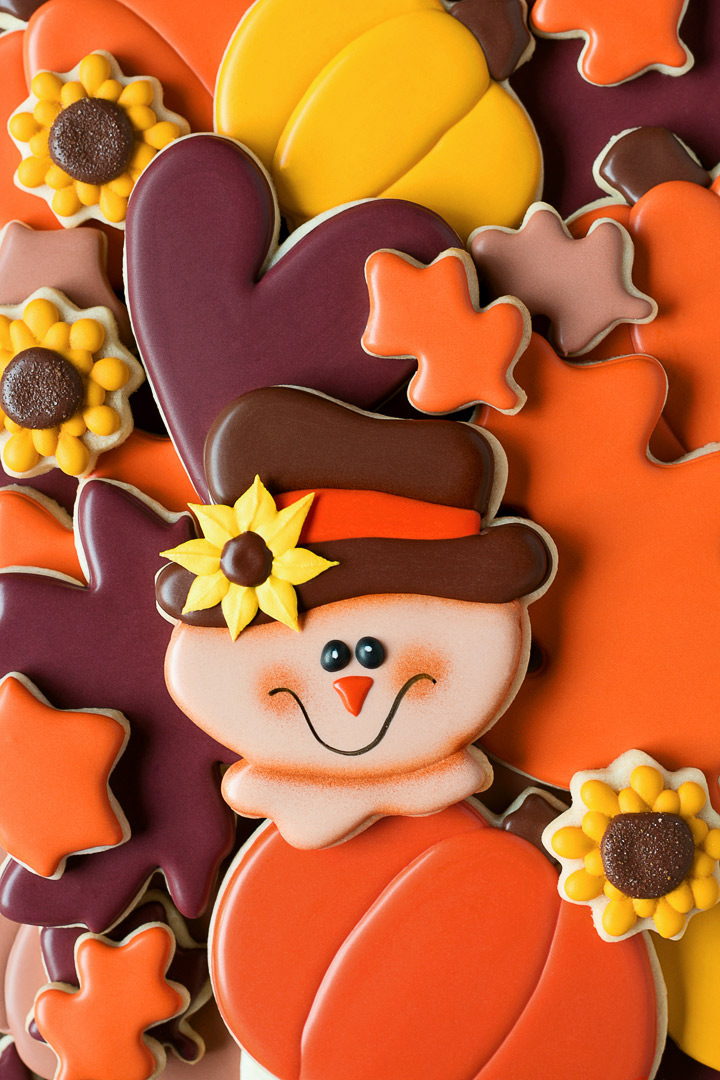
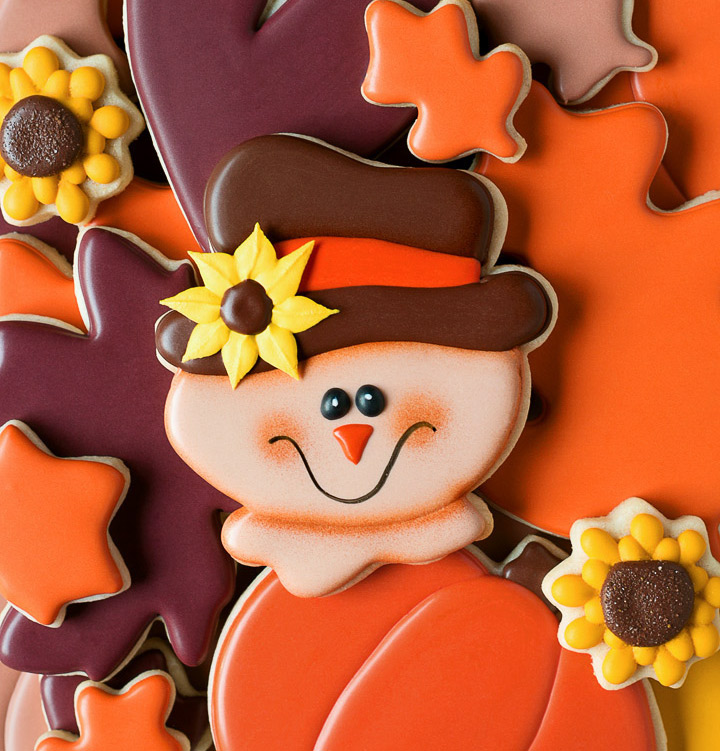
You may notice the scarecrow in the tutorial isn’t airbrushed but the one in the photo below is airbrushed. I didn’t add it to the tutorial because I honestly forgot to take a video of it. All you have to do is use warm brown around the edges of the face and neck. Add a few dots for the cheeks. Easy peasy!
Oh yeah, before I forget, leave a comment below for a chance to win the scarecrow and sunflower (aka my hedgehog) cookie cutter. I will pick a winner sometime Sunday, November 6, 2016. Good luck!
Bear hugs,







I am up very early this morning which is way out of normal for me. I am so happy to see this cookie. It is adorable! I have learned so much from your blog. You are the best. Thank you for your clear and precise directions. I hope to win the cookie cutter but if I don’t I will certainly be ordering one. Have a great Thanksgiving!!
I recently found your blog and LOVE IT! I’ve learned so many little tricks and techniques lately. Like the free e-book you sent was certainly a huge help. I’ve always had trouble making sugar cookies until recently with your help. Thanks so much. I’d love to win the cookie cutters but if not will be checking into them to possibly add to my slow growing collection! Keep up the great work and lovely blogging! Thx again! ?
These are the cutest scarecrows I have seen!!!!! And your video is wonderful–I still marvel at the smoothness of your icing surface. By the way, the cheeks really make a big difference! My Michaels has never gotten even one of Sugarbelle’s cutters but I won this little guy from someone else so I am ready to try these!
Me again–I just watched the video again and I have a question. How do you get that gorgeous shade of brown? It looks like melted chocolate! Thank you!!!
Thanks for all the great tutorials!!! Yes are awesome!!!
Super cute! I love her cutters and your tutorials! Thank you!
Hello Lisa……love him….some scarecrows I have seen have so many steps and details. I added him to my set this year and was so glad I found him the other day at Michaels….I hope who ever gets him loves him too. I normally us 2 different cutters or turn a cupcake cutter upside down…now I don’t. Looking for quick ideas this year because I have a few to make. He is adorable. Thanks as always for the tutorial. Happy Baking ???
So cute! Fall is my favorite time of the year too.
Absolutely adorable! The face is so cute! Thank you for sharing!
Just recently signed up for your newsletter and I am soooooo glad I did! Absolutely obsessed with all your stuff, and love waking up everyday to check my email for some light reading!
Thank you for sharing!!!
Love this post & video. It’s really too warm to be fall here in southeast Tennessee, but I’m still churning out the seasonal baked goods. The cookie cutter is too cute. BTW, do you have a store in Sevierville? I’m up that way quite frequently & would love to stop in if you do.
Hey Tammy,
I don’t have a store. I love staying home and working on goodies for blog. If you email me the next time your here, we can get together for coffee or maybe a cookie! 🙂
The Scarecrow is so cute. Always happy for new ideas to add to my fall cookie platter.
You’ve inspired me to try a scarecrow! I know it won’t be as professional as yours, but I have to start somewhere!
Hi, I love your tutorials, the scare crow cookie cutter is so cute, I don’t have it. I do however have a ridiculous amount of cookie cutters, but not that one! I have decorated cookies for years but just learning royal frosting. Thanks so Much!
Love adding new cookie cutters to my collection!
So cute. Love his smile. 🙂
Oh those are just adorable!
Now,, to accomplish these for Thanksgiving!! My neighbors will love these! Thank you for taking the time to share!
These are adorable….I ‘may’ attempt this design for thanksgiving…love the email newsletter! Thanks for having it.
This is so cute, would love those cookie cutters!
These are so adorable!! I wish I had even a portion of your talent!
Love your scarecrow!
Your icing consistency is always PERFECT as are your cookies as well. Love the scarecrow.
I would love a chance to win. I’m just starting out and I have loved all of your help and direction. Thank you for taking the time to do all of this!
I love your blog/posts…a true inspiration! :o)
Love it! So cute!!!
Lisa, can the scarecrow cutter be purchased separately or is it part of the 18 cutter set? I can’t find it on the internet to purchase. I always make Sugarbelle’s scarecrow using a cupcake cutter, following her tutorial of same but I love the shape of this cutter more! !
The cutter is one of two in a set ( the other is a scarecrow) that is an exclusive at MICHAEL’S craft stores only. I would suggest calling beforehand to see if they are carrying the Sweet Sugarbelle line of products. If you are lucky enough to find it in your area…I would suggest buying a few…they are hard to find! My Great Aunt found mine in Arizona and she went to 6 or more Michael’s trying to find one for me! Good luck Sherrie!
Thanks Gail! The cutters are a Scarecrow and a Sunflower. I’m glad your aunt found one for you!
Thank you!
Hi Sherrie,
The Scarecrow and Sunflower cutter were exclusive to Michael’s and they sell out FAST! That is why I grabbed one to giveaway. 🙂
Thank you!
I had to call 3 Michael’s in my area and FOUND one set!!!! They are holding it for me for pick up tomorrow. Yay!!
Picked up my scarecrow and sunflower cookie cutters on Friday for only 49cents WHAT? There were no other Sugarbelle merchandise for sale! I think Michaels is doing Sugarbelle a great disservice!! Exclusive rights to sell her items – but they don’t offer them online and don’t carry them in all their stores – I hope she negotiates a better deal when her contract expires with them!
I just did a set using the 4 cutters I picked up when stateside. They are so fun to work with. You did a fabulous job here!
THIS IS SO CUTE!!!
Absolutely beautiful! I recently started decorating cookies and your tutorials have been fun and inspirational. Thank you!
Oops I meant ice cream cutter not cupcake cutter!
I tried to make a scarecrow -didn’t do so well!!! Maybe the right cutter will help!!! Lol!!! Love this one!!! And sad because our Michael’s doesn’t have your stuff yet!!! May just have to order it right from you!!!!
Hi Ronnda.
The cutter designs aren’t mine. Sweet Sugarbelle designed them. I love her and her work and you can see her stuff here: http://www.sweetsugarbelle.com
I’ve looked for this cutter everywhere and I cannot find it. 🙁 ……. I love your tutorials, they are always great ?
Wow! it´s a really cute cutter and that scarecrow looks just pretty. I´m from Mexico and here we are not very fond in scarecrows and pumpkins season, but I would love to start the tradition 🙂
I’d love to win these cookie cutters. Where I live, they weren’t available. We don’t have a Michael’s here. Anywho, I love following you!! You’re so inspirational!!!! Thank you for sharing your talent! ?
So cute!!!! Thanks for the step by step!!!
Lisa- your scarecrow is adorable! My Michaels STILL doesn’t carry the cutters. I’m dying here!! Crossing my fingers in loveland Ohio 🙂
We owned a hedgehog when my kids were small….it would be great to surprise their young families with headgehog cookies! I will have to check them out at Michael’s! Thanks for all of your time teaching us
Okay. If you get the scarecrow and sunflower cutter, you will see how I make the sunflower into a hedgehog cookie. I updated the post and the tutorial will be here soon. 😉
I LOVE these little scarecrow cookies. So cute.
Thank you so much for this great tutorial and givaway!! I have been wanting this cutter set but the Michaels store by me dosen’t have the Sugarbelle line. So this is my chance to own it!! (praying) lol
I just love your posts and blog, Lisa! I’ve learned so much from you – now I just have to put it to work. LOL I’m rather excited this year because Thanksgiving will be at someone else’s home. I usually have it and there never seems to be time to make special cookies for the day, now I can. Of course I would love to win these, but I already feel like a winner by finding your page & blog. I have 3 favs & you are one of them. Thanks for ALL that you do to help us beginners along. I’m not in it make money, only smiles.
And your making the world better one cookie at a time Lisa! Never forget that! 😉
This is so cute- I want to make one too!
I absolutely LOVE this cookie cutter. Perfect for the fall, and Thanksgiving! Cant wait to try your royal icing recipe
What a wonderful giveaway. I don’t own any of her cookie cutters yet and would love to win this!! Thank you so much for all you do for us little “cookie people!!”
Your cookies are so adorable. I am relatively new at this and have a long way to go to get mine looking anywhere near as nice as yours. But you inspire me. I am going to make cookies for Thanksgiving, Autumn leaves and such. The scarecrow would be a great addition. Keep posting your amazing work. I truly appreciate it. – Nanna Niki
So so cute!!
Very Cute!! Love your work. 🙂
Lisa
As always you amaze us with your work full of love ! Thank you for being you my friend! Xo
Paula
These are so cute, sugar belle is just so darn clever. I wanted this set but couldn’t get them at my store. Love your videos and blog posts, always so helpful!!
Scarecrows are one of my favorite cookies to make. The fall colors and faces are so much fun. Thank you for your awesome videos! I am a big fan and would love love love another scarecrow cutter!
How wonderful you are sharing your good fortune! If I would be lucky enough to win…that is what I would do! I would share the scarecrow with my 13-year-old cousin who is just learning, who lives in another state. And I would happily add the hedgehog to my cutters! I do not have a hedgehog yet! Thank you for hosting this giveaway and sharing your amazing talents with the world! Have a great day…and a Happy Thanksgivng!
Hi Gail,
I think giving it to your cousin is so nice of you. I know she’ll love it!
I edited the post because Sugarbelle’s Sunflower Cookie Cutter is my hedgehog cookie cutter. Photos coming soon! 😉
Very cute!! Would love to experiment with this cookie cutter. I always need more “fall” themed cookie cutters. Thank you for this wonderful giveaway!
I love these cookie cutters.
I have been so thoroughly impressed with your blog and am beyond inspired to transform this fascination into a hobby. I have been admiring and researching royal icing cookies for over a year now and am finally taking the plunge to making my own. I have loved every email sent since subscribing and can’t wait to debut my first real set of cookies at Thanksgiving. These scarecrow cookies would make a great addition. Thanks for the instructions!!
Welcome to the great world of cookie decorating! It doesn’t get much better than this! Let me know if you need anything!
Bear hugs!
Great tutorial and thanks for adding the bit at the end of the write up about the airbrushing.
Great addition to the fall collection!
Absolutely love!
As close as Sweet Sugarbelle lives to me, our Michael’s doesn’t carry her cutters. ? I would love this one!
Thanks for all your great tutorials! I’ve learned tons from you and still remember how nice it was to meet you in person at CookieCon. You are amazing.
Recently signed up to your blog. I’m just starting my cookie journey. Thank for all you share!!!
Love your scarecrow! Thanks for the great video. Such a big help
What a fun and friendly scarecrow …for a fabulous fall!! (I haven’t had any coffee yet, can you tell lol ?). Seriously though, thanks for sharing all things cookie – your passion is contagious!
Lisa – this scarecrow is the cutest! I just had a new great-niece born this morning and her mom LOVES autumn. Little girl scarecrows will be the perfect thing to take to visit the new baby. I am addicted to your blog! I have learned so much from you. My entire family requests decorated sugar cookies for birthdays and every other gathering! You are truly my inspiration. Thank you so much for doing what you do!
Awe! Congrats on being a aunt! Your so blessed and I hope her mommy likes the girl scarecrows. Will you send me a picture or tag me in your photo? I’d love to see a girl version of this guy. 😉
Bear hugs,
Lisa
Those are adorable!
I love these cookies!!
Awww… Thank you so much for helping me with the link! and I love cookie cutters more this one is so cute! Thank you for this giveaway!
Adorable! You are such a great artist and cookie educator!! 🙂
Thank You for the opportunity to win this cookie cutter…but, also Thank You for the many tutorials ! Your tutorials are very informative ! Thank You again for all you do for us beginning cookiers !
Gah!!! So cute! I hate to confess, but I actually don’t own any of Callye’s cutters yet! But I want to change that! And would love to win some 🙂 We had twins earlier this year so I haven’t been back to making cookies yet, but am planning to for Thanksgiving! The scarecrow & sunflower would be perfect!
These are great, the Sugarbelle line is amazing! Thank you for sharing your awesome works of art!
I am loving all your blogs! So many adorable ideas! Thank you for continuing to put out such fun information!
Such a cutie scarecrow. Can’t wait to see the hedgehog tutorial. I’ve just subscribed to your wonderful tutorials, and I’m hooked on you . (There might be a cookie for being hooked…)
I follow you on fb and Pinterest and love your tutorials. I bought sugarbell’s cutters but never saw the scarecrow! Pick me please?
How adorable!! Michael’s stores in Michigan carry absolutely NO sugarbelle cookie cutters yet!! I’ve tried contacting them, and I get no reply. Anyways, I’m hoping that will change and they will get her entire line in the Michigan stores!! In the meantime, thanks for this great tutorial!! You rock!!
I bake for fun for my friends & grandbabies they will love these adorable little scarecrows 🙂 Thank you for always posting the tutorials for us – HaPpy FaLL YaLL!!
Love your posts, instructions, ideas – didn’t think you could top all that BUT now a giveaway! Hooray!! I, too, love Fall.
Love all your tutorials and this scarecrow is so cute thanks for taking the time to do this, very inspirational.
These are adorable! Thank you to both of you for all you’ve done for the cookie community. ?
Your the best!!
So cute! I’m just starting to get into cookie decorating and I’m definitely learning a lot from your page! Thanks for the tutorials and wonderful design ideas. 🙂
Soooooo cute! I want to make these for my Thankgiving table!
Thank you for the opportunity to win this cute cutter so we can make your adorable scarecrow cookie.
I love all your ideas!
You inspire me to make new designs. You’re scarecrow is beautiful. I love the sunflower. It completes the cookie. Thanks
The 3 Michaels in my area don’t carry her cutters ?. I ordered a bunch of items off HSN but I didn’t see the scarecrow one. It would be awesome to win this to add to my collection. It’s so cute!!
Btw, I love all your videos and cookies!!! You’re so creative!!
I am so excited to try the scarecrow. I agree with you, those are so adorable, and fall is my favorite time of the year as well. I started decorating cookies last year at Christmas. My husband teaches at the University of Nebraska in Kearney (UNK) as an Industrial Distribution professor. I love to make treats for his classes, and last year for the sub for Santa party that the students put on for the kids in our town, I was asked to make 100 cookies. I couldn’t just do chocolate chip, so I decorated sugar cookies, and no two were alike. So now the students are always asking for fun cookies, that my husband so willing volunteer’s me for. I have definitely caught the bug. My sister is flying in to town next week and we are going to make cookies while she is here. She will definitely catch the cookie bug like me. Thank you for your great tutorials, they have helped me a great deal.
I just want to say I decorate cookies for every holiday and love this scarecrow for fall. I teach students how to create RI cookies and your blog and ideas inspire me to do more!
Very Cute!!! Thanks for a GREAT Tutorial! Unable to buy SugarBelle’s Cutters here. I wish Michael’s sold these cookie cutters online. I’ll just have to keep my fingers crossed & hope that I win!
Very cute! I need to practice more.
Fall is a beautiful time of year but it’s still almost 90 degrees here in Charleston,S.C. Could use some cool temps here because we are melting. Leaves aren’t changing and we are still recovering from hurricane Matthew! Cookie baking is a stress reliever.
Your cookies are absolutely adorable and I love following you as you have helped me so much during my cookie journey! I will be attending cookie con for the very first time next March and hopefully we will meet. Also, I am located in Tennessee too..a small town outside of Nashville! ?
I’d love to see you at Cookie Con Kristy. Come find me so us Tennessee girls can chat! 🙂
HI Lisa,
I will! I am so looking forward to a fantastic weekend in SLC and meeting all my cookie idols in person. Enjoy your evening! 🙂
This is so generous of you!
OMG, I am on vacation right now and have been making my husband stop at every Michaels we see. I have been through 4 states and have yet to find them!!
I think your work is soooooo wonderful!
I can not wait to try making some sort of cookie! LOL
Have a great weekend and thank you so much for sharing! Angel
I love your cookies! I started following you on Instagram and have been obsessed with your designs! I go to school in Nashville and am originally from California. I’m planning on using my winter break to bake all the time and just keep practicing on my decorating skills. It is so generous and thoughtful of you to do this giveaway! I have 2 cousins under 6 years old and I love baking for them, especially around the holidays. Unfortunately, I can’t make it home for Thanksgiving this year but I am fully planning on sending family a few boxes of cookies to send everyone a bit of love. I hope you have a wonderful season and I can’t wait to see what you make next!
Adorable love your work
Thanks for the tutorials. I am a big fan. New cookie decorator, and your site is a big help through my journey into decorating sugar cookies. Thank you again!
I finally found a cutter in New York City! Last one at Michaels!! I’m from Ohio. I go out of my way to get what I want. ? I love the way you decorate and all of the recipes you post. This little guy rocks!!
I am new to cookie decorating and I love it, but I never imagined how much joy I would get from giving my cookies to people. Everyone loves them! I am hoping with time to get better on my techniques. Love your blog!
Fall is my favorite season for decorating cookies too!!! I LOVE the scarecrow… he is so adorable!! I’d love to add those cutters to my collection ❤️
So, So CUTE!!!!! I would LOVE to give it a try!! Always enjoy watching you decorate!
Very cute! and detailed. Thank you for all you do to help us to be better decorators! I look forward to and enjoy every post! You’re amazing!
Love your tutorials. Always giving lots of great ideas.
I absolutely love these! Makes me excited about Fall❤️
Thanks for all your videos. As a newbie I learn a lot. These are 2 cutters I don’t have even though my collection has grown so quickly. ?
These are adorable!!
Great tutorial! I’ve looked at my small town Michaels for the cutters and no such luck!!
You are so generous to share your skill with the world. Your videos are so incredible. Thank you so much!
Love you blog! It was the first one I bookmarked when I started decorating cookies!
The cutest scarecrow cookies ever!
Thanks for an awesome giveaway!!! I love her cutters and stencils…great for taking guess work out! Would love to add this cutter to my collection. Great video….thanks!
Thank you for your time . I had great praise for the cookies I have just started to do and you have giving me the courage to complete them. Thank youm
Love the cookies and tutorials! I’m always amazed at how easy it looks to decorate the cookies so flawlessly. However, I know it takes time and practice! ?
Just bought some of your Christmas cookie cutters!!! I’m so excited to try them! I love all your cookies!
Hi Emily,
The cutter line is Sweet Sugar Belle’s. You can see her work here http://www.sweetsugarbelle.com. She’s amazing!
I knew as soon as I sent it that I was incorrect! LOL what I meant was, I bought the cookie cutters cause of inspiration from your cookies. And I love her’s too! ?
Your scarecrow is SUPER cute!! So whimsical, fun and fairly simple! Thanks for sharing your tutorials!
I would LOVE to win these cutters! Thanks for the give-away!
I love the use of the cutter as a hedgehog. Ive been wanting to make some for my breeder. Adorable!
I’ve looked for these cutters everywhere to no avail. None of my Michaels nearby carry them. Boo! Would love to win them! Thanks for the giveaway!
Fall is my favorite too! I would love to make these cute scarecrows! ????
I’m a total newbie at cookie decorating and I love it. I found your blog a few days ago and can only dream of my cookies looking as beautiful as yours. Thank you for all your tutorials. I would really like to win these!
Si cure! My nieces and nephews would love theses!
Love your blog! Always great ideas!
I love watching you’re video. I always learn something new.