This is MY BRAIN and You Can’t Have It Bouncer!
This post may contain affiliate links.
This tutorial has taken me a while to finish. Don’t get me wrong, it’s not because the cookies are hard to make. It’s hard because it’s an emotional kind of post. I think all of you know about my brain tumor, which I named “Bouncer.” I don’t want to go into the hard details of how sick I was because I want to focus on the positive. I’m going through recovery and getting better every day, but there’s one thing I have to say, and I decided to say it with cookies. Here goes, “This is MY BRAIN, and You Can’t Have it, BOUNCER!” Get out of my head and stay OUT!
WOW, I feel so much better. So no more focus on “Bouncer,” the Big Bad Brain Tumor. Instead, we can focus on brain cookies that will be cute for Halloween. Did I say cute? I meant to say creepy!

There are a few steps involved in making these cookies, and the fun part is that we get to use some fun tools for the plaque cookie. Have you heard of Sweet Stamps? It’s okay if you haven’t, because we’ll talk about them in a minute. If you have heard of them, I bet you love them as much as I do. I have a tutorial coming soon, so stay tuned.

- This Wilton Egg Cookie Cutter comes with a small bunny cookie cutter. I think my little bunny bounced into a basket and decided to stay there. If you think about it, you could say the bunny bounced away just like Bouncer did. Let’s forget about the bunny for now and focus on the egg.
- You can make brain cookies with different sizes of egg cookie cutters. This Wilton egg is 3⅞” wide x 4½” long. I like it because there is room to add the circle cookie cutter to represent the brain tumor.
- If you don’t want to add the brain tumor, you don’t need a circle cookie cutter. That would make this a good cookie for Halloween.
Are you ready to decorate?
Supply List for “This is MY BRAIN, and You Can’t Have it, Bouncer!”
(may contain affiliate links)
Recipes:
- Sugar Cookie Recipe
- Royal Icing Recipe
- Fondant Recipe- Here are three different sizes of fondant recipe so you can pick which size you need.
- Full Batch of Fondant Recipe or
- Half Batch of Fondant Recipe or a
- Small Batch of Fondant Recipe
- Cake Central Piping Gel That Works Recipe – Make your own piping gel with this recipe by JanH on Cake Central. It’s simple, and it makes your brain cookies look a little more creepy, like an actual brain.
Royal Icing Colors:
Cookie Countess Gel Colors:
AmeriColor Gel Color:
- Super Red Soft Food Gel for the Piping Gel Recipe
Cookie Cutters:
Egg with Bunny Cookie Cutter Set– This is a Wilton Set, and the dimensions are about 3⅞” wide x 4½” long x 1″ deep.
Circle Cookie Cutter- The one used in this set was 1 1⁄4″, or you can match the size to the egg cookie cutter you use.
Sweet Stamps:
- Sweet Stamps – I have two sets of Curly Letter Set Upper and Lower Case set.
Hillary and Jon at The Cookie Countess sent me a set along with the tacky pad and the brush duo because I was going to do demonstrations with them at Cookie Con in March. Instead, I ended up having brain surgery the day I was supposed to arrive at the conference. My tumor (Bouncer) is gone, and I feel so much better. And thanks to Hillary and Jon, I can now write on cookies! They’re amazing!
I loved the Curly Letter Set so much that I purchased another set. Writing on cookies isn’t stressful for me anymore. Thank you, Hillary and Jon, for the gift and for introducing me to Sweet Stamps!
Sweet Stamps Tacky Pad Base
Sweet Stamp – Professional Brush Duo
Edible Art Edible Paint – Black
Airbrush:
The Cookie Countess Airbrush Colors:
Tools:
- Turkey Lacer
- Tipless Decorating Bags- Truly Mad Plastic or Flour Box Bakery
- Rainbow Dust Professional Cake Decorators Food Pen Jet Black, or another brand of black food-safe pen
- PME Paint Brush for the red food gel, or get them on Amazon- PME Paint Brushes
- Ball Tool
- Cookie Turntable
- Fondant Roller
I know this looks like a lot of supplies, but if you’re a baker, you probably already have most of them. The Sweet Stamp supplies and the Edible Art Edible Paint are new tools for me. We can finally write on cookies with these products without stressing out.
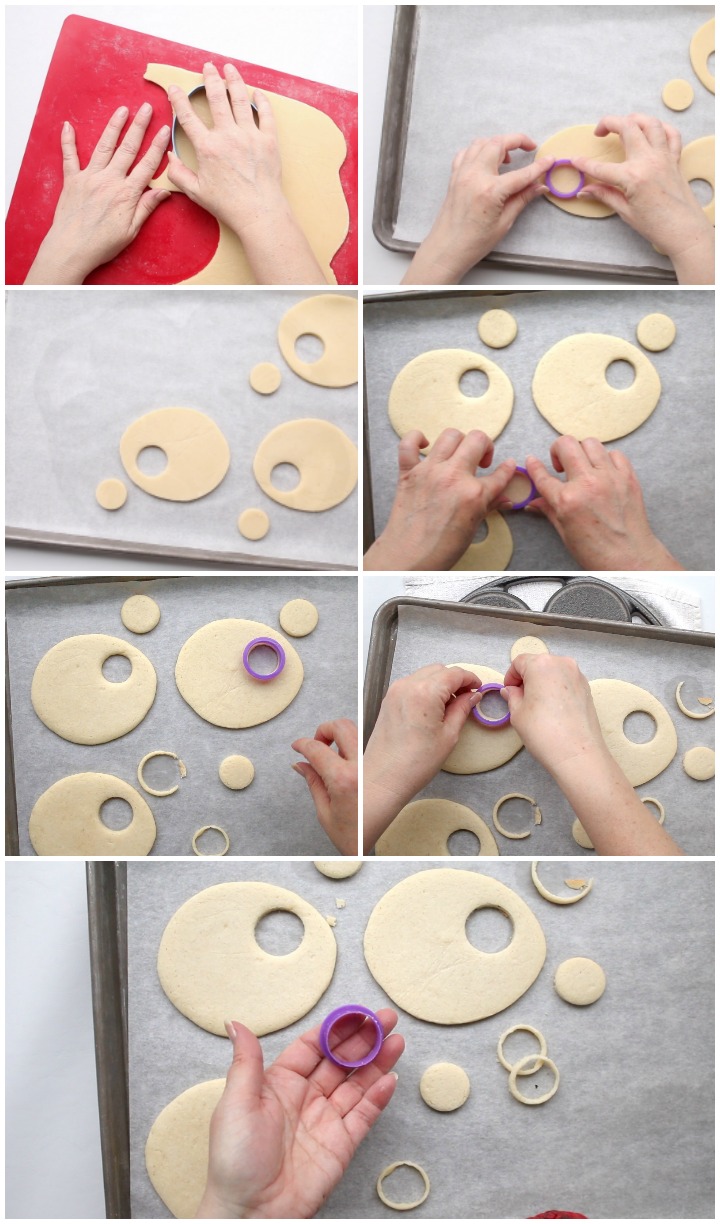
- Begin by making your cookie dough. Place it in the freezer for about five minutes to make it nice and cold. You might decide to leave it in there for ten minutes. Keep in mind that when the dough is frozen, and you try to cut out shapes, the dough can break, so let’s go for nice and cold and not frozen.
- Then, cut out the egg shapes.
- Place the egg shapes on your baking sheet and cut out the circle. You can make yourself a template if you want them all in the same place.
- Bake the cookies according to your recipe directions.
- When the cookies are removed from the oven, use the circle cookie cutter to recut the circles down to the original size. We all know that cookies can expand when they’re baked, so we need to work fast because this needs to be done while the cookies are still warm.
- After you have resized the circle cookies, repeat the same step for the circle in the egg cookies. This will make sure all the circle cookies fit into the egg cookies after they’re decorated.
TIP– A copper, tin, aluminum, or stainless steel cookie cutter would be better than a plastic cookie cutter since the cookies are hot. I’m glad the plastic cutter didn’t melt!
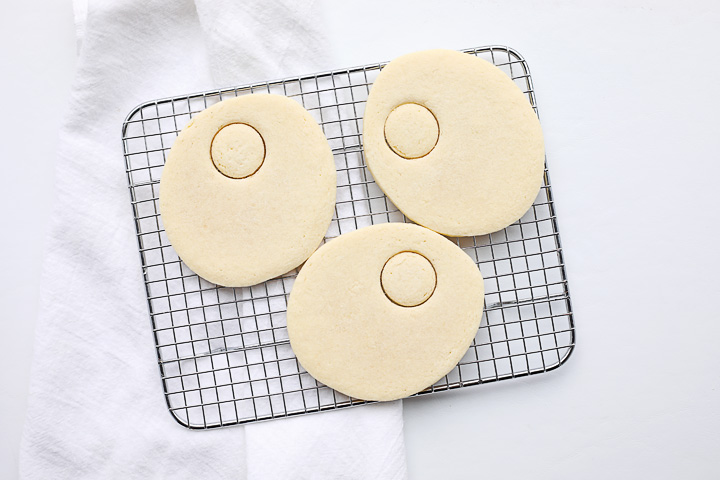
- Now that you’ve cut the circle cookie and the hole in the egg cookie, they fit perfectly. If they seem a little snug, you may need to use a hand-held grater to trim some off the edges, but be careful and don’t break the cookie or grate your hand.

- Time to mix the royal icing colors. Let’s start with the pinkish color. To make this pink (or a light pink icing), mix two of The Cookie Countess Countess Gel Colors. Mix a little Countess Pink Gel color with a little Positively Purple Gel Color. This is my new favorite royal icing brain color.
- The icing color for the circle cookie was made with The Cookie Countess Positively Purple Gel Color.
- Outline and flood the egg (brain) cookies with the pinkish royal icing. Set them aside and let them dry.
- Next, outline and flood the circle cookies with purple royal icing and let it dry.

- It’s time for the fondant. I always try to make it the day before I use it, so I know it’s ready.
- Fondant Recipe- Here are three different sizes of fondant recipe so you can pick which size you need.
- We’ll use the same gel colors we used to make the royal icing pinkish color.
The Countess Pink Gel Color
Positively Purple Gel Color.
- Add equal parts (I added a drop of each color) and then knead the fondant.
- Keep it covered with plastic wrap until you’re ready to use it, so it doesn’t dry out.

- Break off a piece of the fondant and roll it out into a long string that looks like a sausage.
- Paint the egg cookie with a little water so the fondant will stick and look like a brain. Don’t use too much because it’ll break down the royal icing.
- Find the center of the brain cookie. Start zig-zagging the fondant back and forth on one side of the brain. Make the zig-zag from the top all the way down to the bottom.
- Fill in the rest of that side with swirls and curls until that side is covered.
- Repeat for the other side of the brain.
Is it starting to look like a brain to you?
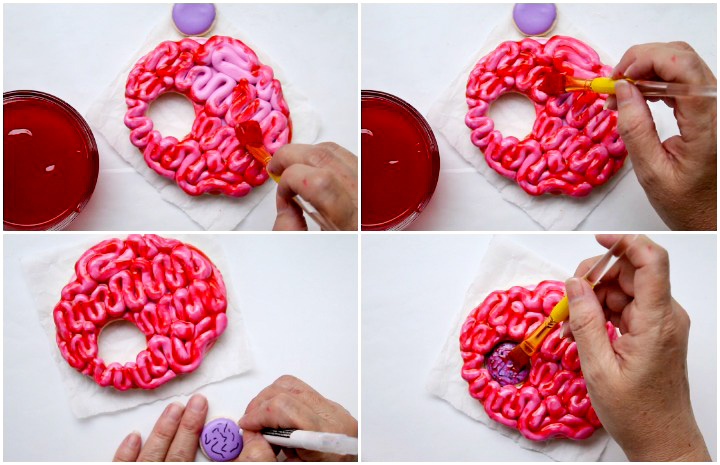
It’s time for the piping gel.
- You can find the recipe at Cake Central: Piping Gel That Works Recipe.
- Add a little AmeriColor Super Red Food Gel Color to get the red piping gel.
- Let it become room temperature before you paint it on the fondant.
Time for the tumor cookie:
- Once you have covered the top and sides of the cookie with the piping gel, add the squiggly lines to the circle cookie. The squiggly lines will make the circle look like a purple tumor cookie.
- Place the tumor in the hole of the brain cookie. I lifted the brain cookie, placed the tumor cookie on the table, and then set the brain cookie on the tumor. I didn’t want to mess up the fondant by adding the tumor cookie through the top. You can see how it’s done in the video below.
- Once you add the tumor cookie, paint it with a little of the piping gel.
- Let the cookie dry completely, or serve while the piping gel is a shiny and creepy.

Time for the Sweet Stamps.
Here are the Sweet Stamps everyone is talking about. They’re wonderful and easy to use. I’ve always had a hard time writing on cookies, and this makes it so much easier! Yes, these letters are in fondant, but you can make them work on cookies as well. I’m working on a tutorial now, and it’ll be done soon. I hope you get a chance to play with Sweet Stamps soon because I think you’re going to love them.
- The hardest part is getting the letters out of the tray for the first time. I used my turkey lacer to help pop them out, but be careful! You don’t want to break the letters, so go slow and take your time.
- Pop out the letters you’ll need and lay them on the table the way you want them to appear on the cookies.
- Once it’s laid out, take the Sweet Stamp Tacky Pad and gently press onto the letters. Be careful so you don’t make the letters slide around. Hold it still and steady while pressing.
- Lift the Sweet Stamp Tacky Pad, and your words will be on there backward. That’s good. That means they’ll be pressed into the fondant in the correct way.

Time for the plaque cookie.
- Roll out the pinkish fondant.
- When you think about a plaque cutter, you need to focus on the size of the cutter. If you have a small word, it won’t be that much of an issue for you. If you have multiple words or a large word, you need to focus on the size and shape of the plaque cutter. So take a minute and find the right cutter for your word or words.
- Next, roll out the fondant, but don’t roll it out super thin. You need it to be a little thicker so it’ll show the letters when you stamp it.
- Press the words into the fondant.
- Gently press the tacky pad down, so your words will be easy to read.
- Gently lift the tacky pad straight up.
- Place the plaque cutter over the words on the fondant and cut it out.
- Paint a little water on the cookie.
- Add the fondant to the top of the cookie and move it a little to place it in the middle of the cookie.
- Once the fondant is in place, use the ball tool to decorate.
- Now it’s time to paint the letters with the Edible Art Edible Paint – Black and a Sweet Stamp – Professional Brush Duo. You can see how easy it is in the video. Just go slow and have fun.
- Time to airbrush. Airbrush the edge with The Cookie Countess Airbrush Colors Vivid Violet.
- Next, airbrush the edge with Royal Red Velvet. Lightly airbrush the center also.
- Finally, lightly spray Countess Pink all around and do a light spray.
- Let it dry.

This is the bye-bouncer plaque you can see in the video. The final picture looked better with the letters painted in red. The plaques look good when sprayed with White Jewel Dust Edible Glitter. This is my favorite plaque because of the lavender spray, but the other one looked better in the picture.
I think the reason I like these plaque cookies is that they say bye to Bouncer. I’m totally on board with that! No more Bouncer ever!
This is MY BRAIN, and You Can’t Have It, Bouncer! Video
Here’s a video for you. I hope you enjoy it! Let’s make these again in October because making brain cookies for Halloween will be fun. What do you think about making them with bone cookies? Would that make things too creepy? I hope not!

I’m going to admit that this post and these cookies were a little hard for me to make. It’s an emotional post, but I’ve learned so much since I was diagnosed. I learned that you all have hearts as big as the great outdoors. You have shown me love and kindness and have prayed for my family and me. I’ve never felt so blessed in my life. I’m alive because you all cared about me.
All the sickness came from that brain tumor that was the size of a tennis ball. Yes, a tennis ball! It pressed my brain to the right side of my head. It made me have blind spells where everything was white for minutes at a time. I couldn’t see, and it was terrifying. Bouncer made me violently ill for months. He made me suffer headache after headache. That tumor made me forgetful and repeat things I had no idea I was repeating. ‘Bouncer’ was strong, but you all are stronger. You prayed and sent love. You showed me how love can change a person’s life, and I’m very blessed. I’m thanking God for listening and answering everyone’s prayers. Thank you for being stronger than “Bouncer” and for loving me! I love all of you!
Bear hugs,

Bear hugs to you Lisa! It makes me so happy knowing that you are feeling much better now! You and your family will continue to be in my thoughts and prayers!
Have a great week and weekend coming up!
These cookies are cute but more importantly I’m so glad you are healing. I’ve been praying and following your journey and happy that “bouncer” is gone. Love and Hugs and thanks for all of the inspiration you have been to so many?
Thank you for your prayers Janine. Everyone’s prayers and love is why I’m still here. Thank you!
Bear hugs,
Lisa
Lisa,
I am not sure why I didn’t know about bouncer ( the jerk!). Daily praying for you , complete healing in Jesus name !! Hugs
DJ Franklin
B’ham , Alabama
Hi, Lisa ~ I had no idea, but I am SO very glad that you are doing better. Thank you for ALL you do and share with everyone ~ I’m a huge fan and love your work!. 🙂 Love and hugs, Diana
Thank you Diana! You have no idea how much your love and hugs mean to me. Thank you!!!!!!
Love and hugs to you!
Glad to see you are well enough to be posting cookies. Praying you continue to do well with your recovery.
Happy to hear that you are doing well and getting stronger, Lisa. Prayers for you and your family for continued healing and Blessings.
I am new to your blog and amazed by the cookies that you create. I am happy that you have overcome this bouncer. You have a wonderful gift. I look forward to seeing your beautiful creations! XOXO and hugs!
Hey Lisa…am glad to read your post and this is an awesome way of fun with kid…i will trying to make this..brain cookies..Thanks for sharing…!