How to Make Adorable Polar Bear Cookies
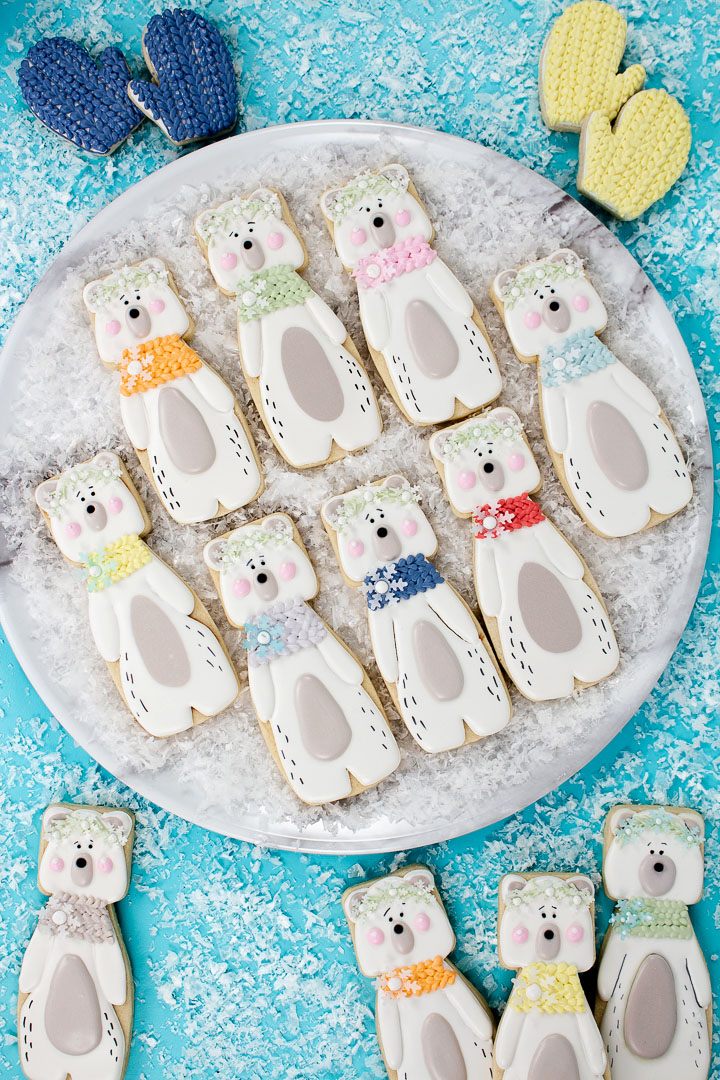
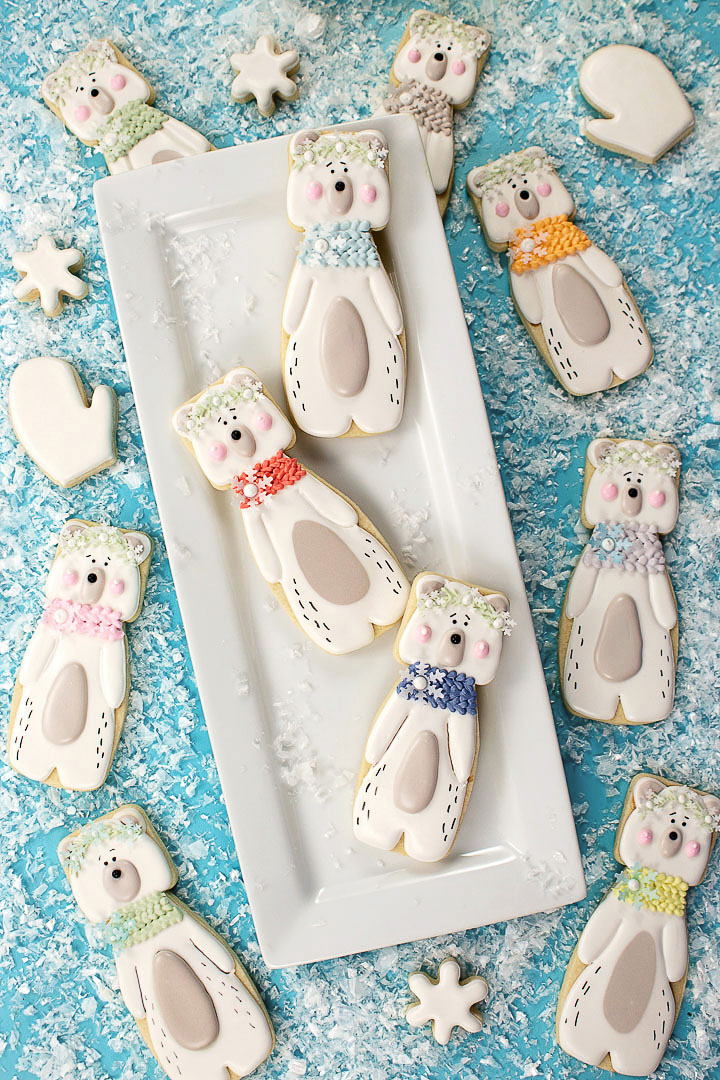
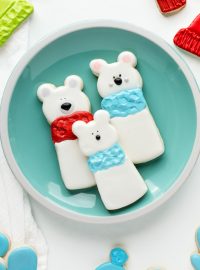
Do you have a favorite animal? I bet you can’t possibly guess what my favorite animal is because I never turn it into a set of cookies. okay, I know you don’t believe me so I’ll confess that bears, all bears, are my favorite animal and I love making animal cookies. As a matter of fact, here are some adorable polar bear cookies that are cute and delicious.
Before we begin, there are some things in this tutorial I haven’t shared with everyone before, but the wait is over. Today we’re going to use several colors of royal icing in a different consistency and we’re going to add a few fun snowflakes to give the bears some chilling accessories.
Supply List for How to Make Polar Bear Cookies:
(may contain affiliate links)
Recipes:
Sugar Cookie Recipe
Royal Icing Recipe
Royal Icing Colors:
(We’ll talk about royal icing consistency in a minute, but here are the colors that were used for these polar bear cookies)
The Cookie Countess Gel Colors:
- Countess Pink
- Outrageously Orange
- Sunshine Yellow
- Brick Red mixed with Royal Red Velvet
- Mushroom Gray
- Beachy Blue
AmeriColor Soft Gel Paste Food Colors:
Wilton:
Tools:
- Turkey Lacer
- White Wafer Paper
- Snowflake Stamps or you can purchase wafer paper snowflakes that are already cut out from Intricut Edibles. I found out about Intricut Edibles from Blyss Cookies who are amazing! I love everything Blyss does and I can’t wait to see them at Cookie Con in February because nice talented people at Cookie Con make the world a happy place!
- Tipless decorating bags from Truly Mad Plastic, Flour Box Bakery or The Cookie Countess
- Rainbow Dust Jet Black Double Sided Food Pen
- Black Nonpareils
- 4mm black dragee
Optional:
Cookie Turntable Swivel for Cookies and the Mini Mat
Fan to dry your cookies
Airbrush System and Airbrush Colors:
The Cookie Countess Airbrush System
The Cookie Countess Airbrush Color:
- True Blue for the wafer paper snowflakes
Royal Icing Consistency:
The icing for the scarves is a thick royal icing that will hold it’s shape once it’s piped.
The rest of the royal icing is a little thinner, but it’s still thicker than my usual 15-Second Royal Icing.
I tried something new with these cookies. If you saw my Cute Valentine’s Day Panda Bear Cookies blog post, you probably noticed I said my icing had been getting craters the last few batches. I found a tip from Sweetopia a long time ago and a tip on Coriannes Custom Cookies to help prevent them. The tips work, but I wanted to play around with my royal icing consistency to see if I could make the craters stop.
These adorable polar bear cookies are decorated with a thicker royal icing. It’s not my normal 15-Second Royal Icing. It’s a little thicker, more like a 20 to 25-Second Royal Icing and guess what? It worked well and two days later the icing is still smooth, full and doesn’t contain a single crater. I’m going to have to play with this thickness more because I’m kinda loving it right now.
Before I settle in on this consistency, there needs to be more experimenting with different consistencies to see how they hold up to this weird Tennessee winter weather. I’m going to try 10-Second Royal Icing and see how that works and I’ll let you know the results as soon as the cookies dry. Stayed tuned to see the results.
How to Make Adorable Polar Bear Cookies Video:
Polar Bear Cookie Tutorial:
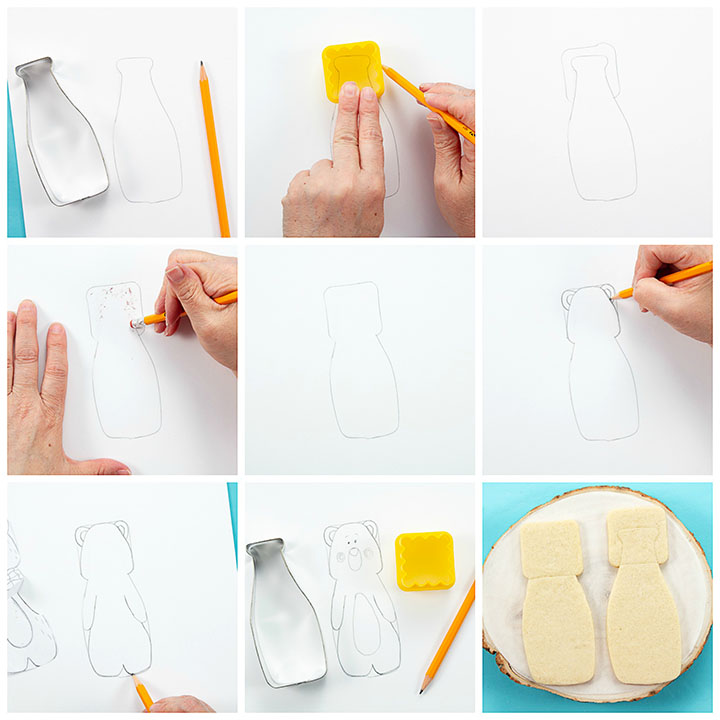
- Would you have ever guessed that a bottle and a square cookie cutter made these bear cookies? You should watch the video to see how easy it is to combine two cutters to make cute cookies.
- You don’t have to draw this bear because it’s simple to do now that the pattern is in place, but I wanted you to see how easy it is to make a fun cookie with two random cookie cutters.
- If you look at the last picture you’ll see two different ways to cut the dough. I highly recommend you cut out the dough like the second cookie. It’s more sturdy and won’t break as easily and the one with the square placed at the top of the bottle before it bakes. I’ve baked and made a million cookies like the first one, but the second cookie is more sturdy and makes me feel more confident. Now you know my opinion, but you make the one that makes you comfortable.
- Roll out your cookie dough and place it in the freezer for ten to fifteen minutes so it’ll be nice and cold and simple to work with.
- Next, cut the bottle shape cookie dough and then cut out the square.
- Use the top of the bottle cutter to cut out that shape in the square dough and try to get the top of the bottle close to the top of the square because it makes a great sized bear cookie. You can place it midway in the square which will make a taller bear with a longer neck if you’d like. It’s up to you on how tall to make your polar bear cookies because this bear belongs to you.
- Place both shapes of the dough on a cookie sheet lined with a Silpat or parchment paper.
- Gently place the square dough over the top of the bottle and gently press it together. Don’t press hard. Just gently press the shapes together and bake according to your recipe directions.
- Let the cookie cool completely before you decorate them.
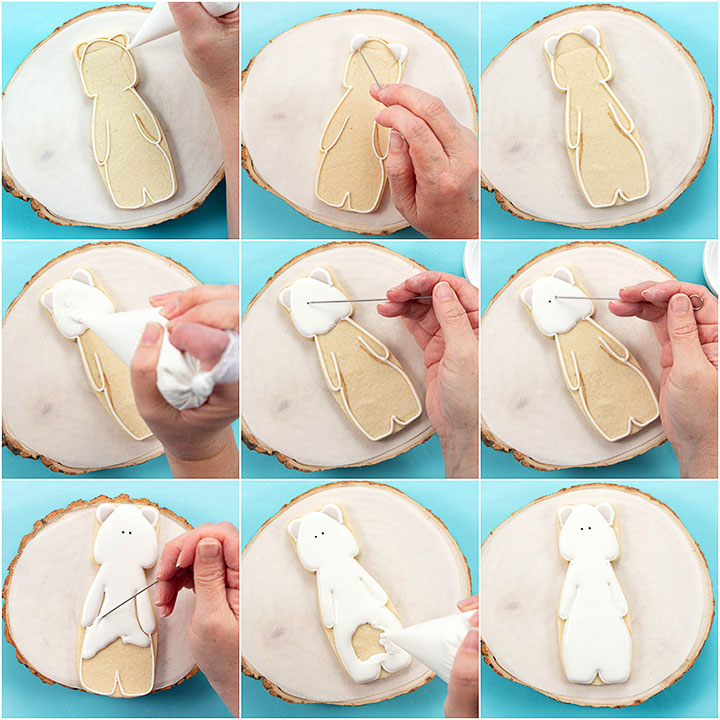
- Outline the bear with the white royal icing and let it dry for about ten minutes.
- Flood the ears with the white royal icing and then add the gray while the white is wet.
- Use a turkey lacer to smooth it out and spread the gray icing into place.
- Let the ears dry for about fifteen minutes.
- Begin flooding the rest of the bear and start with the head or the arms. I did it both ways and I prefer starting with the arms since we need to be careful to not push the icing over the outline.
- After you flood the face add two black nonpareils for his eyes. An easy way to add the eye is to dip your turkey lacer into a small amount of water. Touch the tip of the turkey lacer on a paper towel and then touch a nonpareil and it will stick to the turkey lacer. Place it on the bear where you want to place the eye. Repeat for the other eye.
- Finish flooding your bear and let it dry completely.
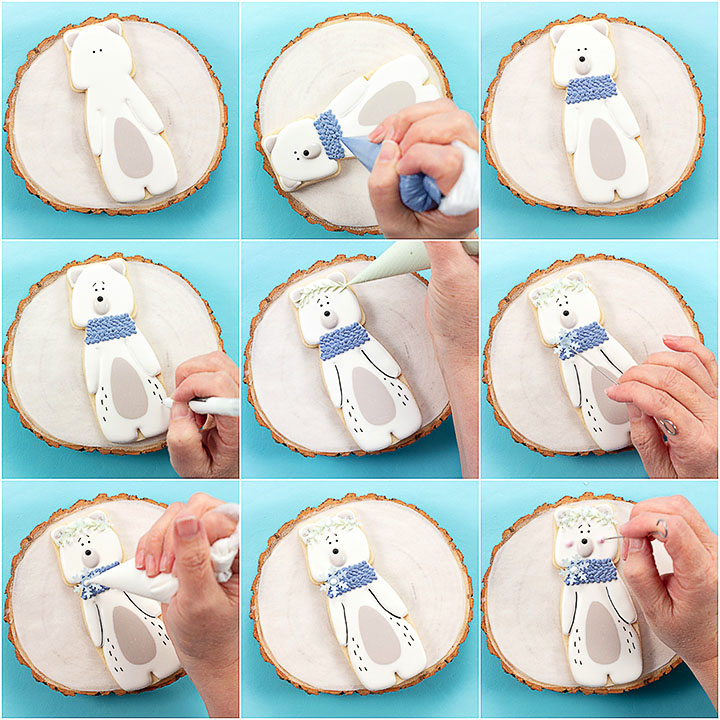
For the tummy, you can do a wet on wet technique and add the gray royal icing while the white is wet or you can let the white dry completely and add the tummy when you add the scarf. If you look in the picture above you’ll see it done both ways and you can see which one you like better.
- Pipe the muzzle with the gray icing and add a 4mm edible nonpareil for the nose, but you can use black icing for the nose and eyes if you prefer.
- Use the jet black food pen to draw the eyebrows and the lines beside the tummy.
- Pipe the scarves by piping small hearts close together in a row. For the second row, turn the cookies to the other side and pipe more hearts. Doing them upside down and side by side will make it look like a knitted scarf.
- Next, pipe green lines to look like a pine branch at the top of the head because we all need a pine branch headband.
- Add the snowflakes and pipe a white dot inside each snowflake so it will look a little fancier.
- Pipe pink cheeks and add a white dot to each because the dotted cheeks are adorable.
- Let the cookies dry completely.
I know the supply list seems long and there are a few more steps to this cookie because most of my cookies are super simple and flat. Adding dimension isn’t hard and it makes cookies look a lot more customized and I totally plan on keeping it up in the future because it’s pretty.
Before we go, look at the two bears at the bottom of the image below. Notice one has a puffy tummy and one has puffy cheeks because I wanted you to see the difference when the cookies are side by side. Which do you like better? Personally, I like the raised tummy and puffy cheeks. I hope you make some adorable bear cookies and share the photo with me because you and bears make me very happy!
Bear hugs,





Adorable polar bears!!! BTW, your comments feature on the You Tube video is turned off so I could not leave a comment about how adorable the bears are!!
Youtube has updated how they handle videos that are kid-friendly and part of that is disabling all comments. They want to make sure the videos are 100% safe so not allowing comments will help them control that. I’ll miss the comments but I’m glad the kids will be safe on my Youtube channel.
Thanks for coming here to leave a comment. You made my day!
Hugs!
Lisa, thanks for the tip to use a paper punch to punch edible wafer paper for the snowflakes! Brilliant!
Hi Sherrie!
That tip was on Blyss Cookies blog and it’s amazing! They even shared where to purchase wafer paper cut-outs! If you haven’t been to their blog you need to go because it’s full of eye candy, or should we say eye cookies!!!
https://www.blysscookies.com/
PS- Be sure to tag me or share your cookies with me! I’d love to see your amazing work!
These polar bears are SUPERCUTE! Creative use of cutter,, Beautiful colors and design. Love them!
Lisa,
Thanks so much for featuring our wafer paper snowflakes in your instructions! Just saw this today. Stay warm friend!