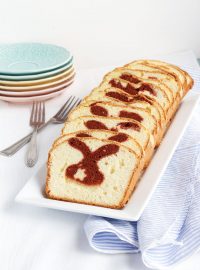
How to Make Cute Easter Egg Cookies
Can you believe it’s almost Easter? Where does the time go? I know most of us are stuck at home because of the coronavirus and we’re not really sure when things will start to go back to normal, but we can stay positive and do things that make our hearts happy like decorating cookies. These Cute Easter Egg Cookies remind me of being a kid and dipping those eggs into that small bowl of smelly vinegar and food color. It makes me happy because I remember doing this with my grandpa and he always made me laugh. It’s a good memory I’d like to celebrate every year so this is my new Easter cookie staple.

Are you decorating cookies since you’re home? Leave me a comment and let me know what you’re creating while you’re snuggled in your sweet, sweet home.
Supply List for How to Make Cute Easter Egg Cookies:
(may contain affiliate links)
Recipes:
Cookie Cutters:
- Egg Cookie Cutters- You’ll need two cookie cutters to make this set of cookies. One cutter needs to fit inside of the larger egg cookie cutter so you can trim them down to make the larger one look like a bowl. Don’t stress, you can see how to do this in the video and it’s simple!
- Thermometer Cookie Cutter– I got this cute little cookie-cutter at Cookie Con. Autumn gave it to me and I’m so happy it worked for what I had planned. You can find them at Country Kitchen Sweetart along with all kinds of other goodies. Thanks, Autumn for the perfect cookie cutter.
Royal Icing Colors:
- White
- Green thick royal icing to make the leaves under the flowers on the bowl. You’ll also need leaf tip #352 to another leaf tip to make the leaves.
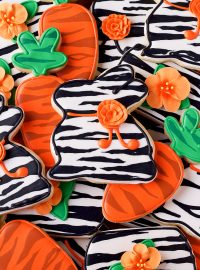
- The Larger Egg Cookie Cutter is decorated with AmeriColor Turquoise Soft Gel Food Color
- Decorate the smaller eggs any color you’d like. I mostly used The Cookie Countess Gel Colors to make this set and they are:
- Yellow-Neon Bright Yellow
- Pink- Neon Bright Pink
- Purple- Neon Bright Purple
- Orange- Neon Bright Orange
- Green- Neon Bright Green
and I used Wilton No Taste Red for the cute little egg at the top of the photo. If you want to make the egg holder cookies or if you want to write the colors on the bowl you’ll need a thick black royal icing.
Tools:
- Apple Blossom Royal Icing Transfers– You can use any color or colors you’d like. I made them out of the same colors I used to decorate the small eggs. You need to make the apple blossoms a few days before you make the eggs in the bowl so they’ll be nice and dry.
- Turkey Lacer
- Tipless decorating bags from The Cookie Countess & Flour Box Bakery
Airbrush System:
Airbrush Colors:
Optional:
- Cookie Turntable Swivel for Cookies and the Mini Mat
- Fan to dry your cookies
How to Make Cute Easter Egg Cookies Video:
If you watch the video you can see how I made the pattern for these cookies. It’s simple and I made a little picture and instructions for you so click the link below to get it.

- I love the color of this bowl because turquoise is a beautiful color.
- To decorate the bowl paint a little of the turquoise royal icing on each side of the egg.
- Next, outline the bowl and let the outline dry for about ten minutes.
- Flood the bowl and let it dry completely.
- Use The Cookie Countess Mermaid Teal Airbrush Color to paint the inside of the bowl on each side of the egg.

- Mix a little black food gel color with a small amount of vodka so it’ll be the right consistency for splattering the bowl.
- Mix a little white food gel color with a small amount of vodka so it’ll be the right consistency also.
- Use a new toothbrush to splatter the black food gel on the bowl so it’ll look modern and hip.
- Clean the toothbrush or use another new toothbrush to splatter the white food gel on the bowl.
- Outline the top and the side of the bowl with the turquoise royal icing so it will look like it has a little dimension.
- Airbrush the side and bottom of the bowl with The Cookie Countess Mermaid Teal Airbrush Color.
- Let the cookie dry for about an hour before you move to the next step.

- After you mix the colors outline the egg and add some lines inside the egg so the icing will dry nice and flat. You might wonder why you see royal icing lines on some cookies these days. It’s because it will help you flood layer of royal icing dry and look nice and flat. Sometimes the royal icing can sink or dry and look uneven and this will help it look flat and smooth. I just thought I’d take a minute to explain those little lines inside the egg.
- Next, flood the egg and add a white line to give your little cookies a little bit of a shine because we all like a little shine on our Easter Eggs.

- Add two leaves to one side of the bowl and add the apple blossom you made ahead of time. If you don’t have an apple blossom you can make a rose, ribbon rose, or a swirl rose. The tutorial for the swirl rose is on a cookie, but you can make them smaller using tip #13 for royal icing flowers you can add to cookies like this one. Or you can skip this part and don’t add a flower.
Let’s make the little thing you use to get the eggs out of the vinegar mixture.
- This cookie cutter is a Thermometer Cookie Cutter from Country Kitchen SweetArt and it’s perfect for an egg dipper cookie!
- Outline the cookies with white royal icing and pipe the lines so your flood icing will dry nice and flat.
- Let the outline and lines dry for about twenty minutes.
- Flood the cookies with the white royal icing.
- Let the cookies dry completely.
- Pipe two circles on the thermometer. Pipe a large one on the larger end and a small one at the end of the stick.
- Then, pipe a line to connect the two circles.
- Pipe a squiggly line over the straight line and circles because that’s all you have to do to make it look like an egg dipper. You can see how simple it is in the video.
- Let the cookies dry completely.

- Now you can stop here or you can write the color of the eggs on the bowl so everyone will know what color the egg cookies will be dipped in. I didn’t share how to do the writing because I’m working on a post to share how to write. Writing on cookies is intimidating, but we can all do it. I’ll share it with you as soon as I get it done and since I’m home for a while I’m sure it’ll be soon.
I hope you get a chance to make these with the kids because it’s fun to plan the colors of the eggs and making the apple blossoms ahead of time.
What are you doing since you’re home? Are you playing with the kids or are you spring cleaning or are you watching your favorite movies? We love to know so leave a comment and inspire us to try something new. Just do me a favor and stay safe!
Bear hugs,


Lisa, These are darling cookies and so creative. I enjoyed reading about your memories coloring Easter Eggs with your grandfather. Take care.
These cookies are so clever! I love that you added the little metal dippers too.