Shabby Chic Cookies
This post may contain affiliate links.
Don’t you hate it when you are decorating cookies while singing Disney songs in your head and then all of a sudden……it happens! You reach for a cookie and poke your finger right into the icing! Then you scream, “NOOOOOOO” and everyone in the house comes running because they think you have broken your leg only to find out you messed up a cookie!! Who wants shabby chic cookies? UGH!
Then, you get frustrated and reach for another cookie and poke your finger in it! I hate when that happens! Well, that is exactly what I did when I was making these. I poked 3 cookies and pitched myself a little mini fit and took my fingers and poked them all! Then, I walked away feeling bad and very mad at myself and ate a bowl of ice cream to make myself feel better. After I ate my ice cream, I was still mad so I cleaned out my bathroom closet because I didn’t want to be in the kitchen.
When I finally went back into the kitchen and saw the beat-up cookies, I actually liked what I saw! I added a little green flower and there it was shabby chic cookies!!!

I love when something goes wrong and is then turned into something good. Now, these are not the cookies I was going to do a tutorial on, but sometimes things happen and you just need to go with it. I will make the other cookies for you later.
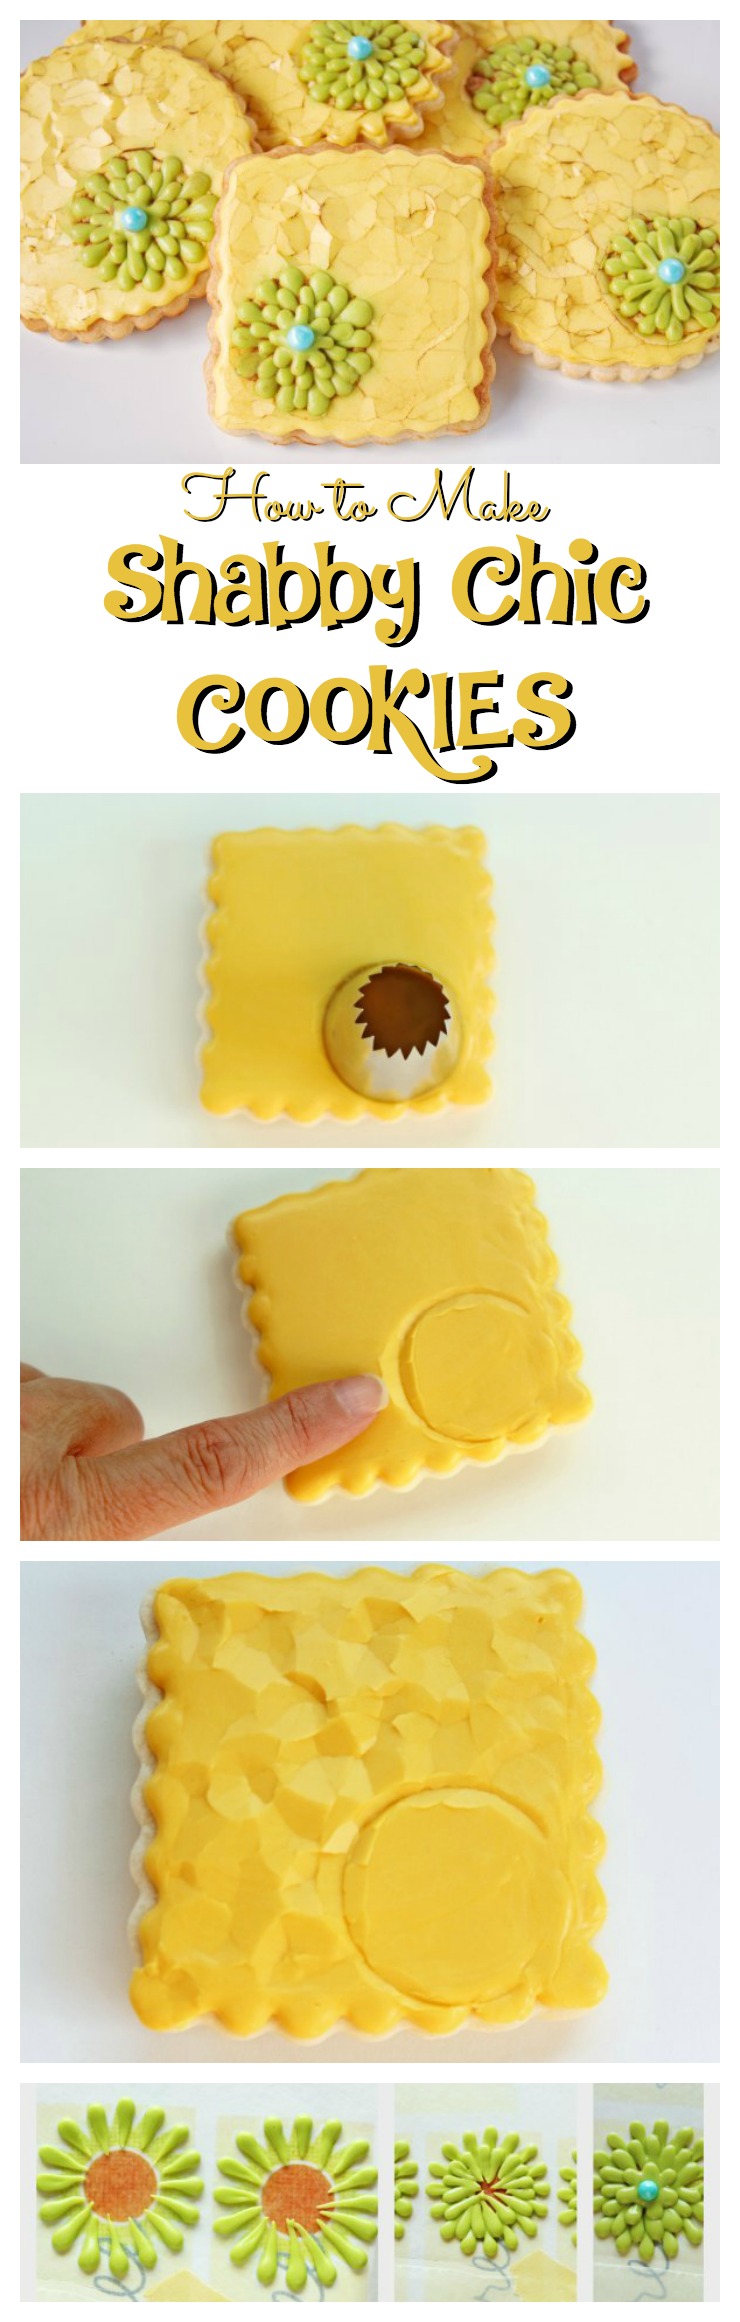
Supplies for Shabby Chic Cookies:
(may contain affiliate links)
Yellow Flood Icing
Green Outline Icing
Blue Candy Beads

First, outline and flood your cookies. I was going to add a cute little flower on this cookie so I started to trace the end of that big fat tip so I would have a guide. When I sat the tip on the cookies, the tip cracked the icing. I thought the icing was dry. I did the fan trick from SweetSugarBelle and they had set by the fan for 2 hours. The problem is, it was VERY HUMID that day. The icing was just dry enough to make me think I could trace it.

See the big round dent in the icing? This, and my finger, is what caused the little mini fit that helped clean out my bathroom closet. I took my finger and made some more breaks in the icing.

The key to this technique is the drying time. If you wait until the icing gets really dry, it will not break. If you try to push on it before the top dries, it will be a mushy fingerprint. The top has to be dry enough to crack. For me, it was 2 hours with a fan on a humid day. I suggest you make a test cookie and try to crack it to see when the time is right.

Now for the flower. With the green icing, I made the flower on the cookie using the circle as a guide. For this tutorial, I did it as a RI Transfer because I forgot to take pictures when I made the cookies. Sorry about that!
- I used a #2 piping tip and I started at the top edge of the petal and squeezed a drop of icing. Then, I eased up on the pressure as I moved toward the center of the flower. Continue until the first layer is complete. I left space between each petal. Let it dry for a few minutes before you do the second layer.
- Repeat the first layer but start about 1/4 of the way down the petals. Let it dry before you move to the next layer.
- Repeat for the third layer and add a Blue Candy Bead.

Now, you can stop once you add the cute green flower or you can make it aged to more of a shabby chic look. I love aged cookies like these Anthropologie Inspired Easter Cookies from Sweet Sugar Belle. The first time I saw them, my jaw hit the floor! I wanted to hop on a plane and knock on her front door and beg her to give me a private lesson, but I didn’t want to scare her so I stayed home. Her brush technique worked great for these, but the only thing I did differently is I used Hershey’s Cocoa instead of making my own powder.

I hope the next time you stick your finger into a cookie and have yourself a little mini fit and eat ice cream and clean out your closets and avoid the kitchen, you will remember, sometimes you can turn a mistake into something great!
Here are More Flower Cookies:
Flower Cookie Pops
Flower Bouquet
Black-Eyed Susan Cookies
Sunflower Cookies
Rose Swirl Cookies
Edible Apple Blossom Cookies
Bear hugs,

I would not have thought to do this, though I have put a poke or two in iced cookies at one time or another. I love what you did here and what you called these cookies. The flower addition really makes them an Shabby Chick is the perfect name for them.
you see this is where you and I differ. I’d have thrown them out and walked away, maybe eaten one. I need to learn your patience
Great flowers! I love all the texture! Very unique.
As for humidity, I’m struggling with that and just wrote a post for next week on the topic. We’re sans a/c, so humidity is a real killer. Fortunately, in San Diego we don’t get too much of it. Alas, when it’s here, I’m screwed! haha.
Anywho, I love your spirit of improvisation! Sometimes, you roll with the goofs and they work. They definitely worked with these shabby chic treats! 🙂
These are the greatest cookies ever and now I am going to start poking at everything!!! Yep they are…My newest favorite cookie! 🙂
These cookies are gorgeous! You did better than I would…I prolly would have either eaten all of them OR tossed them in the garbage. I know you have a lot more patience than I do, thus the incredible results.
Pat
Not sure what happened to my comment….but these cookies are gorgeous! You have an infinite amount of patience and talent. Wish I had one, or 3, right now!
Pat
These are absolutely smashing. Tres shabby chic!
Hilarious!! I made some like that(the cracked part)just the other day…wish I’d seen your tutorial BEFORE I scraped it off and started over!! :O) I love the way your mind (and creative talents) works. In the meantime, I’ve started work on your owls…soooo fun!! (even tho I did the first one with the feathers upside down..hee hee)
These ROCK, Lisa!!! So completely gorgeous! I can’t wait to try this….the possibilities are endless! Thank you for sharing with all of us!
I’m your newest follower….and I just PINNED this cookie. I love it and find it to be the newest creative design. Fabulous….thanks for sharing the idea.
These are so beautiful!!! And perfect tutorial for someone as clumsy as I am!! ;o)
Wow I bet this design would work great with meringue buttercream….my favorite tasting but least favorite to decorate with cookie icing! 😀
OH. MY. GOODNESS!!! I am totally in love with this look and I plan to shamelessly copy it in the near future!! These are so fun and striking and I’m sorry you had a bad day — but these are so cool!!
Genius! Pure genius.
Lisa, I’m using this technique RIGHT now, to create the lit ash end of a cigar.
I LOVE THIS!
I LOVE THIS!
That is an awesome story! And what a great technique!