How to Make Beautiful Royal Icing Roses
This post may contain affiliate links.
How are you all holding up? I know it’s getting hard to stay home while waiting for this pandemic to end, but playing with royal icing seems to create a sense of peace. Making beautiful royal icing roses is a simple way to take our minds off of all the things that are going on in the world. They won’t make us forget everything that’s happening, but it’s a nice escape for an evening of cookie decorating.
I hope you like what I’m sharing today because making beautiful royal icing roses is my new cookie love. Adding a simple rose to a cookie with a basic outline and flood is a great way to make your cookies elegant and classy. Beautiful royal icing roses look great in different colors and sizes. Another great thing about making royal icing transfers and flowers is that you can make them without baking cookies. If you make a Half a Batch of Royal Icing you’re all set to spend the evening making little works of art.

I hope you’re ready to get started because I’m so ready to decorate with you. Grab a decorating bag and a #101 decorating tip and let’s get started!
Beautiful Royal Icing Supply List:
(may contain affiliate links)
Recipes:
(You’re royal icing needs to be thick when you make roses. I’ll make a post soon on how to make the thick icing with two colors in the piping bag.)
Tools:
- Decorating tips #101 and #102
- Tipless Decorating Bags- Flour Box Bakery, The Cookie Countess, and Truly Mad Plastic
- Flower Lifter
- Parchment Paper– Before I bake cookies or make royal icing transfers I’ll cut some parchment paper squares so I’ll be ready to make anything my heart desires. Grab your scissors and some parchment paper and have fun!
- Flower Nail– I recommend getting more than one flower nail because you can make several roses at the same time. The reason for multiple nails is that once you pipe the base you’ll need to let it dry for a bit before you start making the actual roses.
Optional:
- You’ll need something to hold the flower nails. I had a helper who cut a few boards and drilled a few holes for the flower nails! They’re a great thing to have when making roses. You could also use a foam cake dummy like this 6″ x 4″ Square Styrofoam Cake Dummy from Country Kitchen Sweetart. I know if you want to make some royal icing roses you’ll find something to hold your flower nails.
How to Make Beautiful Royal Icing Roses Video:
I hope you enjoy the video and get a chance to see the video on Instagram and Facebook. It took some time, but I finally learned how to make a square video like everyone recommended. It’s easy once you learn how and my videos are a little different so I hope you enjoy them!

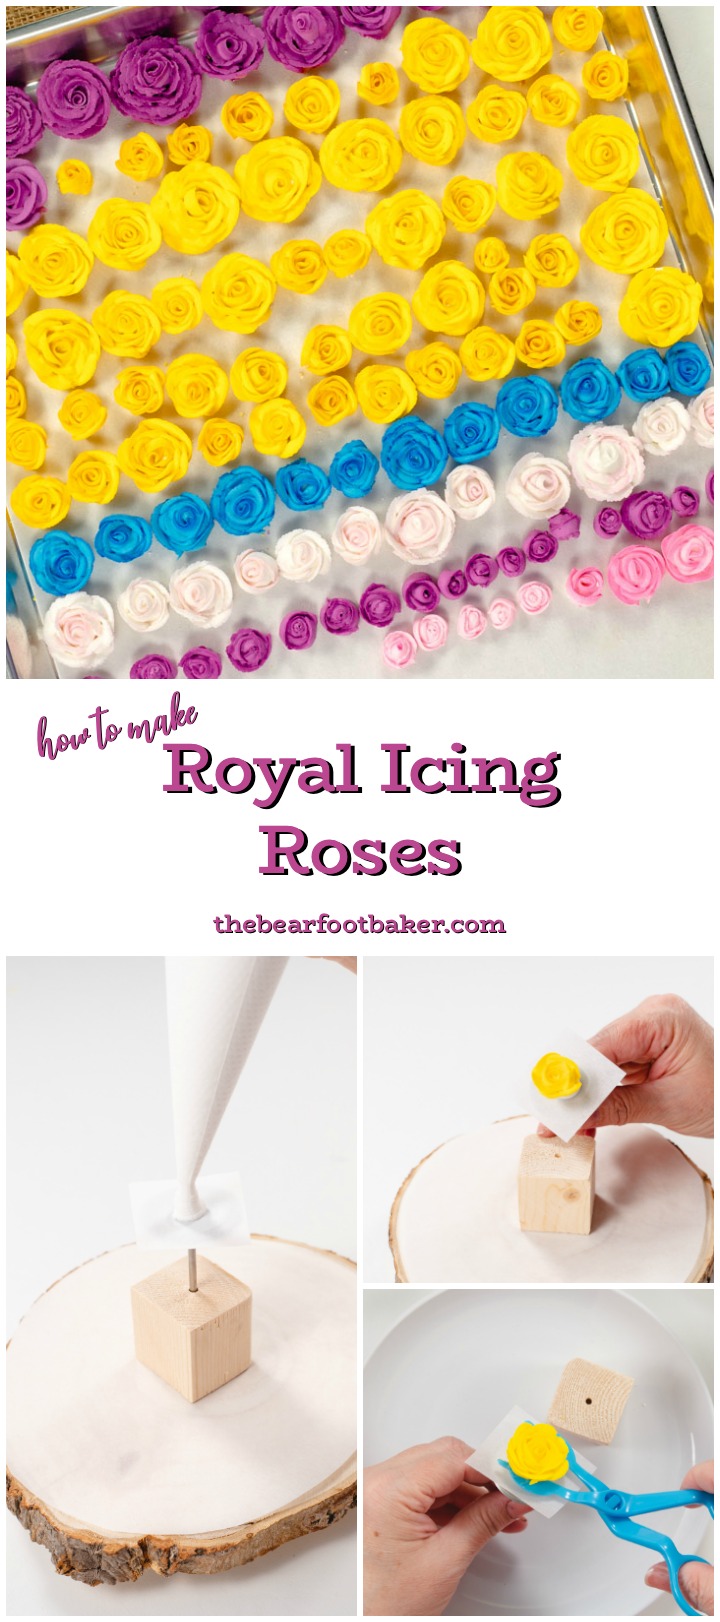
- Remember when I told you I had a helper who made some flower nail holders for me? Here they are. These things are great because you can use them over and over to make as many roses as you’d like. You can also use them to help you spin the flower nail so you don’t have to totally hold and spin it in your hand. It’s a handy little tool I know I’ll keep around for many years to come. Helpers are wonderful!
- Once you have your flower nail holder you can add your flower nail and prepare it for the rose you’re going to make.
- Add a dot of thick royal icing on the top of the nail and add a parchment paper square so you’ll be ready to decorate.

- Next, add a base of thick royal icing for your rose. I usually use white royal icing, but you can use the same color of icing you’ll use to make your roses. If you use white, make sure the spiral of the rose covers the base so your rose won’t show a white center.
- Once you’ve piped the base let it dry for about thirty minutes so it doesn’t tip over as you pipe the rose. Do you see why we need more than one flower nail? They really help!
- Now that the base has had a little time to dry, grab your piping bag and get ready to decorate.

- Begin by making a spiral around the tip of the base. All you have to do is hold the piping bag with the wide end of tip #101 at the bottom and the skinny tip at the top.
- Hold the tip next to the top of the and turn the nail as you apply pressure to the piping bag and spin. Once the spiral is complete let it dry for about 10 minutes so it won’t fall flat or move as you add the next layers of the rose.
- Next, pipe three petals around the spiral. Pipe the petals in an up-and-down motion like a rainbow and overlap each petal.
- Let the three petals dry for about ten minutes before you add the next layer.

- Make the last layer of petals on the rose. This time pipe five petals in the up and down motion and this will be the last layer for these royal icing roses. You can make another layer if you want a bigger rose so you should pipe seven petals around.
- Let the rose dry overnight before you try to remove it from the royal icing base because if you try to move it while the icing is wet you might mess up a few petals which is sad. We want happy roses not smooshed sad roses.

- Removing the royal icing roses from the base is kind of fun because you get to use this really cool Flower Lifter tool. They’re a lot like scissors so all you have to do is cut the flower off of the base, but the key for me is to wait until the royal icing has dried overnight. If you watch the video you’ll see why this process works for me.
- Once you cut the rose you may need to trim some of the royal icing off of the bottom so it will sit flat once you add it to your cookies. If it has a lot of icing on one side it will sit crooked and that doesn’t always look pretty.

- All of the roses on this cake stand were made with thick royal icing. Do you see how different they look?
- The reason some of the roses look like they don’t have strong petals is that I rushed as I made them. You might be wondering what that means so I’ll explain.

- If you watch the video you’ll see me pipe this purple rose. As I work my way around the layers, you’ll see the icing start to weaken and flatten itself out. It’s kind of like you’ve decorated a cookie and you want the icing to dry flat so you jiggle it. Right? Well, when you keep piping petals on a rose when the center is wet, you’re moving the icing. When you move the icing it will fall flat.
- If you pipe the spiral and wait a few minutes the spiral will have a chance to dry a little bit so it won’t be easily flattened by the new movement. Does that make sense?
- Let each layer dry for several minutes before you add the next layer. Your roses will look more like real roses instead of melting roses.
This little observation is for royal icing. If you pipe a rose with buttercream icing, it won’t jiggle flat as easily as royal icing.

If you notice the purple, white, and blue roses have petals that look a little rough on the edge. That can be caused by a few different things.
- It can be caused by the amount of pressure that’s being added to the piping bag. If we turn a flower nail fast without applying the right amount of pressure, the petal will look jagged. When you stretch royal icing it’ll look torn.
- There might be a little piece of dried royal icing in the tip. If so, that causes it to look ripped as the icing leaves the tip.
- It could be because my royal icing is really, really thick. If that’s the case, add a very, very tiny amount of water so the petals will be smooth.
Personally, I love the roses with the torn petals mixed with the smooth petals because they look like real life. Not every beautiful flower is perfect, but you know what? It’s the imperfections that make us who we are just like the beautiful royal icing roses.
So hang on as we battle the coronavirus and build our supply of royal icing transfers. When things get back to normal, we may have a few jagged edges and that’s okay because we are all beautiful.
Bear hugs,

Thank you so much!! My roses never came out perfectly and now I know why!!! I rushed to make them without waiting between layers to dry … tonight I’ll make some using your technique
Thank you!!!