How to Make Simple Baseball Cookies with a Video
This post may contain affiliate links.
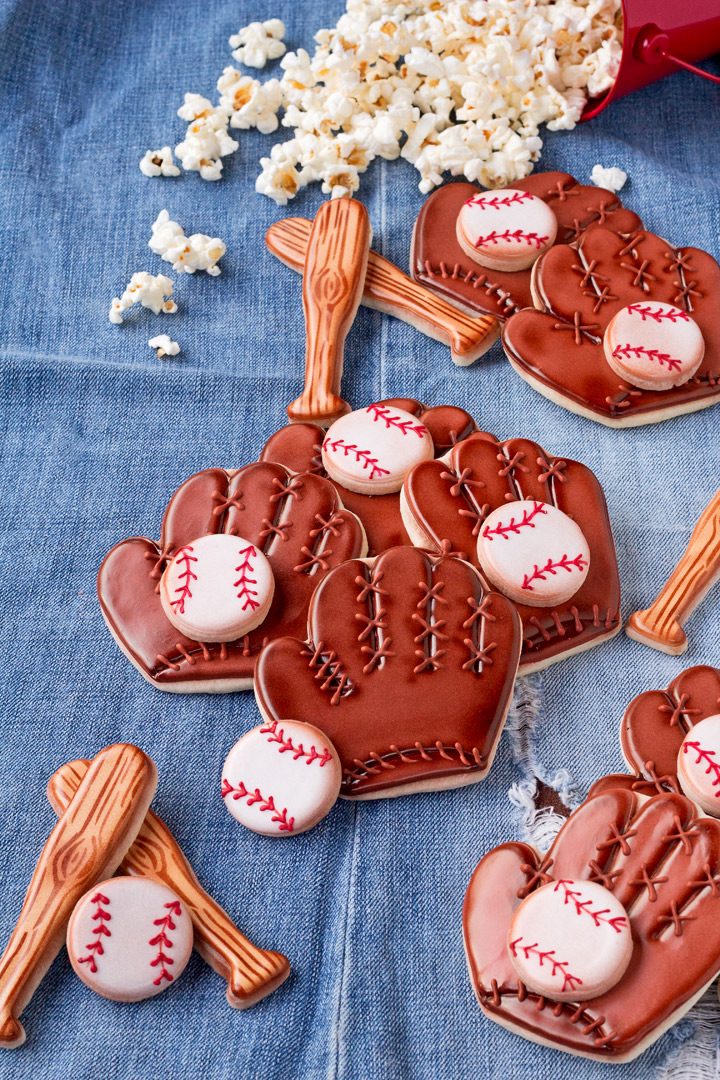
Did you play baseball when you were a kid? I guess you don’t have to be an all-star player to make baseball cookies and that’s a good thing for me because I played softball and I wasn’t very good at it.

All I remember was waking up early on Saturday morning, putting on my uniform, and standing in the middle of left field hoping someone would hit the ball to me. No one ever did.
I wasn’t upset because I never dreamed of becoming a softball superstar, but playing did teach me how to be patient. I would look up in the sky and see the clouds and let my imagination run wild with what shape the clouds made. Was the big cloud a dinosaur or a dragon? Do I see a puppy or a skinny hippo?
Seeing the different shapes and standing there all alone in the left field helped grow my imagination and taught me patience. Maybe that’s why I like making cookies.
Supplies for Baseball Cookies:
(may contain affiliate links)
Recipes:
Cookie Cutters:
Royal Icing Colors:
- Brown
- Tan
- White
- Red
Tools:
Decorating Tools:
- Decorating bags with couplers, and #2 decorating tips
- Or you can use decorating bottles fitted with #2 decorating tips
- Or Tipless Decorating Bags
Airbrush Machine and Supplies:
- The Cookie Countess Airbrush System or ADC Airbrush System
- Warm Brown Airbrush Color
- Wood Grain Stencil
Let’s do this!
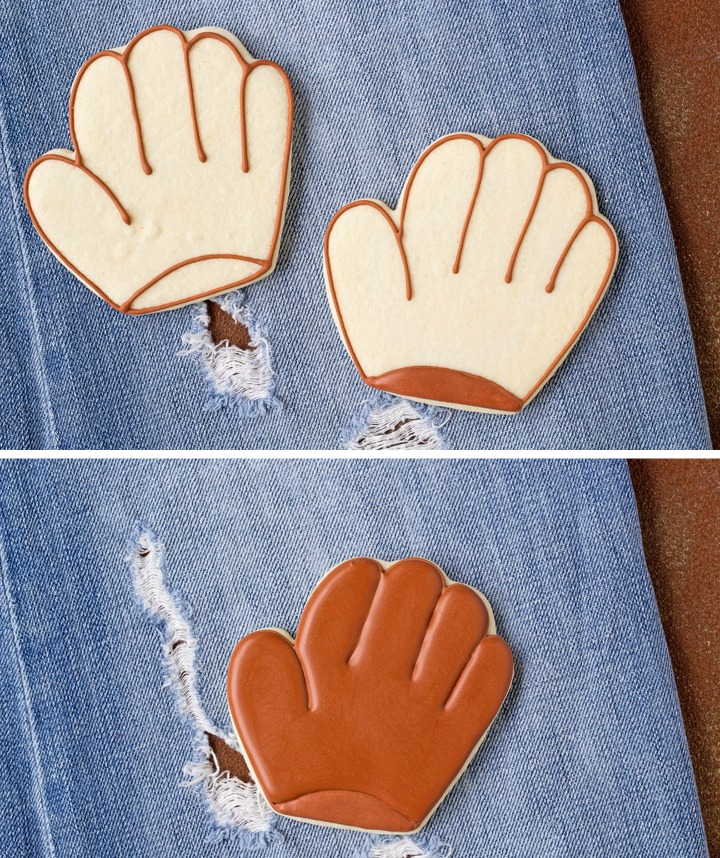
- Outline the baseball cookie with the brown icing and let it dry for a few minutes.
- Next, flood the glove with the brown icing and be careful not to cover the piped lines. This will help the fingers on the mitt look separate.
- Let the icing dry overnight.

- Airbrush the outer edge of the mitt and the seams in between the fingers with the brown airbrush color.
- Airbrush the part of the mitt where you put your hand in the mitt.
- Pipe the stitches with the brown icing and let it dry for about 10 minutes.

- Airbrush the stitches.

- Here is the part that makes me a little nervous. Use the airbrush gun to make the mitt look dirty. Spray a few random dark spots and lightly spray the rest of the glove to make everything match and the colors blend.

- Outline and flood the baseball bat cookies with tan royal icing.
- Let the icing dry overnight.
- Place the wood grain stencil in the Stencil Genie or use magnets to hold it in place.
- Airbrush the bat cookies with the warm brown airbrush color.
- Remove the stencil and airbrush the edges with and add a little color to the knot on the bats.
You may be asking yourself where’s the ball? I didn’t take pictures of it. Does that make me a horrible blogger? I was so excited that I was finally making the bat and the mitt that I forgot to take pictures of the cookies. I’ll make more soon!
How to Make Baseball Cookies Video:
I used a mini heat gun to dry the surface of the cookies. It was raining the day I made these and I wanted the cookies to shine so I used the mini heat gun and it’s wonderful! Just hold it over the surface of the cookies for a few seconds and the icing will shine and you won’t have creators.

The next time someone asks you to play baseball you can either grab a glove and go stand in left field or you can look at the clouds and make some baseball cookies. I think I’ll stick with the cookies for now.
Bear hugs,

Lisa these are SO cute!! Makes me want to go to a ball game and get popcorn, a hotdog and a cherry coke! And I hate craters. My cookies have a higher chance of getting them if I don’t put them in front of the heater fan and it’s even worse on rainy days ?
I forgot about the hotdogs Cori! And maybe some cotton candy!
I hate craters as well. They really can mess up a batch of decorated cookies!
Love these! I’m actually in the process of planning my granddaughter’s tee-ball team cookies for their District Tournament. I don’t have an air brush machine so what I do is use my food gel and a paint brush to make the wood grain on the baseball bats that I made for a few baseball teams. Since her team name is “Sweet Tarts” their colors are so cute so their bats will be the colors of those candies and all of their gloves are pink.
For those who don’t own an air brush machine, remember that your food gels will do the job for almost all projects calling for an airbrush machine, except stencils. I don’t use stencils so I have no idea about that. Thanks for the great tutorial! ??
Thanks for the advice and tips Melissa! I hope the girls do great at the tournament! 😉
What a fabulous set! I just attending my nephews baseball game this past weekend and he would have loved to celebrate with these cookies, maybe next time!
Don’t you love watching little kids play baseball? I wish I’d have posted them sooner so you could have taken him a few.
Tell your nephew to have fun at the games!!!!
I love these, Lisa! My hope while playing was to be invisible on the baseball field!
I feel ya Kathy!!! I really enjoyed watching the clouds! Maybe next time we can be on the same team and bring a few cookie supplies! Hehehehe
How did you get the fingers on the gloves to stay separated? I tried it and it blender together.
To make the lines and the fingers separated just outline the glove and let it dry for a few minutes. When you go back and flood the cookie, just be careful and don’t let the flood icing cover the piped outline. You can watch the video and it might help.
I also updated the post so it will explain things a little better. 😉
Sorry about the trouble!
Thanks Lisa! I will give it another try. One last question, do you use the same size tip for the outline and for the flood icing?
“Dropping the ball” and forgetting to take pictures of your balls does NOT make you a bad blogger! I am constantly forgetting to take pictures for my Facebook page as I am having so much fun decorating that it never occurs to me that I didn’t take any pictures. 🙂
I drop the ball a lot Janis! I hope you take more pictures of your Facebook page! I love to watch the process of you making things!!!!
Great tutorial Lisa.
Did you use the high or low setting on the heat gun? Your mitts have a lovely sheen to them. Do the cookies dry as fast as they would in a dehydrator?
These cookies are adorable! The only thing I’m missing is the airbrush and the heat gun. My husband is going to kill me if I buy ONE more cookie decorating tool. 😮 Thank you so much or the great tutorial!
Hi Michele!
You don’t need a heat gun if you have a fan.Once you decorate the cookie place them in front of a fan as soon as you finish the flooding and they will dry with a nice shine.
You can also use a food safe marker to shade them. I did a tutorial and it’s super easy! How to shade a cookie with a food safe marker: https://thebearfootbaker.com/2013/09/sweet-sugar-belles-bus-cutter/
Now you can make them without buying another “Cookie Tool!”
Bear hugs!
Lisa, thank you so much for always sharing your tutorials! You’re an amazing artist, and I’m so glad I finally subscribed to your emails, etc. via my correct email. I was wondering if you wouldn’t mind sharing how you made the ball cookies. Did you pipe the red lines? Could you do wet on wet for the lines, etc? Thanks so much. Have a blessed Memorial Day 2017 weekend. No rush….just whenever you can respond! Blessings, Suzanne