Beehive Cookies-Airbrush Look without an Airbrush
This post may contain affiliate links.

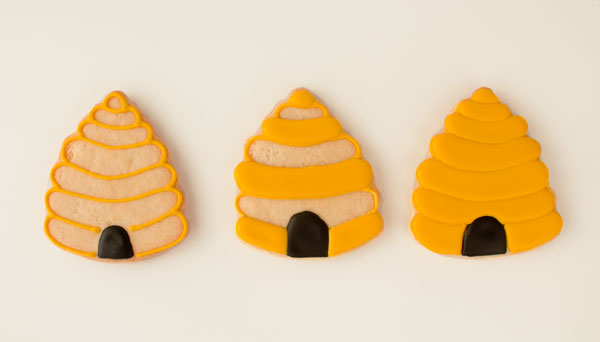
Have you ever seen a real beehive? Not one a beekeeper keeps, a real beehive in the wild or your yard? I have and it is a beautiful, creepy and noisy thing. I have see two in nature and there is nothing like it. I actually saw one this week that inspired these beehive cookies. I know you are probably getting tired of seeing these bees so this is the last bee post for a long, long time! I promise. I just though a beehive cookie would be a great way to show you that you don’t have to have an airbrush gun to get airbrush details on a cookie. You do however need a paintbrush. Two of these cookies were painted and one was airbrushed. Can you tell which one is airbrushed?
Supplies for Beehive Cookies:
Black 15 Second Icing
Honey Yellow 15 Second Icing– (Mix yellow with ivory until you get the desired color)
AmeriColor Warm Brown Food Gel Color
Bee Royal Icing Transfers
Paintbrush (used for food only)
Beehive Cookie Cutter-(I can’t remember where I got mine but here are few that are really cute.)
 Begin by outlining and flooding the be entrance to the beehive with the black icing. Let it dry completely so you don’t risk the black bleeding onto the yellow icing. For more information on why colors bleed click here.
Next, with the yellow icing, outline the beehive cookie by following the edges of the cookie. Flood every other section and let dry for about 20 minutes.
Then, flood the remaining sections with the yellow icing and let them dry completely.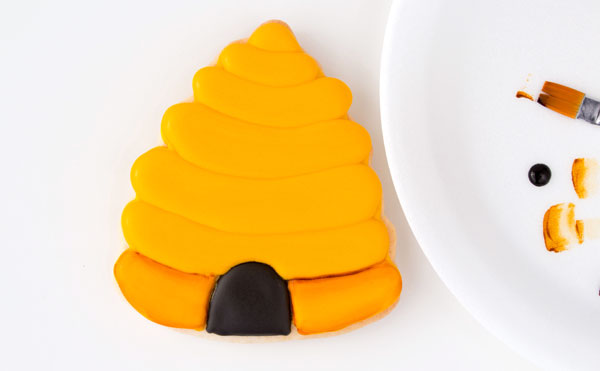 Next is the fun part. Adding depth to a cookie is easier than you may think. All you need is a good paintbrush like these, and some food color gel. I used the #8 brush from this set and dipped one side of the brush into the warm brown gel color and the other side into some water. Then, make a few practice stokes on a plate or an old cookie.
If you want to airbrush instead, follow this tutorial to find out how. If you want to watch a video on how to paint on a cookie click here.
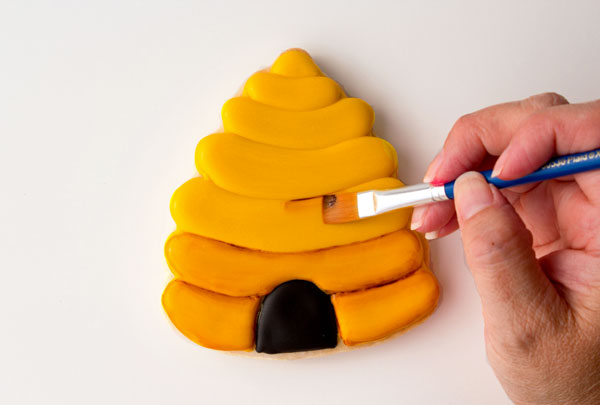 Once you feel comfortable, start painting the gel beside the groves of the sections letting the edge of the brush go into the grove. Continue until all the sections are shaded. I really enjoy painting cookie but, the airbrush gun was much faster.
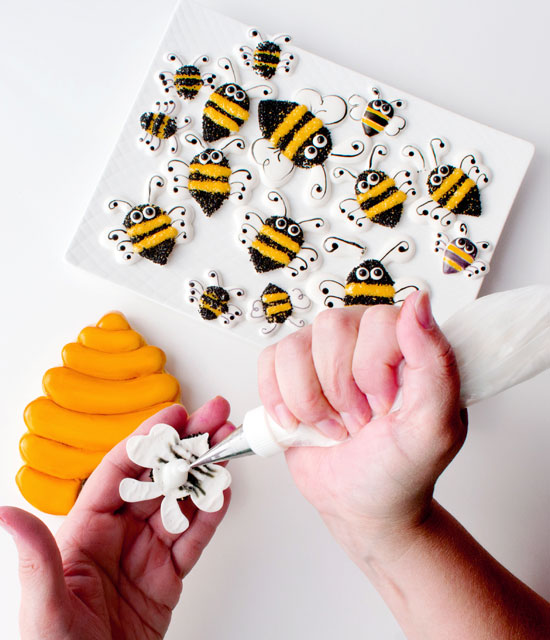 The beehive cookies are cute on their own but, all beehives need bees. It is easy to add a royal icing transfer to a cookie. Simply add a little royal icing to the back of the transfer and placing it onto the cookie where you want it. Lay it flat and let it dry.
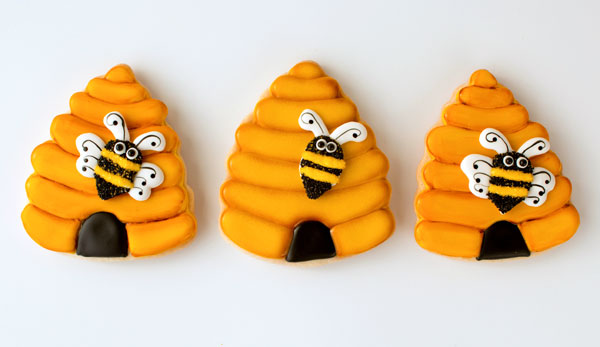 In case you couldn’t tell which beehive cookie was airbrushed, it is the middle one. No airbrush and no wings on the bee so I could keep then straight! I love “Wendy” my airbrush gun but, to be honest, I think I like the beehive cookies that were painted a little better. You don’t have to have an airbrush gun to add shadows to your cookies. Sometimes a paintbrush is all you need.
Bear hugs,

Oh, I love the idea of painting to add some dimension! I (still!) don’t have an airbrush, so this is an awesome technique for me!
So dang cute. I hope our bee population recovers, I see dead bees everywhere. (Better than dead people, right?)
Gorgeous as always Miss Lisa!!!
I could immediately pick out the air brushed cookie, but like you, I think I prefer the look of the painted cookies. They really have a lot of depth to them. The bees are so adorable and they look great on the beehives! Pinning.
So cute, I love those bee transfers!!
You know, I’ve never seen a real beehive before. I feel like I’m missing out. But these cookies are so much fun and what a great tip! You’re always coming up with the most innovative ways to add something “special” to an ordinary cookie!
WOWSA Lisa! These are so adorable! Love the shading and ADORE the bees!!!
Love these bee hive cookie and sadly I have been way to close to a bees hive 🙁 I would enjoy biting into these and giving those bees a taste of their own medicine!
They are adorable, love the hives and those bees are TOO cute, wow did I just say that. Needless to say after my encounter…I’m allergic so these are the only types of bees I like 🙂 Wonderful work. Love the effect you did with the brush!
Adorable…and of course I love the little RI transfer bees. I would not have thought to do the “shading” on the beehive like this…very clever!
Such a great, informative post! Thanks 🙂
This is a great idea and if I think I would have much better control over a paint brush than I would with an airbrush. Thanks so much for sharing this.
Love the bees and the beehives!
Love these Lisa!
I was looking for a design for my last Wilton Course 2 class and found your site (again). The couple I’m giving the finished cake to both have the first initial B, so they call their home the Bee Hive. These are perfect! I can do a message like “Meant to Bee!” or “Two Bees in a Pod.” Thanks for the great tutorial! I see one if your bees lost an antenna, so I guess breaks happen even to the best of us.
That couple sounds so cute!A bee hive will be great for them!
I always make a ton of transfer becasue they do break. I hope yours stay in one piece! Bear hugs!!
Thanks. I realize I did the antennae too thin, actually piping as antennae, instead of as wider pieces like you did. But, fingers crossed. They are pretty cute. I think I will pipe 6-8 bee hives in buttercream, then place the bees on those. I’ll have to get one of those bee hive cutters, they are adorable.