How to Make Cactus Candy Decorations with a Video
This post may contain affiliate links.
Have you seen all the cute little cacti everywhere? They’re growing in popularity everyday. If you want to have a party with a cactus theme now would be a good time because you can find cactus decorations everywhere. You can even make your own cactus candy decorations with the free templates I’ve made for you. If you don’t like royal icing, you can make them with chocolate and use them on cakes and cupcakes.

Supplies for Cactus Candy Decorations :
(contains affiliate links)
Royal Icing:
Templates Cactus Candy Decorations:
- Large Cactus Candy Decorations
- Small Cactus Candy Decorations
- Large Heart Shaped Cactus Candy Decorations
- Small Heart Shaped Cactus Decorations
- Large Mitten Cactus Candy Decorations
- Small Mitten Cactus Candy Decorations
Royal Icing Colors:
- Green
- Terracotta Color-I used orange and brown food gel
- White Royal Icing
Tools:
- Decorating Bags or Decorating Bottles with #2 decorating tips
- Tipless Decorating Bags
- Turkey Lacer
- Wax paper
- Masking or Painter Tape
- Double Sided Tape
- Foam Board, Baking Sheet, Cutting Board, or a flat surface for the transfer patterns.
Let’s do this!

- Begin by printing the templates from the supply list. I’ve made them in two different sizes, but feel free to adjust them to the size you need.
- Get a piece of foam board (cut it to the size you want) and tape the template with double-sided tape so it doesn’t move.
- Cover the template and the foam board with a piece of wax paper.
- Tape it into place with the masking tape. Try to remove all of the wrinkles so your transfers will be flat when they dry.
- Mix the royal icing colors and add the royal icing to the decorating bags.
- Pipe the arms of the cactus first and let them dry for about 10 minutes so the top of the royal icing will form a crust. This will make the arms of the cactus look as if they’re separate from the body of the cactus.
- While the arms are drying, pipe the base of the clay pot with the terracotta royal icing and let it dry for about 10 minutes. You can use the turkey lacer to help push the royal icing into the corners of the pot if necessary.

- Once the cactus arms have had a few minutes to dry, pipe the body and use the turkey lacer to help make a nice round shape.
- Let them dry overnight.
- All that’s left to do is to pipe the rim of the clay pot. I didn’t follow the template because I wanted them to look a little more free-handed instead of square like the template. If you want to use the template, go for it. You can also use it as a guideline and make nice round rims. It’s up to you.
Cactus Candy Decorations Video:
Are you ready for a quick little video? Here you go!
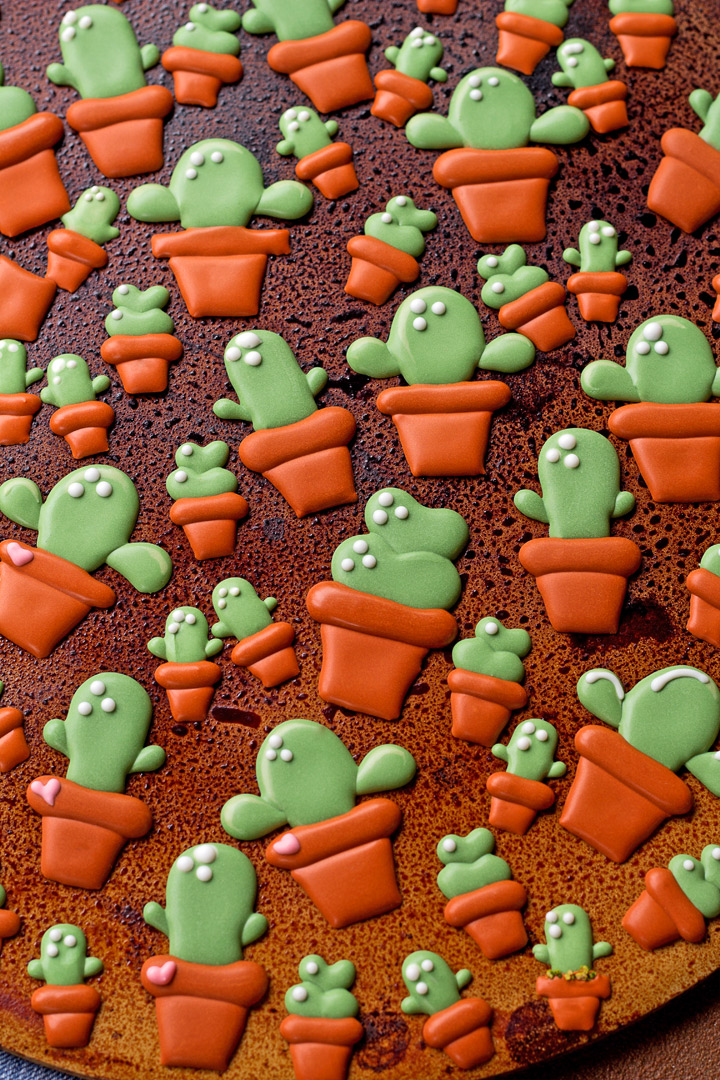
I kept the design simple, but keep in mind you can decorate the pots in different colors and add all kinds of thorns and textures to the cacti. I’m thinking about adding a few flowers to the top of the gorgeous green plants when I add them to the cookies. Adding a flower on top will give them a little pop of color and some personality.
Have fun decorating with them!
Bear hugs,

Those are the cutest Cactus I have ever seen! Thank you for doing a great step by step tutorial and adding in all of the guide sheets. You are awesome!
Oh, how absolutely adorable and such the cute idea!
Adorable as always! As I watched the video I thought you could also add white sprinkles while the cacti were wet for an easy peasy thorn effect. Like your idea to add tiny flowers, too. 🙂
I need your help! How do you keep your transfers smooth and with depth once they’re dry? Mine flatten and the top ends up less than smooth once they’ve dried – even in the dehydrator. Also, sometimes when I pipe smaller circles or shapes, the center collapses, even if I “stir” the icing gently once it’s piped to get rid of air bubbles. Help!
Hi Sandy,
How thick is your royal icing? If I had those issues I’d make it a little thicker next time. As far as the dents or the royal icing sinking in the center, you might want to dry it with a fan or even a mini heat gun. The heat gun will help the top layer of the icing dry and it will have a really nice shine when it dries. It will also help prevent the air bubbles from popping and making craters.
Hope this helps!
Lisa
I made a big batch of our local town’s mascot by using this method. How do you keep your transfers from breaking when removing from the wax paper? I had 12 survivors out of 30! Could it be something with the royal icing consistency? Your transfer’s are always so adorable!
Hi Shannan,
The consistency does have something to do with it, but I think it’s how we remove them from the wax paper. Here is a post I did explaining how to remove them without as much breakage.
https://thebearfootbaker.com/2013/07/remove-royal-icing-transfers-from-wax-paper/
Keep in mind the RI Transfers do break so make extras just to make sure you have enough. Store them flat in an airtight container away from sunlight and they will last for a really long time! Hope this helps!