Easy Butterfly Cookies Part 2
This post may contain affiliate links.

Butterflies. Caterpillars. Leaves and pupa. What do all these things have in common? Cookies of course! Yesterday we learned how to make easy butterfly cookies with a little airbrushing and painting. Today, I want to show you how to make easy caterpillar cookies. Seriously, what is more fun than making a cookie version of caterpillars, pupas, and leaves with butterfly eggs on them? I bet there is something that is more fun but, let’s make the cookies anyway.

I was excited about this set and was a little surprised at how much fun I had making them. This is a great project for anyone who wants to learn how to airbrush and paint on cookies because you can spray the entire butterfly wing without worrying about controlling the spray. The caterpillar cookie is made with airbrushed and painted lines and that is great for a beginner’s project because the process is simple with wonderful results.
Supplies for Easy Butterfly Cookies Part 2 – Caterpillar Cookies:
(may contain affiliate links)
Cookie Cutter:
Royal Icing:
Tools:
- Decorating bag or a decorating bottle fitted with a #2 tip.
- Airbrush gun with Yellow airbrush color.
- Black Food Gel Color
- Paint Brushes – Set 1 and Set 2

Begin by outlining and flooding the caterpillar cookie with white icing and letting it dry completely.

Once the icing is dry, spay the caterpillar where the sections meet with the yellow icing. Here is a little video to help with that.
How to Airbrush a Caterpillar Cookie Video:
When you watch the video, notice the angle of the airbrush gun and how far away the nozzle is away from the cookie. The closer the nozzle, the finer and more controlled the airbrush line will be. If you hold the gun far away, you will get a nice mist all over the cookie.

Now that the caterpillars are dry and airbrushed, it is time to paint.
- Begin with the thicker lines on the caterpillar. You can use almost any size brush for this. The set listed above has different sizes. You can use the #2, #4, or #6.
- Dip the tip into the water and use a paper towel to blot off some of the excess.
- Then, add a little black food gel to the tip. Make a few practice strokes on a paper plate or parchment paper and begin making the lines on the caterpillar.
- These lines are placed where you airbrushed with yellow.

- Next, use a detail brush (script liner) and make some smaller wavy lines on each side of the thick lines.

- Repeat for each section of the body.

- Flip the paintbrush over and use the wooden end to make the eyes. Dip the end of the brush into the black food gel and dot it carefully on the face of the caterpillar.
Repeat for the second eye. Now you have a completed caterpillar cookie so let’s focus on the leaves with the eggs.
Supplies for the Easy Butterfly Cookies-Leaves with Eggs:
- Green 15 Second Icing
- Pearlized Ivory Sugar Pearls
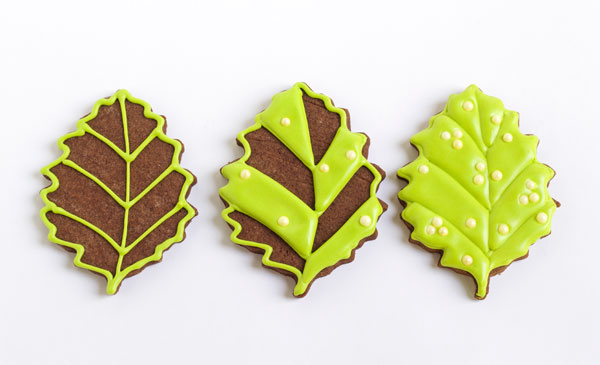
The leaves are very simple to make. You could add a little green airbrush color if you want to but I like them plain.
Outline the leaves with the green icing and flood every other section. Add a few sugar pearls to make them look like butterfly eggs. Let it dry for about 20 minutes and repeat on the other sections. All done!
For Part 1-How to make Butterfly Cookies, click here.
For Part 3- How to make Flying Butterfly Cookies, click here.
Check out these links for more fun summer cookies and airbrushing tutorials.
- Simple Butterfly Cookies
- Seafood Cookies
- How to Airbrush Cookies Video- Crab Legs
- How to Airbrush Sanding Sugared Cookies
- Airbrush station to keep your decorating space clean
Bear hugs,

Wow, those Monarch Butterfly cookies sure are gorgeous!
You are so clever, I want your steady hand and then I want to have you by my side when I use my air brush. I love the way they turned out!
Ahhhhhh!!!! I so wish I had an airbrush!!! But I promised hubby that I wouldn’t buy one until my sales warrant it AND I pay off my credit card….thankfully that’s ALMOST done lol
I recently spent $130 on my Pico and it has been such a game changer in my cookies and my sales!!!! Hopefully soon I’ll have an airbrush to go with it!!! ???