Happy Little Snowman Royal Icing Transfers to Decorate Your Cookies
This post may contain affiliate links.
Happy Little Snowman Royal Icing Transfers
Have you ever lived in a place where the weather has a mind of its own? If not, you need to visit East Tennessee. Let me paint a little picture for you. It’s winter and last week we had a day where the temperature was 77 degrees. Two days later we had eight inches of snow that knocked our power out for several days. As I sat in the living room (recovering from Covid, yep, Alan and I both were recovering from Covid when the power went out) playing Alan one million games of Gin Rummy, I was thinking about work. I love my job and all I wanted to do was play with royal icing, but I didn’t have power or any royal icing on hand. All I could do was daydream about happy little snowman royal icing transfers.

As soon as the power came back on I scrubbed the house, washed all the sheets, blankets, and towels, bleached as many surfaces as I could to kill all the possible Covid things, and then I some snowmen. I was so happy. It was the perfect way to end ten days of quarantine and days without power.
Supply List:
(may contain affiliate links)
Recipes:
Royal Icing Colors:
- White- Americolor Bright White
- Black- AmeriColor Super Black
- Orange- Outrageously Orange with a touch of AmeriColor Gold
- Blue- AmeriColor Turquoise
- Green- AmeriColor Avoacado
- Tan-AmeriColor Gold
Snowman Templates:
- Small Snowman Royal Icing Transfers | The Bearfoot Baker
- Medium Snowman Royal Icing Transfers | The Bearfoot Baker
- Large Snowman Royal Icing Transfers | The Bearfoot Baker
Tools:
- Foam Board—I tape my pattern on foam board so I can place the pieces in front of a fan to help them dry.
- Cello Bags should be taped over the pattern so you can pipe the icing and remove it after the snowmen dry.
- Tipless piping bags
- Painters tape
Happy Little Snowman Royal Icing Transfers Video:
Enjoy the video!
Let’s make a snowman!

The same rules apply as I’ve always recommended when we make royal icing transfers.
- Print your pattern.
- Cover it with a cello bag and tape it in place.
- Pipe your white royal icing.
- Let it dry completely.
- Add the details.
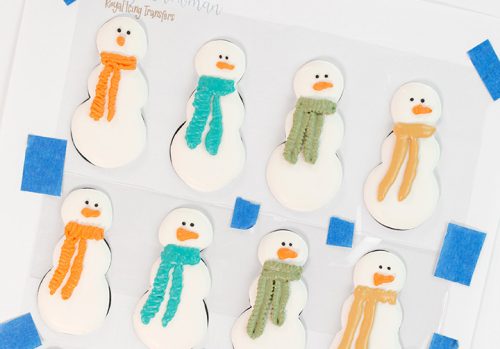
The scarves were piped with outline-consistency royal icing and a tipless piping bag. The gree was piped when I cut a ‘v’ in the end of the bag as if I were going to pipe some leaves. It was fun and I liked the way it turned out.
I didn’t take a lot of photos of these guys. If you watch the video you will see how to make them. So print off the patterns and have fun making these little guys!
Bear hugs,

Glad you are feeling better and have your power back. Love your blog!!
You have such great information. I love seeing what you are creating. And you are one of the few sites I have purchased from. All these ads are so frustrating to try to follow your videos and read the great information you offer.
I hope they are paying you for them. Thanks for all your great insight and inspiration. I have such limited time to create fun things like decorated cookies, so it’s great to find usable information that offers so much. Just very distracting.
Thank you so much for everything you share! I just started learning about cookie decorating and I found your podcast that I can’t stop listening to. I’ve just taken a step back from my career to start a family and this cookie thing has been the most positive, calming thing I never expected I could do in a million years. Thank you for sharing all of your knowledge ❤️.
Awe! Thank you and WELCOME TO OUR COOKIE WORLD!!!!