How to Make Simple Acorn Cookies
This post may contain affiliate links.
You probably think it’s weird that I’m posting Simple Acorn Cookies in May, but bear with me for a minute. There is a set of cookies I’ve been wanting to make since last fall, but something always came up or I’d get distracted. As I was looking for a cutter the other day I decided it was time to take the plunge and make this set of cookies no matter what time of year because this dream needed to be a cookie reality.
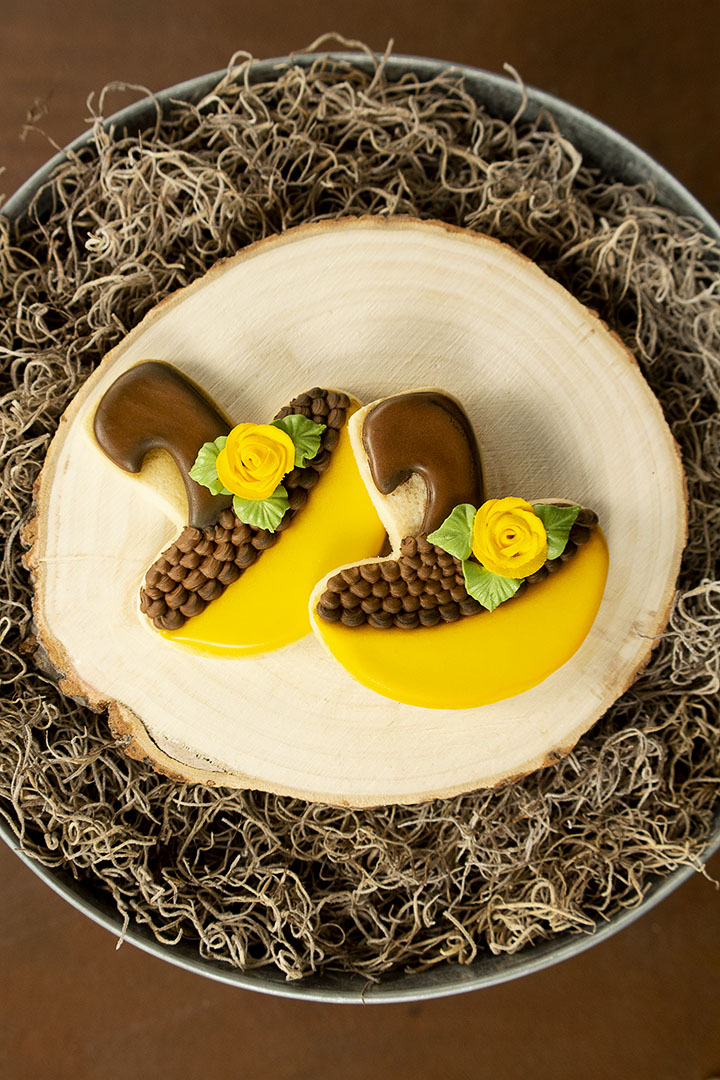
If you’re still wondering this is not the full set of cookies I’m talking about. This is just one of the accent cookies in the set. Stick with me and you’ll soon see the cookies I’ve been dreaming of since last fall.
The really neat thing about designing and making cookies is the option is unlimited so once I share the complete set you can customize the colors and shapes and make it your own. If you like the way this set looks then feel free to make it and then my cookie dream will be another cookie reality. Isn’t that cool because cookies rule?
How to Make Simple Acorn Cookies Supply List:
(may contain affiliate links)
Recipes:
Cookie Cutter:
- Mushroom Cookie Cutter- Almost any mushroom cookie cutter will work for this design, but here are a few links for the cutter used in this set Amazon, The Flour Box, or The Cookie Countess
Royal Icing Colors and Consistencies:
- Brown- Americolor Chocolate Brown (.65 ounce) or your favorite brown food gel color.
- Thick consistency for the cupule or the acorn’s hat.
- The stem is outlined with thick royal icing and filled with a flood consistency.
- Yellow- Mix Americolor Lemon Yellow (.75 ounce) with Americolor Gold (.75 ounce)
- Outline the bottom of the acorn with a thick royal icing consistency.
- Flood with a 15-second royal icing consistency.
- Green- Americolor Avacado (.75 ounce) mixed with Americolor Electric Green
- Thick royal icing consistency for the rose leaves.
Airbrush Colors:
- Totally Brown- The Cookie Countess Airbrush Color
- Sunshine Yellow- The Cookie Countess Airbrush Color
Free Royal Icing Rose:
(Make these ahead of time and in multiple colors because you can use them on different cookies.)
Tools:
- Turkey Lacer
- Tipless decorating bags- The Cookie Countess or The Flour Box
- Leaf tip #352 You can get it at The Cookie Countess, The Flour Box, or Amazon
- #2 Decorating tips- If you’d like to decorate with tips you can use them in your tipless decorating bags or you don’t have to use them. For some reason, I’m back into my PME tips and I’m kind of loving it right now.
- Food-Safe Marker to draw the pattern on the acorn cookie.
How to Make Simple Acorn Cookies Video:
I hope you enjoy the Simple Acorn Cookies Video!
Simple Acorn Cookies Tutorial:

- Begin with your favorite sugar cookie recipe and bake according to the directions. If you’re looking for a recipe you can try my Sugar Cookie Recipe.
- Make a batch of royal icing or half a batch of royal icing add your food gel colors and place them in your piping bags.
- Once your cookies have cooled and you’re ready to decorate, draw the stem on the acorn with a food-safe marker.
- Draw a line to separate the cupule and the bottom of the acorn.
- Outline the bottom of the acorn with the thick yellow icing. If you’re afraid your icing will sink as it dries you can add a few thick lines so it will support the flood icing as it dries.
- Next, flood the bottom of the acorn with the yellow royal icing flood consistency.
- Outline the stem of the acorn with the thick brown royal icing.
- Flood the stem with the brown flood royal icing consistency.
- Let the cookie dry for about 20 minutes before you begin airbrushing.
TIP:
- If you want to use one consistency of royal icing, go for it! I wanted to make sure my acorns looked pretty so I felt the need to use two consistencies.
Airbrush Simple Acorn Cookies:

- It’s time to airbrush our little acorn cookies. Lightly spray the edge of the stem with a brown airbrush color. I used The Cookie Countess Totally Brown Airbrush Color and I love it. You don’t have to airbrush the top of the stem if you don’t want to. Actually, look at the stem and imagine the sun is shining at the top left. Where would the shadow be cast? I suggest you airbrush under the hook, on the bottom, and on the right side. That will make it look like the top is lighter where the sun is hitting it because we know how the sun makes things shine.
- The same thing goes for the Sunshine Yellow Airbrush Color, but the difference is the cupule will cast a shadow on almost all of the bottom of the acorn. So airbrush around the entire yellow part of the acorn.
Time to Make the Cupule:

- Making the cupule is simple because all you need to do is pipe dots with thick brown royal icing and as you pull away, finish with a quick jerk as you finish applying pressure to the decorating bag. You can see how it’s done in the video.
- Make a row across the yellow icing.
- Then do the next row and repeat the rows until you get to the top.
- Use a turkey lacer to clean the top when you’re done.
Add the Flower to the Acorn Cookies:

- So, sometimes I do things in the wrong order and this is one of them. I added the rose to the acorn before I airbrushed the cupule which makes it a little harder to airbrush.
- I recommend airbrushing the bottom of the cupule with the brown airbrush color and then airbrushing the right edge. Remember to imagine the sun is shining at the top left of the acorn and decide where the shadows would be cast and airbrush there. Again, you can watch the video to see how I did it and make yours the way you like them.
- After you airbrush the cupule you can use a little royal icing to glue the rose in place.

- After you attach the rose pipe three petals with the thick green royal icing and the #352 decorating tip.
- Let your cookies dry completely.
Thank you for hanging out with me and waiting for the rest of this dream set. I’ll post the rest soon so stay tuned.
Have a great weekend!
Bear hugs,
