How to Outline and Flood a Cookie with Royal Icing
Happy Halloween! I wish you could bring your little trick or treats to my house tonight so I could give them some all hallows eve cookies. The only thing is you’d never find my house because you have to go through mountains, around crazy wicked curves, and through a creek. So let’s outline and flood a few hallows eve cookie with royal icing instead.
There are a lot of new cookie decorators out there so I thought this would be a great time to go over some basic decorating tips. It doesn’t get much easier than learning how to outline and flood a cookie with royal icing. And let’s face it, sometimes life gets busy and we can’t give 100% of our attention and time to making cookies. That’s OK. You can make simple cute cookies and everyone will love them because you made them something special. It’s a gift they can’t buy in stores that you made just for them.
How to outline and flood a cookie with royal icing:
(may contain affiliate links)
Royal Icing Recipe or Half Batch of Royal Icing Recipe
15 Second Icing fitted with the #2 tip in the following colors:
Orange Icing with a touch of Ivory
Lemon Yellow Icing with a touch of Gold
Sky Blue Icing with a tiny, tiny touch of Ivory
Black Icing
Optional- Airbrush Gun with AmeriColors Airbrush Colors Warm Brown and Blue
How to Outline a Cookie with Royal Icing:
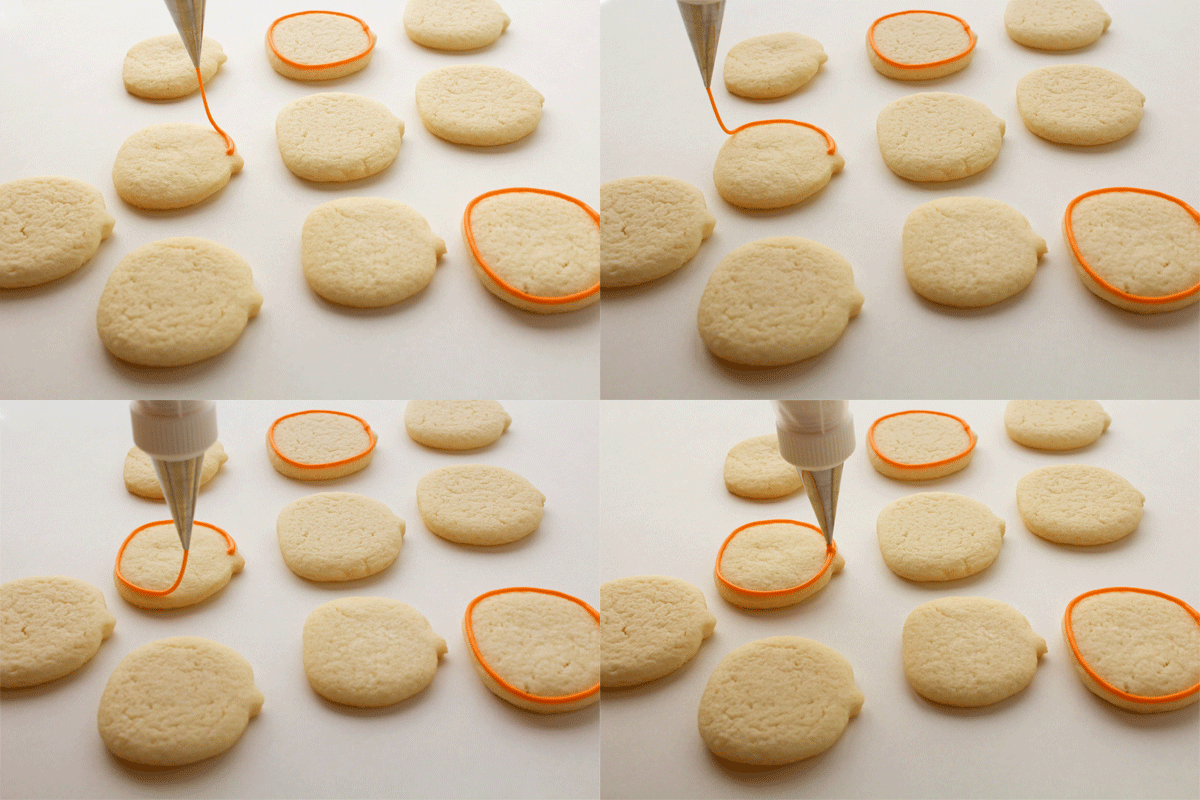
Begin by outlining and flooding the cookies. Each cookie is outlined and flooded the same way so I wanted to take a few minutes to share with new cookie decorators how easy it is.
When outlining a cookie with royal icing, place the tip close to the cookie and squeeze the piping bag gently until the icing comes out of the tip.
Then, let the icing touch the cookie and begin to lift the tip away from the cookie while continuing to add gentle pressure.
As you outline the edge of the cookie, hold the tip away from the cookie and let the icing fall as you guide it. If you try to outline with the tip close to the cookie, you will probably end up with a wiggly outline. Holding the tip away will allow you to pipe with control even if your handshakes a little.
How to Flood a Cookie with Royal Icing:
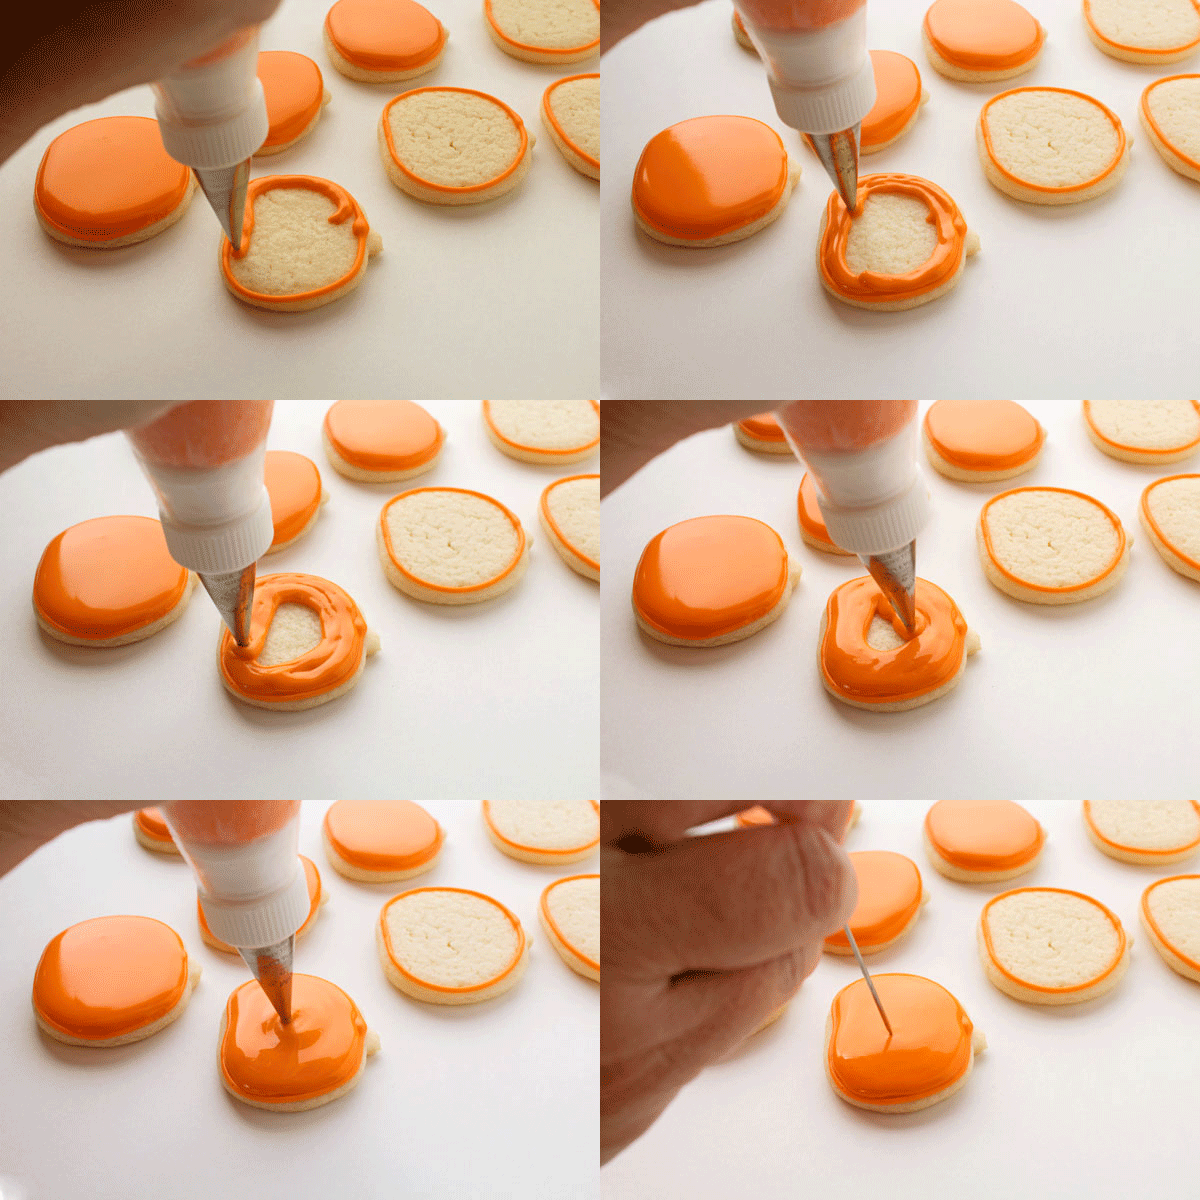
Flooding a cookie can be accomplished with or without piping an outline. If you use an outline, it will help the icing stay on the cookie without oozing off the edge of the cookie. Flooding without an outline will give you a seamless edge.
To flood a cookie with an outline, begin by starting at the edge of the outline and squeeze the piping bag until the icing comes out. Keep applying pressure to the piping bag as you slowly apply the icing around the edge of the cookie. Keep flooding the cookie by going around the cookie until you reach the center.
I will show you how to outline a cookie without an outline soon.
Once your cookie is completely flooded, gently shake it and tap it on the cookie on the table to help the icing flatten out. Use a BooBoo stick or a turkey lacer (thank you, Heather, for sending me this little miracle tool) to pop any air bubbles. You can get a turkey lacer after the holidays on the clearance rack for next to nothing and it is by far my favorite tool.
Once you have learned how to outline and flood a cookie with royal icing, you’ll have a nice base coat for decorating. There are millions of ways you can decorate cookies. You can leave them simple and cute, add sprinkles, add royal icing embellishments, stencil or you can pipe a few details. Seriously can do anything you can imagine.
I chose to airbrush these by adding a little AmeriMist Warm Brown Air Brush Color to the edges of the orange and yellow cookies. The blue cookies were outlined with AmeriMist Sky Blue Air Brush Color. Here’s a video on how to use an airbrush gun if you want to take a look.
How to Outline and Flood a Cookie with Royal Icing
Happy Halloween! I hope you and your family have a safe and wonderful night filled with costumes, sugar, and laughter! Remember, once you master how to outline and flood a cookie with royal icing, the sky is the limit! If you are looking for some tips and tricks for cookie decorating, you may enjoy the “Beginners Guide to Cookie Decorating.”
Bear hugs,










Great little tutorial…I thought my eyes were playing tricks on me when the pictures started changing. Not sure how you pulled that off, but it is a great way to do a “how-to”!
Hahah! I didn’t mean to play a trick on you Terri! I will save that for April 1st 😉
I’m always looks for good beginner tutorials to share with folks who email me with questions. This post is great, Lisa! It’ll definitely be on my “best of” beginner tutorials list!! 🙂
Thank Michelle! You are so sweet!
GIF TUTORIALS?!?! What a great idea! You just took how-to’s to a whole new level.
Brilliant, just brilliant.
I just didn’t want to add 100 pictues to this post. LOL I thougt a GIF would be fun.
LISA! Love the animated GIFs!! Super helpful to any new decorator.
Thanks Mike!
Love that animation! Very cool, besides being instructive:) I would never think to add blue leaves, but they make such a pretty contrast! Leave it to you:) HAPPY HALLOWEEN!
P.S. I also love your CUTE popcorn ball spider!
Happy Halloween (late) Sue! I like blue and think it gives fall colors a little pop. I did it last year with acorns and want to do it more. Blue is FUN!
Love this and I love the GIFs as well. It adds a nice touch. I think learning to outline was one if the hardest things to do when I first started decorating. It “looks” easy but was a bit more of a challenge when u actually tried it the first time!
Thanks Morgan! I remember my icing oozing off the edge when I started! An outline was a must for me when I began. Royal icing is hard to learn but, an amazing medium once you get it under control. I hope we can shed some light on it for the new decorators.
Look at you, with the fancy GIFs!! 🙂 These are awesome, Lisa! I hope you’re having a fun Halloween! 🙂
I am having fun Jennifer! I will have more fun when I see pictures of your little one! 😉
I was hoping it’s not because it was Halloween when I first view this…the photos were moving around. So I came back today and they’re still moving…whew! I love the tutorial and I am having fun with royal, so I always need a refresher course! Thanks!
Hahah! A little eary April Fool’s photography going on here today! LOL I am glad you came back for a second look! HUGS KIM!!
Wow … you got all fancy dancy with techy stuff! I think your tutorials are great … ’cause I need help with using royal!
First of all Brenda, your cookies are amazing! Second, if you ever need anything, just email me. I don’t know if I can help but I will try my best!
Hi Lisa! I have a question, what kind of tip should I use to flood the cookie? Thanks!
Hi Sofia,
You can use any tip you want when flodding a cookie. I prefer a #2 or #2.5. I have noticed if I go larger than a #3, I have more airbubbles in my icing.
I just love your blog! I am just starting out and so glad I found you! My outlines are horrible, and I am hoping your tidbit on bringing the piping bag UP and letting the icing fall will help ☺
I had a hard time with that when I started Amy. The icing consistency and holding the tip away from the cookie will make a big difference. Let me know if you need anything.
🙂 Thank you!!!
I tried to outline using tip #2 and found it very hard to do. Very hard to squeeze the bag and my line was really crooked. HELP
Hi Kim,
If the icing was hard to squeeze out of the bag it may have been too tick. Try using a thiner icing and it should come out smooth and you will be able to pipe a straight line because the icing will come out easier.
Did u outline and flood with same icing
Hi Alice,
I do outline and flood with the same icing. It is 15 second icing and you read more about it here: http://thebearfootbaker.com/2012/03/royal-icing-consistency/
Do you outline and flood with the same icing?
Hi Alice,
When I first started making cookies I used two different icings, one to outline and a thinner icing to flood. Now I use 15 second icing to outline and flood. It saves a lot of time mixing colors. Here is a link to my icing consistency: http://thebearfootbaker.com/2012/03/royal-icing-consistency/
Hi Lisa, thanks for the great tutorial. With this walk-through open on my trustee ipad, I did my first EVER iced cookies and they turned out pretty good if I do say so myself. Thanks for passing on your knowledge 🙂
I’m so glad you had good results Marie! I’m here if you ever have any questions!
Did you put a picture of the cookies on FB or Instagram? I’d love to see them!