How to Make a Cute Little Panda Bear Sugar Cookie
This post may contain affiliate links.
Do you want to make a cute little panda bear sugar cookie with me? I hope so because I think this guy is fun all dressed up in his little scarf waiting for the cooler weather to arrive. I’m right there with him. I’m so ready to decorate for fall and welcome those cool evenings with a warm cup of tea. Are you with me?

If so, let’s kick off the season with this furry little panda bear.
Supply List:
(may contain affiliate links)
Recipes:
Cookie Cutter:
Royal Icing Colors:
- White- Americolor
- Super Black- Americolor or The Cookie Countess Tuxedo Black
- Green- Succulent Green from The Cookie Countess
Tools:
- Piping bags- I like to use the bags from The Cookie Countess, but you do you and use the bags you like.
- Tips if you like to use them. I use PME #1.5 and PME #2 but this is totally up to you. Go tipless and love it!
- Turkey Lacer or toothpick to help you smooth out the icing and pop those messy little air bubbles.
- Paintbrush
- Spray Bottle- You can find them at Walmart or here is a link to some at Amazon.
How to Make a Cute Little Panda Bear Sugar Cookie Video:
Enjoy!
Let’s make a cute little panda bear sugar cookie:
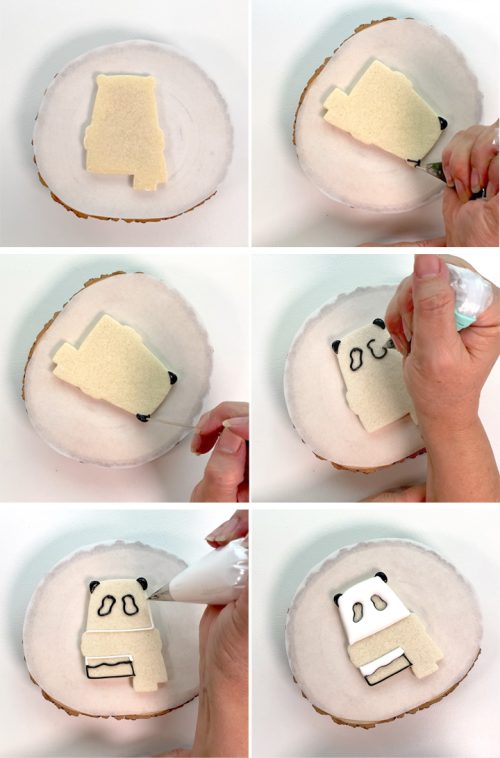
- Begin by baking your sugar cookies. Isn’t this bear cutter from SugarRex adorable? I have another tutorial on the way and the cookies don’t look the same. There are many, many different ways to use this cutter and I think that’s why I like it so much. So thanks SugarRex for making adorable cutters for us to use.
- Outline and flood the ears, eye area, and the bottom of the chest with the black royal icing.
- Then, outline and flood the head and the top part of the chest area with the white royal icing.
Time for some details and let’s add a little fur while we’re making this cute panda bear sugar cookie:
Before we start talking about these next steps let me explain something. I made the black icing bleed into the white icing all along the edges of the eyes. If you watch the video I’m sure you’ll see where I made my mistake. I also caused it to bleed around the nose. The ears and chest were fine but the eyes and nose aren’t. I’ll point it out in a minute in the directions below where I made my mistakes.
- Flood the eye and chest area with the black royal icing and use the turkey lacer or the toothpick to smooth out the icing and pop those pesky little air bubbles. Don’t add the white dots to the eyes yet. I did and didn’t like the way they looked flat so I decided to add a little texture. Don’t get stressed. It’s simple and it’s a lot of fun.
- You can outline and flood the scarf or you can wait until you finish the fur. This cute panda bear sugar cookie scarf was outlined and flooded before the fur and it was easy. If you wait until after you make the fur the scarf may not have smooth edges.
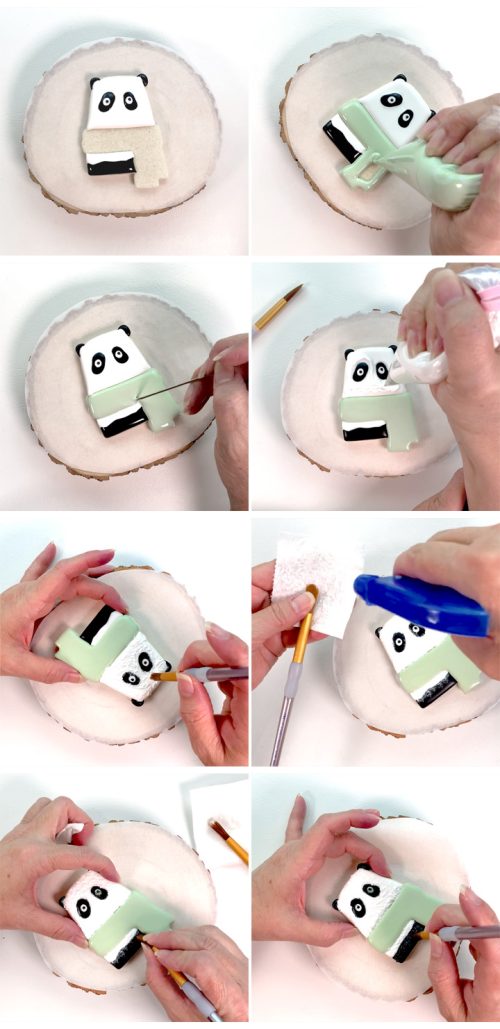
- Place the bear in front of a fan and let the icing dry. This is where I messed up and made the eyes and nose bleed. I left mine on the table without the fan. I never ever never do that! I always use a fan. What happens when I don’t use a fan? Bleeding! UGH!
- After your bear has dried for a while you can add the fur. Grab a paintbrush, squeeze some white icing on his face and tap it with the paintbrush. This is why the outline and flood icing needs to be dry. If you tap it with a paintbrush while it is wet you will cause it to sink or break. You don’t want a bear with holes in the icing so be sure to let it dry for a while before you do this. Repeat with the black icing on the ears, eyes, and black part of the chest.
- Place it back in front of the fan for at least ten minutes.
- Next, pipe white dots for the eyes and add a black dot.
I also did one other thing that caused the bleeding issue and you can see that in the video. If you spray a paintbrush with water to remove the white icing fur that accidentally gets on the black royal icing let it dry for a minute or two before you add the black fur to the eyes, ears, and chest.. I didn’t wait for the dampness to go away. Nope! I rushed in added the fur to the eyes. Be patient. It would have only taken a minute or two for it to dry, but I didn’t wait and look at my poor panda bear. Sad little guy.
Add details to the scarf to keep this little guy warm and looking good:
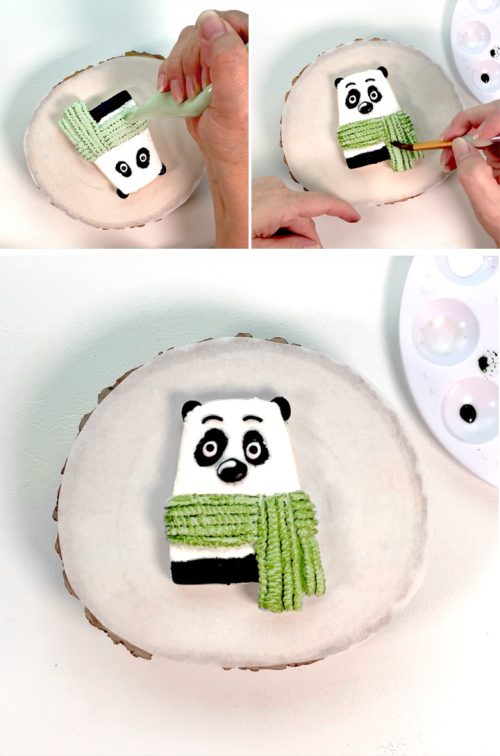
- Cut a large hole in the gree outline icing. Pipe some squiggly lines on the scarf and let it dry until you can touch it without causing it to sink or lose its shape.
- Dip a paintbrush in some water, then in some of the food gel color you used for the scarf, tap it on a paper towel to remove some of the water, and rub the edge of the brush over the squiggly lines you piped. Some food-gel color will stick to the lines and make the scarf look like it has texture.
Guess what? You’re done! You just made a cute little panda bear sugar cookie! It’s so simple! Thank you for hanging out with me today and I hope you’ll come back soon because I have a lot going on and can’t wait to share it with my cookie friends!
Bear hugs,
