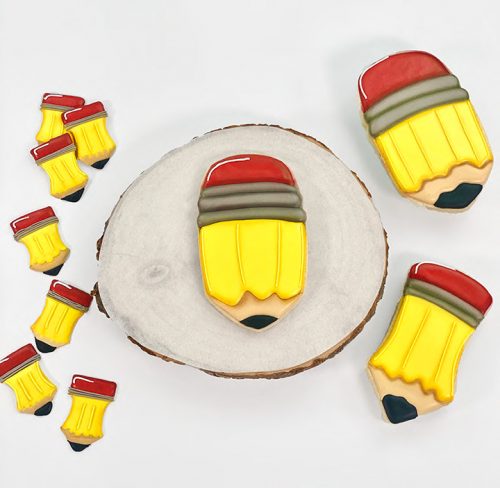
How to Make Cute Pencil Cookies that are Airbrushed
I know I’m a little late with the back-to-school cookies, but I have a good reason. My internet has been missing in action. If I was a cookie decorator before the internet had been invented I would have used a really cute pencil to write down all the information on how to make cute pencil cookies for you guys. It would have been hard to deliver since I don’t have everyone’s address, but I think we could have worked something out.
Thank goodness our internet provider came to the house, moved the satellite dish, and upgraded my account so I have up-to-date communication with the world again. Having internet feels really good especially when you don’t want to use cute pencil cookies to write cookie tutorials. I know, I know you can’t use cookies to write, but hey, let’s use them to make our kids, teachers, and friends happy.
What do you say? Want to decorate some cute pencil cookies with me?
Supply List for Cute Pencil Cookies:
(may contain affiliate links)
Recipes:
Cookie Cutter:
- Pencil Cookie Cutter– There are many cute cookie cutters out there so pick one or two that you like and make some pencil cookies.
Royal Icing Colors:
I made an outline and flood consistency for each color. If you only want one consistency here is how I make my 15- Second Consistency Icing. You do whatever makes you happy!
Airbrush System:
Airbrush Colors:
- Golden Yellow Airbrush Color
- Gray Matters Airbrush Color
- Royal Red Velvet Airbrush Color
- Totally Brown Airbrush Color
Tools:
- Decorating Bags
- Food Safe Edible Marker
- Turkey Lacer, Thingamagenie or here, Boo Boo Stick, or Toothpick- Something to help you smooth out the icing and pop any air bubbles after you outline and flood the cookies.
New Products I’m Loving!
- Before we get started I wanted to mention a few new tools I’ve been working with lately. Hillary at The Cookie Countess has a Mesh Non-Stick Baking Mat and I love it! It makes the cutest mesh pattern on the back of the cookies and I think it’s adorable. I’ve been using Silpats for years and I love them, but they cost over $20 each. The Mesh Non-Stick Baking Mat at The Cookie Countess is less than $10! What a great deal! I’ll be purchasing more in the near future.
- She also has The Cookie Countess Counter Cover and I use it every single day! It keeps your counter or table safe and clean and allows for easy clean-up. I wish I could have had this the entire time I’ve been decorating. Thanks, Hillary for making decorating and clean up easier.
- Last but not least is the Magic Stencil Screen Airbrushing Tool! Did you get one? I bought mine the first day she announced she had them because I know the magic it holds. Basically, it holds your stencil in place so the air from your airbrush gun doesn’t move the stencil as it’s sprayed. This means the color is sprayed where you want it and not under the stencils and it’s small enough to store with your stencils. I place mine in a 12″x12″ Album Refill with a piece of cardstock paper behind it. I always know where it’s at so that’s a real good thing. It’s with the stencils keeping them company. I’ll be using mine in tutorials soon so you can see it in action.
How to Make Cute Pencil Cookies that are Airbrushed Video:
I love airbrushing cookies so stay tuned for more!
Let’s Decorate Some Cute Pencil Cookies:
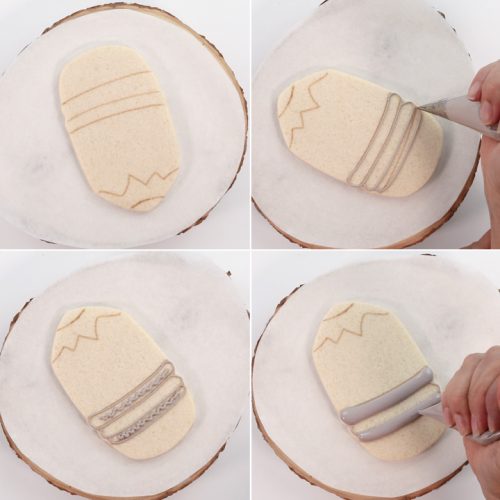
- Draw the different sections of the cookie with a food-safe marker.
- Outline the gray ferrule (the gray metal band) and pipe a line in the center of each to help prevent the icing from sinking as it dries.
- Flood the top and bottom ferrule sections.
- Let it dry until the top crusts over.
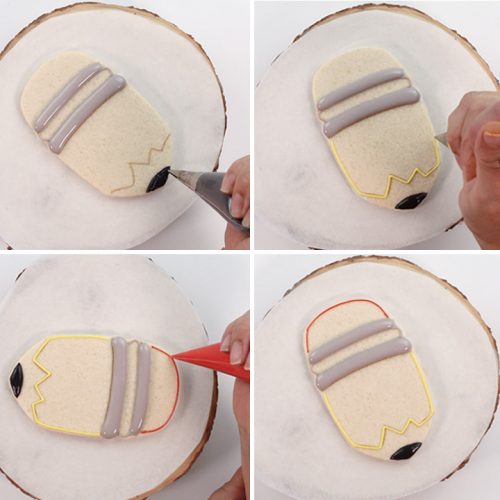
- While you’re waiting on the ferrule to dry you can outline and flood the tip of the cute pencil cookies with the black royal icing.
- Then, outline the center with the yellow royal icing.
- Next, outline the eraser with the red royal icing.
Do You Airbrush As You Go or Wait Until The End?
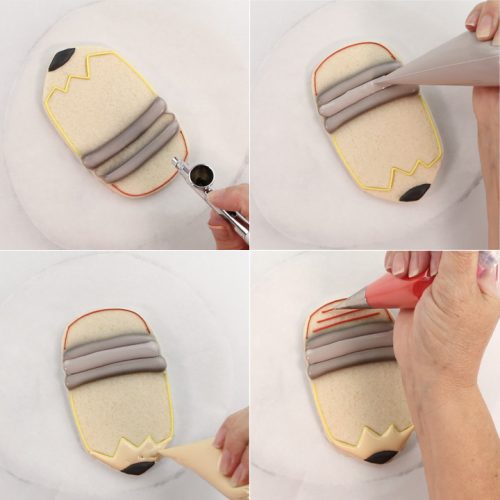
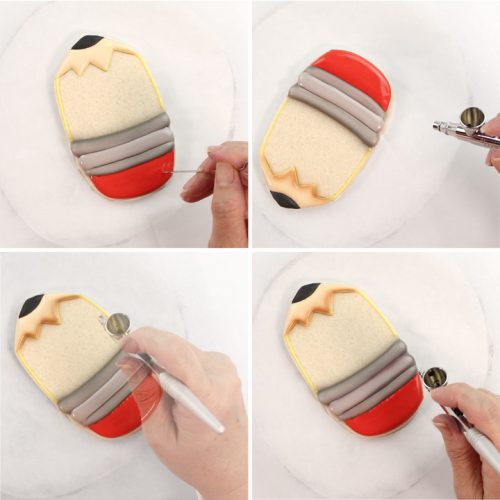
- Before you add more gray royal icing to the ferrule you can airbrush the sections you’ve already flooded. I used The Cookie Countess Gray Matters Airbrush Color and I really like the way it turned out.
- After you finish airbrushing the gray icing you can pipe another line in the center section of the ferrule and flood it with the gray icing.
- Next, flood the wood part with the ivory royal icing.
- Now it’s time to flood the eraser with the red royal icing.
Look at the second image in the picture below. I like to make the icing dance as I airbrush:
- Use your turkey lacer or Thingamagenie to smooth out the royal icing as you flood your cookies. I should’ve mentioned this earlier, but I didn’t. Sorry about that.
- I know that the red royal icing isn’t dry, but I like to airbrush when the icing is wet. This can be hard because if the icing starts to crust over you can make cracks so be careful and work quickly.
- Airbrush the wood part of the cookie with the Totally Brown Airbrush Color.
Pencils Make Me Happy:
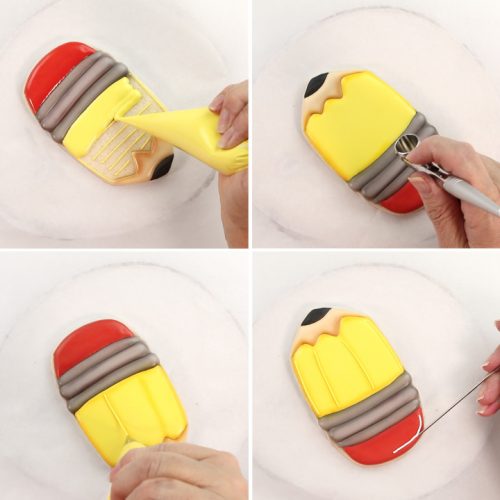
- Last but not least is the pretty yellow icing. I honestly don’t think the cute pencil cookies would be all that cute if we didn’t have a pretty yellow. Pipe some support lines in the center of the pencil body.
- Flood.
- Let it dry or airbrush it with the Golden Yellow Airbrush Color while it’s wet.
- I like to airbrush where I’m going to pipe the two yellow lines on the cookie because I think it helps the yellow royal icing stand out and it looks like a shadow.
- Add a white line to the top of the eraser and you’re all done!
All Done!
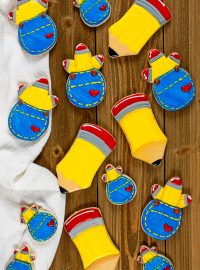
I hope you enjoy these cute pencil cookies as much as I do and I hope none of us have internet issues ever again. If we do, we can make ourselves some pencil cookies. They won’t help us communicate but they will make us happy!
Bear hugs,

