How to Make Adorable Popcorn Box Royal Icing Transfers
This post may contain affiliate links.
Did you see the popcorn candy decorations the other day? Well, if you think about it, popcorn needs a box so why not make some popcorn box royal icing transfers? What a cute Friday night cookie!
I hope you get a chance to make some because it’s fun watching the cookies come together after you make the transfers in advance! That is one of the reason’s I love royal icing transfers. It makes decorating simple and quick. Now let’s make some popcorn boxes!

Supply List
(may contain affiliate links)
Recipe:
Royal Icing Colors:
- Red
- White
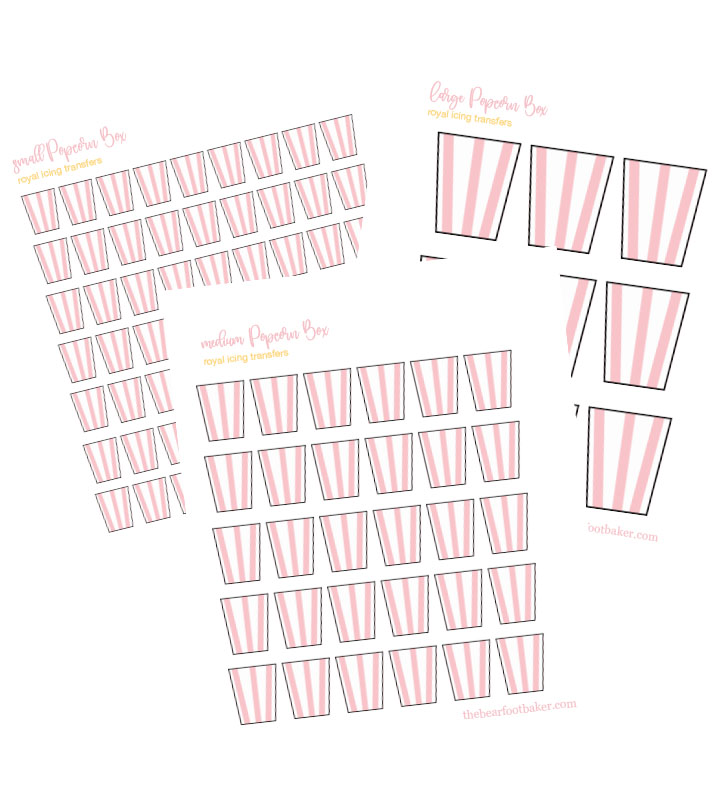
Popcorn Box Patterns:
- Small Popcorn Box Royal Icing Transfer
- Medium Popcorn Box Royal Icing Transfer
- Large Popcorn Box Royal Icing Transfer
Tools:
- Turkey Lacer
- #2 PME Decorating Tip (optional)
- Decorating Bags
- Wax Paper or Cello Bags
- Tape
- Foam board or something firm to use as a background for the transfers. If you’d like to see a tutorial on how I cut and use the transfers you can find it here on my Simple Lemon Royal Icing Transfer Tutorial. You can get four pieces out of each foam board. I use them all the time!
Popcorn Box Royal Icing Transfer Video:
Here’s a little video for ya. Enjoy!
Popcorn Box Patterns:

Just in case you missed it in the supply list, here are the free popcorn box royal icing transfer patterns for ya. Enjoy!
- Small Popcorn Box Royal Icing Transfer
- Medium Popcorn Box Royal Icing Transfer
- Large Popcorn Box Royal Icing Transfer
Cello Bags:

Are you curious about what I use to pipe the royal icing transfer? I use TMP Cello bags and they are wonderful! I’ve always used wax paper in the past and then Maddie from Maddi’s Cookie Co posted about using cello bags in her Instagram stories so I tried it. Well, let me tell you it was love from the very first moment!
These things are like a dream. They hold the royal icing beautifully and they let go like a dream. As a matter of fact, the back of the transfer is super smooth. I love the bags! Thanks, Maddie for letting us know about them.
Foam Boards, Painters Tape and Cello Bags:

- Begin by taping your pattern onto something flat that’s easy to move. My background of choice is foam board. Click this Simple Lemon Royal Icing Transfer tutorial to find out more about it.
- Once your pattern is taped down cover it with the cello bags (or wax paper) and tap them into place. Now you’re ready to begin.
Time to Outline:

- When you’re ready to make them you’ll need an outline and flood consistency royal icing. Or if you want to use one consistency for outlining and flooding, I’d recommend 15-Second Royal Icing.
- Outline each popcorn box and let the outline dry for ten to fifteen minutes.
Let’s Flood the Popcorn Boxes:

- Now fill each box with the flood royal icing.
- See the squiggly line in the top row of boxes? I added those to see if I could tell a difference in the icing once it had dried. Honestly, sometimes I can tell a huge difference and sometimes I can’t tell at all.
That’s another great thing about royal icing transfers because you can experiment with your royal icing and really get to know how to use it. I think you should try them out if you haven’t already.
Let the surface of the popcorn boxes dry for a few minutes until they form a crust on the surface. Just to let you know it’s going to take a while for these babies to dry, but once the surface is dry you’re ready for the next step. Let’s do this!
Every Popcorn Box Needs a Little Red:

- Pipe red lines on your boxes. You have a few choices to make. Do you want thin lines or thick lines on your boxes? You decide and have fun!
Store Them Until You’re Ready to Add Them to Cookies:
Store them in an airtight container away from the sun until you’re ready to use them. I know my yellow is kind of bright in my photo, but I broke my camera. It’s not a bad break and it can be fixed but in the meantime, I’m using my old faithful and I’ve kind of forgotten how to use it. It’s okay, it’s good for the brain to try to remember things like that. So please forgive the over-the-top yellow.
Bear hugs,
