Easy Rose Swirl Cookies
This post may contain affiliate links.
Rose swirl cookies are not only easy to make but they are gorgeous. These rose swirl cookies are sugar cookies decorated with royal icing. You don’t have to use royal icing if you don’t want to. You can use your favorite butter cream icing if you prefer. If you plan to shipping them, you may want to consider using royal icing because it will dry hard and make packaging a lot easier.
 I really like these cookies because they are very pretty and make a lasting impression. Your guests will think you spent hours decorating when it really only takes a few minutes.
Supplies for Rose Swirl Cookies:
Royal Icing (recipe, how to video, how to make royal icing with a hand mixer)
Circle Cookie Cutter (I used a 2 1/2 inch circle)
Piping Bag
Wilton Decorating Tip #1M
Food Gel Colors of your Choice
 Begin by baking a batch of your favorite sugar cookies and cutting some circle shapes. If you need a good recipe, this is the one I use.
While the cookies cool, make a batch of royal icing. If you want to make a half batch of royal icing, click here for the recipe. Then, mix with the food gel colors you want your rose swirl cookies to be. I used yellow, white and blue for this platter. Keep in mind that the consistency is very important when making these. The icing needs to be thick enough to hold it’s shape. If it isn’t thick enough, it will not make crisp lines on the rose swirl and it will look like the icing has melted a little.
You may want to mix your icing and make a few practice roses on some parchment paper or even in the icing container to make sure it is stiff enough. If it is not thick enough, add a little powdered sugar until it reaches the right consistency.
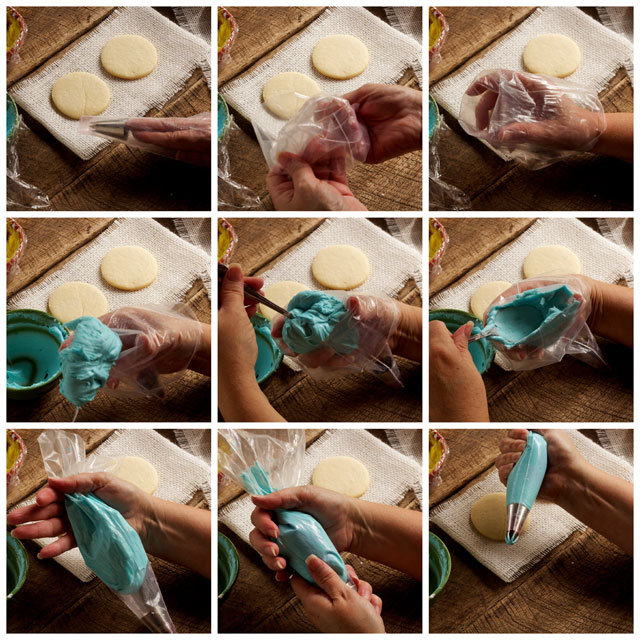
Now that your cookies are baked and your icing is ready, you need to fill the icing bag. It has been a while since I have demonstrated how to do that so I thought today would be a good day to share.
- Place the 1M piping tip into the bottom of the bag. Trim the bottom of the bag so the end of the decorating tip is not touching the hole at the bottom of the bag. If it is touching it will affect the shape of the icing that comes out of the bag and mess up your rose. Trim a little off the bag at a time until the bottom of the tip is free and clear from the bag but not so much that it won’t stay in the piping bag.
- Fold the top of the bag over.
- When the top of the bag is folded over, it makes a cuff for your hand. This will allow you to fill the bag with icing while allowing the top of the bag to remain clean. Your hand will also help you scrape the icing off of the spoon.
- Spoon the icing into the bag.
- Press the icing into the bag using the spoon and the hand holding the bag.
- Press the icing into the bag with the back of the spoon as far as you can.
- Then, twist the top of the bag.
- Hold the bag at the twist and force the icing down towards the tip.
- Gently apply pressure until you see when the icing reaches the end of the tip.
You are ready to make some rose swirl cookies now. Let the fun begin!
 Hold the bag at a 90º angle. Place the tip above the center of the cookie and apply gentle pressure. The tip should not touch the cookie.
 As you apply pressure to the bag, begin to make a circle with the icing. You want the circle to be tight without covering the design you just made.
 Continue to apply pressure while holding the bag at a 90º angle.
 Continue to work around the circle until you reach the edge.
 Keep going.
 Once you get to the edge, begin to release the pressure on the bag.
 As you stop applying pressure to the bag, give a small quick pull to break the icing in a point.
 Use a tooth pick to gently press the tip against the icing onto the rose swirl.
 If you want to add a little bling to them, you can gently sprinkle them with Disco Dust. I know some people don’t like to use Disco Dust but I was feeling a bit brave today. It is raining and I wanted some sparkle and the Disco Dust hit the spot! You can use sanding sugar if you don’t like Disco Dust.
See? Aren’t they easy? I told you they would be. It is also my little way of sending you some roses. I want you to start your week off with a smile!
Flower Cookies:
Flower Cookie Pops
Flower Bouquet
Black Eyed Susan Cookies
Sunflower Cookies
Whimsical Flower Cookies
Edible Apple Blossom Cookies
Bear hugs,
PS-Incase you want to make these later, I have made a picture for you to Pin. It shows each step for you! Happy Monday friends!


I love how elegant these look – and with the addition of disco dust!
Thanks Anne. I love adding a little sprinkle of disco dust to things. Sparkles are so happy!
That’s one gorgeous rose swirl!
Thanks Michelle! I have missed seeing you around! Glad to hear from you.
Okay. I love these big swirly rose cookies but I have to laugh when I see them. Here’s the thought that goes through my head….”Considering how pathetic my tiny swirl rose transfers are, like I would magnify the horror making a ginormous swirly rose?” But those of you who can, please consider to do. Once again, an awesome tutorial 🙂
consider = continue
Play nice autocorrect.
Hahahaha! You really need to try them Anita! They are WAY EASIER the the tiny swirl roses. I promise!!
These are simply beautiful! Love the swirly rose cookies! 🙂
Thanks Karen. They are a lot of fun to make. I also love how fast it is to make a giant tray of them.
I love making swirl roses and how simple, yet simply elegant they are. Once I spent hours on cookies and added a few rose swirls and everyone kept commenting on the roses, not on the ones I had spent hours on! LOL Anyway, those roses you made are beautiful and I love that background!
Isn’t that the way it goes! I am happy your guests liked the rose swirls.
Beautiful… and EASY! Love it! The disco dust is such a nice touch, too!
Hi Mike! Have you noticed how much “Disco” Dust “ROCKS” or should I say “Disco Dust is Groovy?” Hehehe
Simple, classy, and beautiful. You gotta love that! I like doing the rose swirl on cupcakes too!
YES! I taught some girls at our camp how to do that this summer. They LOVED it! 😉
I love the way these look!! Especially with the disco dust!
They’re beautiful 🙂 It’s a great way to make the cookies look professional and pretty, and it looks simple and easy to do. Thank you so much for the tips.
Wow! Simply gorgeous! I love how the disco dust looks. Shiny, sparkly and perfect!
I tried some out with leftover icing yesterday. 24 hours later, they are still not completely dry all the way through… How long do you think it takes to dry 100%? I have a party coming up in about 5 days & I want to make sure I plan accordingly. Thanks! Excellent pictures and instructions!
I would use fresh icing for these cookies. It needs to be tick and it should dry overnight or in about 8 hours. You can try placing them in front of a fan and see if that will help.
Hope this helps,
Lisa
What tip do I use? I am a beginner.
Hi Chris,
It’s listed under the Supply List but it is a tip 1M. Here is an Amazon link for you: https://amzn.to/46Sb0Fz.
Happy Decorating!