How to Make Pretty Royal Icing Toothpick Roses
Okay, I’m not going to tell you making royal icing toothpick roses is the simplest thing to do with royal icing because it’s not. However, I will tell you that you can do this! All it takes is a little practice and patience. You can make pretty royal icing toothpick roses like a master baker because you’re amazing!
Making them on a toothpick is great because you don’t have to bake cookies or do anything crazy. All you have to do is make a batch of royal icing. Color it. Put it in a piping bag. Grab a toothpick. Make some beautiful roses that’ll be ready and waiting for you when you want to decorate. Trust me because I know you’ve got this!
I hope you’re ready because there’s a lot of information in this tutorial.
How to Make Pretty Royal Icing Toothpick Roses Supply List:
(may contain affiliate links)
Recipe:
Royal Icing Consistency and Colors:
- You can use any color of food gel you’d like to make the roses. Just be sure you mix the color before you test to see the thickness of your royal icing. The thicker the royal icing, the more defined your final rose will look. If your icing has too much water, the rose will look like it’s melted a little so make sure your icing is thick enough to hold the petal shape when you pipe it.
- To make these toothpick royal icing roses you’ll need thick royal icing. Place a small amount of royal icing in a bowl and stir it with a spatula. Lift the spatula straight up after stirring it and the icing should form a peak in the bowl and on the spatula. The peak shouldn’t fall over and the icing should not move. It should stay in place and that’s how you know your icing is thick enough to hold the shape of the roses as you pipe them. If the tip of the royal icing does fall over or bends, you can add a little sifted powdered sugar and give it a good mix to make it the right thickness for your roses.
Tools:
- Toothpicks- Normally the toothpicks I purchase are 2.5,” but the toothpicks I used to make these are four inches long because they’re a little easier to spin without poking your finger in the icing. Use any size toothpick you want, but if you struggle you can always use the larger ones.
- Flower Lifter
- Tipless decorating bags- The Cookie Countess, The Flour Box Shop, and TMP
- Foam Board – Foam boards are great for making royal icing toothpick roses because you can poke holes in the board so you can dry your roses while keeping them upright.
- Cooling Grid– Placing the foam board on the cooling grid will allow enough of the toothpick to poke through the foam board and cooling grid and touch the baking sheet. This will help make the toothpicks be stable so they won’t lean or fall over. It’s a great little toothpick holding table for your roses. And you can reuse any time you want to make roses.
- Baking sheet- If you place the cooling grid and foam board on a baking sheet it’ll be easier to move them out of your way as they dry.
- Wax Paper & Painters Tape- This is a great way to cover your foam board so it’ll stay clean so you can reuse it for years to come.
- Decorating tip #101- Tip #101 is a small rose tip. The smaller the rose tip the smaller your roses will be after you decorate them. Country Kitchen Sweetart has a set of three rose tips and a coupler (which I didn’t use in this tutorial) for a very good price.
- Icing Rose Tip Set by Country Kitchen Sweetart
- The Cookie Countess Ateco 101 Rose Tip
- Flour Box Bakery Wilton 101 Rose Tip
How to Make Pretty Royal Icing Toothpick Roses Video:
I’ve heard most of you like watching things in action so I put together a video for you.
How to Make Toothpick Roses:
When making roses you need to be patient and work with several roses at a time because you’ll need the layers of royal icing to set a little before you add more petals. If you rush and pipe all the petals at once your roses will kind of blend together which won’t make a realistic rose. Rushing will make the petals look as if they’ve been melted together instead of looking like individual rose petals.
When you work with multiple roses and add a few petals at a time to each rose, it’ll allow the rose petals to dry and set up. When you add the next petals they won’t melt together.
Let’s start at the beginning because as they say, “Knowledge is power.”
- When you think about making toothpick roses you probably think you’ll need a rose tip, a piping bag, and a toothpick, but what happens after you pipe the rose? Where do you put it to dry? Don’t worry because there’s a simple and very affordable way to make a holder.
- You probably have most of the supplies for the toothpick holder except for a piece of foam board. If you’re out shopping, stop by The Dollar Tree because you can buy them for one dollar. If you go to Walmart they cost about four dollars. I don’t know about you, but I’ll take the one dollar foam board because I can get four for the price of one and that’s a good deal to me.
- The foam board I’ve found is 20″ X 30.” Depending on how it’s cut will determine how many pieces you get. When you’re cutting it to use with your royal icing transfers you should cut it a tiny bit larger than an 8″ x 11″ piece of paper because that is the size of your royal icing transfers. If you’ve been around here long you know you need to tape the royal icing pattern to the foam board and then cover and tape a piece of wax paper on top of it. The reason you do that is the wax paper will allow you to easily remove the transfer once it’s dried completely.
- Let’s talk about cutting the foam board. Keep in mind you need it to be a little larger than your 8″ x 11″ pattern. The most I can get out of one foam board is five and I’ve laid out a picture of how I do that.
- I usually lay five pieces of paper on the foam board and draw lines with a ruler around them.
- The best cutting device I’ve found is a bread knife. Just be careful and don’t cut your hand.
- Cutting a straight line is the simplest way to cut so I cut the straight 30″ line first.
- After you cut the board lengthwise, it’s easy to cut the smaller lines. When you’re done you’ll have five royal icing transfer boards or you can use one or two for the royal icing toothpick rose board.
**Tip**
I always cover my foam board with wax paper because the foam board isn’t food-safe and it keeps the boards clean so I can reuse them over and over. It’s an amazing and affordable tool for your sugar cookie decorating.
- So now you know how to make the royal icing transfer boards, but how do you make it work for royal icing toothpick roses? It’s simple so let’s make one so we’ll have it whenever we need to make small roses for our sugar cookies.
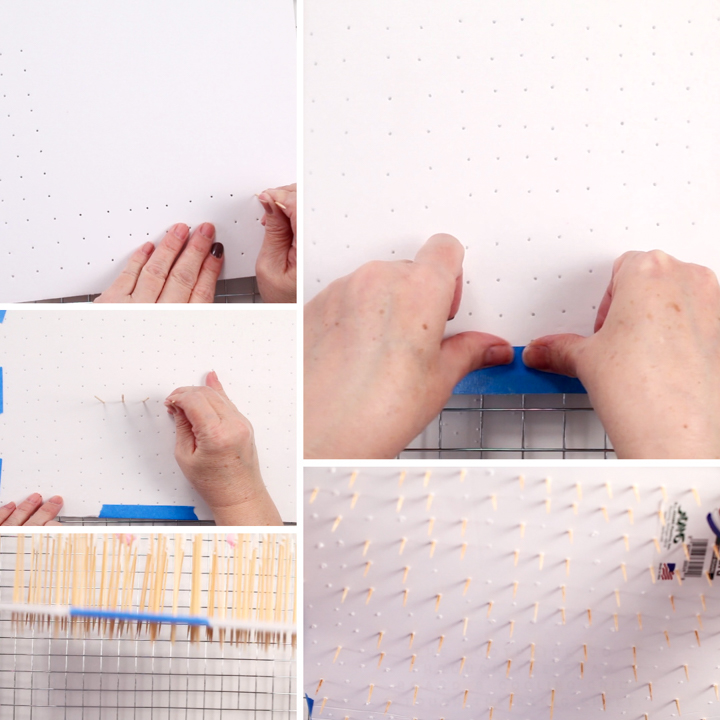
- Begin by poking holes in the foam board with a toothpick. The lines don’t have to be straight, but be sure to leave enough room in between so the roses don’t touch each other as they dry.
- After the holes are made, cover the board with wax paper and tape it down. I like painters tape because it holds well and will let go with a gentle pull.
- Now it’s time to add a few toothpicks so they will push through the wax paper and be ready when you need them. Don’t fill your board all the way because that will drive you crazy. Trust me.
- Did I mention the cooling grid? Let’s talk about that now. Place a cooling grid on a baking sheet before you add the toothpicks. Why? I’m glad you asked.
- When you add the toothpicks you should push them through the foam board, through the cooling grid, and make them touch the baking sheet. This will help make the toothpicks stand straight so they don’t lean over and touch each other.
- If they do touch each other, they will probably mess up your beautifully piped roses. We definitely don’t want that to happen.
- Now you have a royal icing toothpick holder. How cool is that?
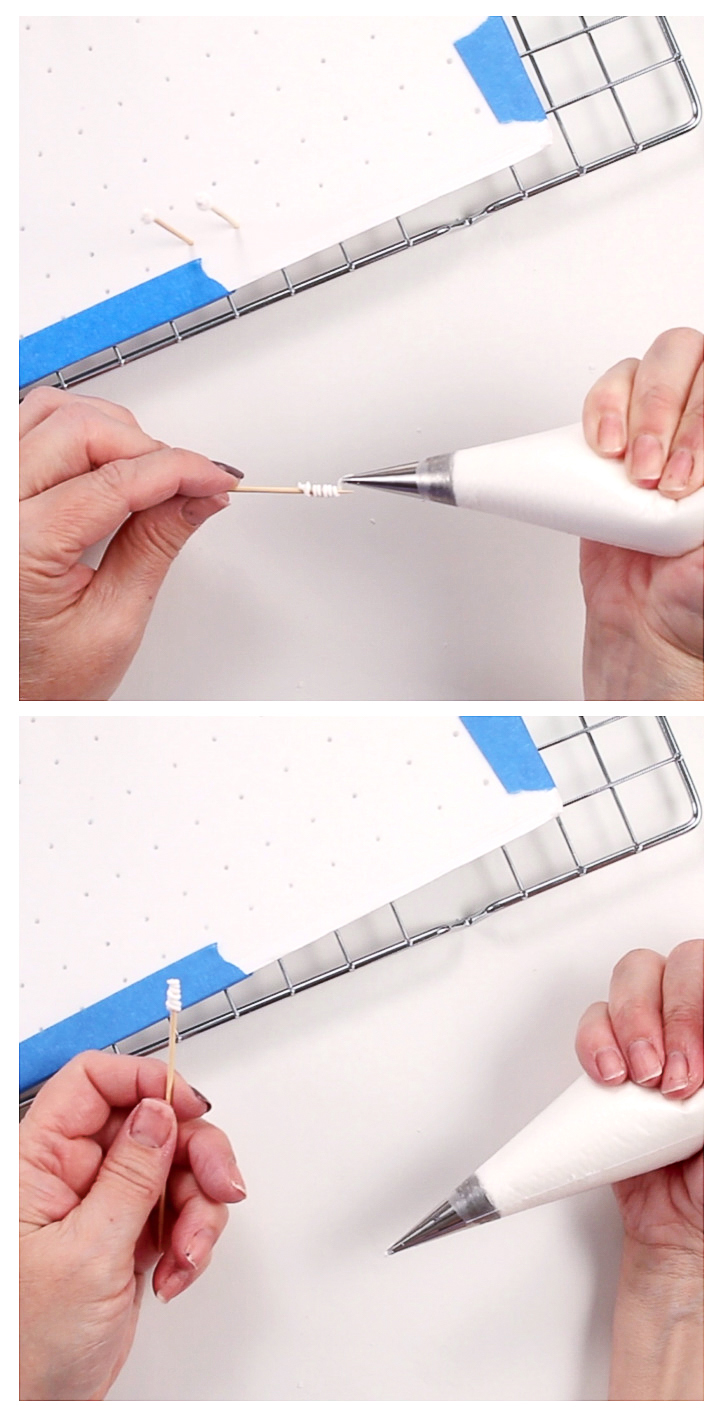
I have a little secret to share with you. For some reason, I need to pipe a line of royal icing around my toothpick before I begin making the roses. I don’t know why, but this is what works for me. If you don’t need to do this, please skip this step.
- Pipe a line of royal icing around the toothpick.
- Place it in or of the holes in the board so it can dry for a few minutes.
- It makes a great little base for me and it might help one or two of you.
- Here is something I did just for this tutorial. I used white royal icing so you can see how the base works. When I make other royal icing toothpick roses, I pipe the baseline the same color as the rose. It won’t stick out like a sore thumb if you see it when the rose is complete. I left a few of them in the image at the top and bottom of the page.
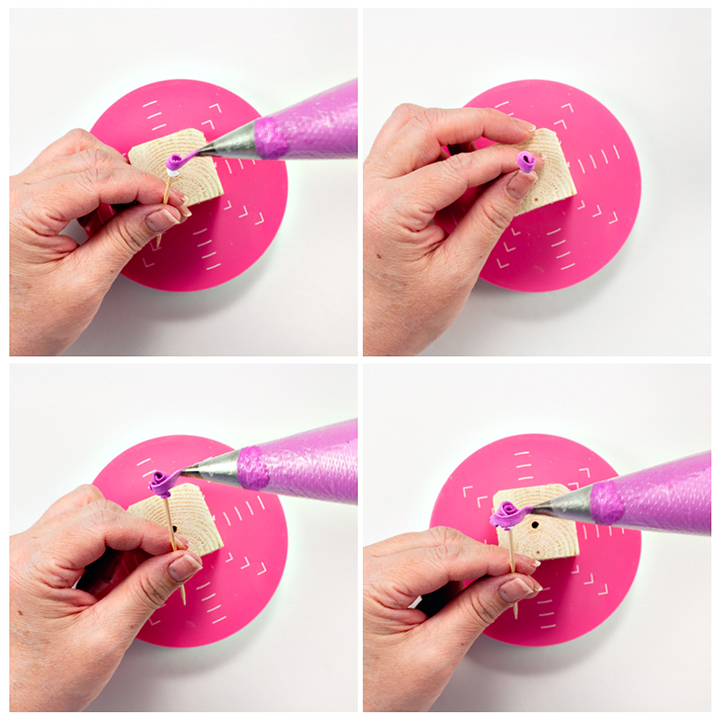
- If you’re making small roses you should use a #101 or a #101S tip. It kind of looks like a teardrop shape and you need to keep the wide end at the bottom and the thin at the top. If the tip is flipped your rose will look clunky.
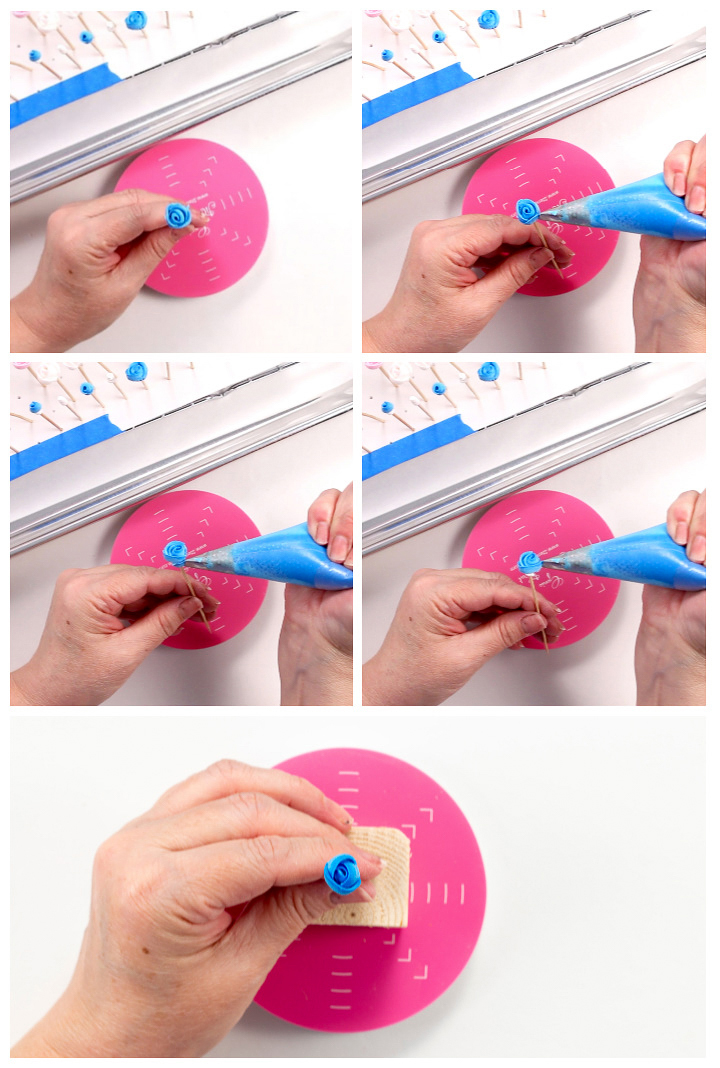
- Begin by piping the center of the rose. It’s basically a ribbon that spirals all the way around the toothpick. If you can, make the narrow end of the #101 tip lean in so it will look like the rose center is closed and hasn’t opened yet.
- You can let this dry for a few minutes while you pipe two or three more toothpick centers. As I said before, let each layer dry for a few minutes so the icing doesn’t relax and kind of melt into each other. Waiting will all the petals to dry and look like individual flower petals. Patience is important.
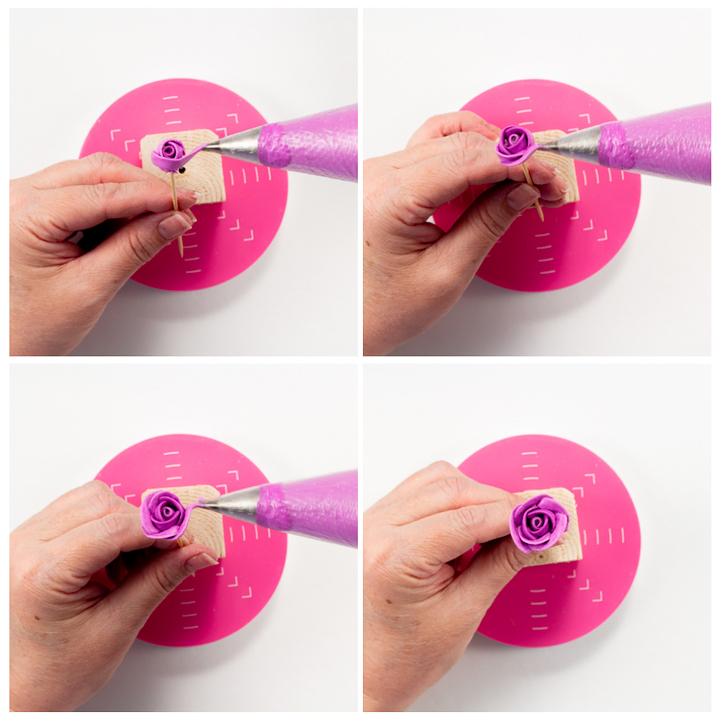
- Next, pipe three petals around the spiral. Pipe the petals in an up and down motion like a rainbow and overlap each petal.
- Let the three petals dry for about ten minutes before you add the next layer.
- When you make roses its good to keep in mind that the petals are added in odd numbers. One spiral for the center, three petals for the first layer, and five petals for the last layer. If you want your rose to be larger your next layer would be seven petals.
- Make the five petals in the up and down motion overlapping them.
- Place the toothpick in the foam board and let the rose dry overnight.
- Mixing up the sizes of the roses will add a little character to your cookies. All the roses in nature don’t grow the same size so mixing it up will make the cookies more interesting.
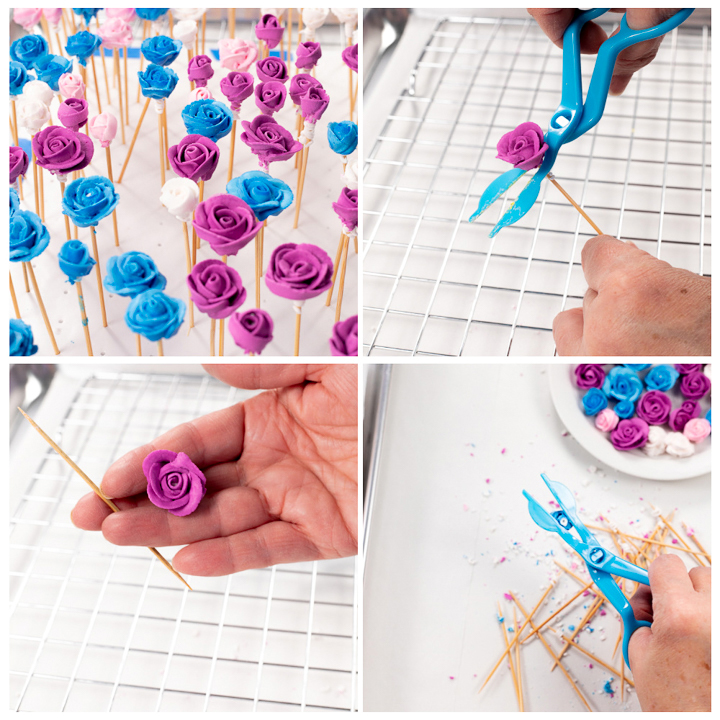
- Removing the roses from the toothpicks after they dry is fun. All you have to do is push the rose off the end.
- Once it’s removed, trim the bottom of the rose with a flower lifter. The bottom of the rose needs to be as flat as possible so it will sit nice and pretty on your cookies.
- If you don’t have a flower lifter, you can use scissors. I like to use the pair that came in my set of knives because I know it’s safe to use on food.
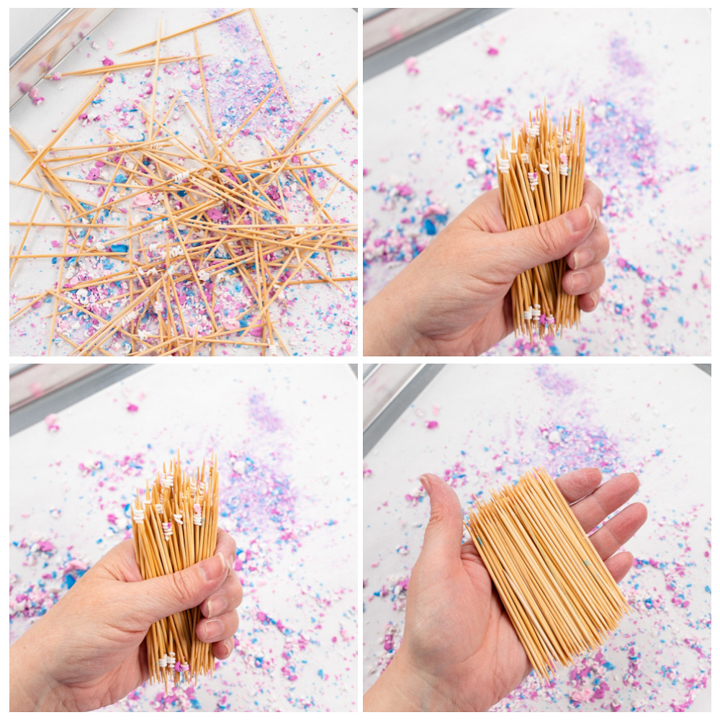
- Making pretty things isn’t always pretty. Moving dry roses from a toothpick will make a bit of a royal icing mess so I recommend removing them over a baking sheet. It’ll catch most of your little royal icing pieces so clean up will be easy.
- I usually remove the icing that stuck to the toothpicks so I can use them again. Add some powdered sugar to leftover royal icing to make it thick and you won’t waste any icing. It’s fun to have colors to choose from when you decorate.
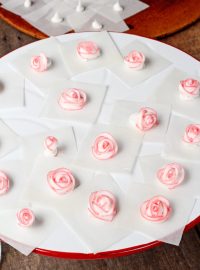
Toothpick royal icing roses ready to add to your sugar cookies. There are a few things I want to talk about before we go.
If you don’t have to pipe the line on the toothpicks before you pipe the spiral center then don’t do it. It’s a way that helps me, but it might not be for everyone.
How are you all doing since we’ve all been under restrictions? It’s not easy to stay home not knowing when things will start to improve. All of us have good days and some not so good days because we all want things to go back to normal. Some places are starting to make changes and adjust the restrictions by opening restaurants to half the capacity. The news here said some stores are starting to reopen.
As these changes are being made, I pray all and your families are safe and stay safe. Cookie people are full of love and make the world a happy place so stay strong! Love you all!!!!
Bear hugs,











These are awesome! I haven’t done a lot of baking and decorating since the restrictions. Finally have time to get to other projects, like painting my kitchen and new floors! I think I’ll try these roses though, I can even use them on my cakes! Do you have hints on how to get the thicker consistency for the roses? Thanks and be safe!!
You are awesome to share all these videos and how to’s with everyone. Thank you so much.
Oh, this is going to be fun! Have avoided roses at all cost because I manage to make nothing more than a huge mess, but the rack and foam board trick will keep my OCD happy and (hopefully) keep me from destroying roses I’ve made. It’s brilliant! Thank you Lisa -you are the beary best!
Could this also be done using buttercream?
Yes, it can Beks! I do it all the time and it’s super fun! 🙂