How to Make Pretty White Pumpkin Cookies
This post may contain affiliate links.
I’m not sure what it is about fall that makes me crazy, but I think it’s all the colors and beautiful things nature offers us. Dear hubby Alan and I went to Cades Cove to see all the gorgeous fall colors, but they hadn’t quite reached their peak. I’m watching closely because once they change I’m going to go for a nice crisp hike and take some pretty white pumpkin cookies to enjoy for my snack. Who knows, we might stop and buy some speckled pumpkins on the way home.

It sounds like a perfect date for me.
Supply List for Pretty White Pumpkin Cookies:
(may contain affiliate links)
Recipes:
Sugar Cookie Recipe
Royal Icing Recipe
Cookie Cutter:
The cool thing is you can make this style of a cookie with any pumpkin cookie cutter you have on hand. Once you make your pumpkin cookies send a picture of them to me at lisa@thebearfootbaker.com we’ll make a fun cookie collage!
Royal Icing Colors:
- Whipped White Gel-15-Second Royal Icing Consistency
- Tuxedo Black Gel– thick consistency royal icing and you’ll use some for spattering the black dots on the cookie
- Totally Brown Gel
- Forest Green– thick consistency royal icing
Americolor
- Ivory
Tools:
Turkey Lacer
Tipless decorating bags from Truly Mad Plastic, Flour Box Bakery, or The Cookie Countess
Leaf Tip #67
Star Tip #20
Food-Safe marker to draw the pattern on the cookie
Paintbrush
Vodka or flavored extract to mix with your food gel color so you can make the splatter on the cookie.
Optional:
Cookie Turntable Swivel for Cookies and the Minimat
Place your cookies in front of a fan so the icing will dry with a nice shine.
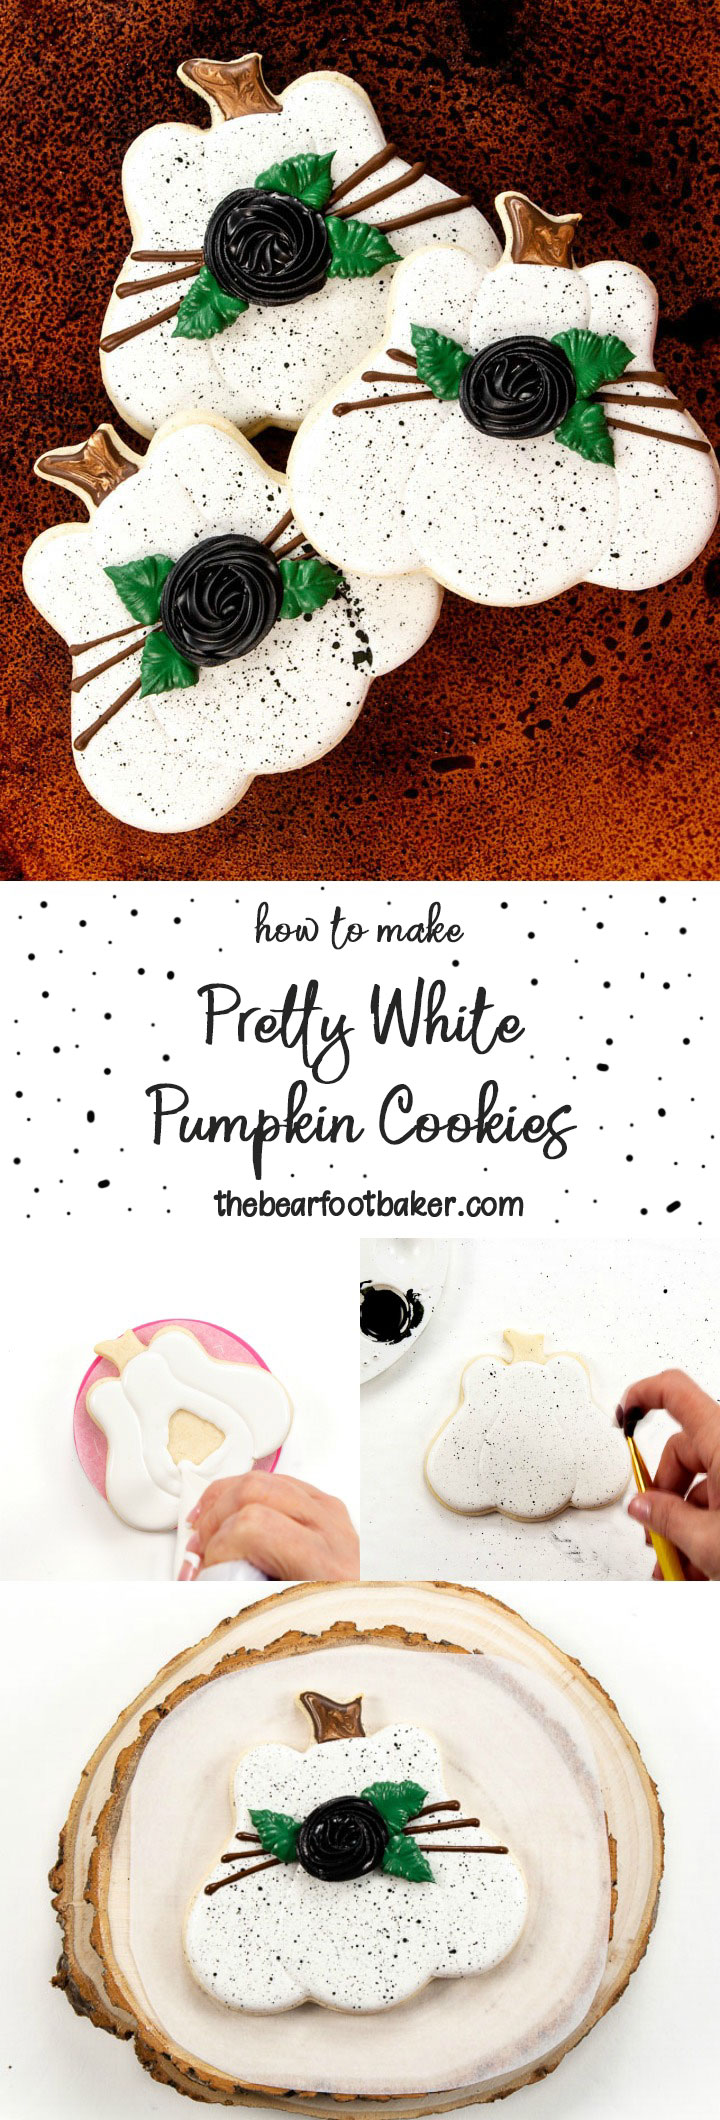
Pumpkin Cookie:

- Draw the pattern on your cookies with a food-safe marker.
- Next, outline the sections of the pumpkin with the white royal icing.
- Let it dry for about five to ten minutes.

- Flood the side sections of the pumpkin with the white royal icing.
- Let it dry for a few minutes until the top of the royal icing forms a crust. If you don’t wait, the royal icing will run together and dry in one flat section instead of looking as if it has three sections. If you want your icing to have a little bit of a shine when it’s dry, place it in front of a fan. I know you probably know all this already, but I wanted to share in case anyone new is reading along.

- Next, flood the center of the pumpkin.

- Let the royal icing dry completely.
Splatter Time!

- Are you ready for the fun part?
- Cover your table surface with parchment paper so you don’t have dots everywhere.
- Grab your food gel color and some vodka or flavored extract because the fun is about to start.

- Mix a little black food gel and then add a little of the vodka and stir it until it’s combined.
- Dip your paintbrush into the mixture and prepare to have fun because the splattering is about to begin!

I love y’all bunches so I’m going to share a huge tip with you. Wear gloves when you do this next part because this isn’t like the markers you buy for your kids. You know, the ones that are washable. Yeah. This food gel will stick around for a few days unless you do something crazy and bleach your sink. It kinda sorta worked, but next time I’ll wear gloves to avoid the bleach. I just thought I’d share that little tip with you.
Okay, back to the cookies.
- Place your cookie on the parchment paper and grab your paintbrush.
- Dip your paintbrush into the food gel vodka mixture and wipe off a little of the gel before you flick it.
- Hold the brush over the cookie and pull your finger across the tip of the brush so the gel mixture will fall all over the top of the icing.
- Watch the magic happen! This is so fun I want to splatter all my cookies with color.

- Carefully outline and flood the stem of the pumpkin with the brown royal icing.
- Be careful and don’t touch the part of the cookie with the wet food gel color or the dots will smear.

- While the brown icing is wet add a few lines of the ivory-colored royal icing.

- Use the turkey lacer to mix the brown and tan together.

- Let the cookie dry for about an hour so you don’t smear the dots as you add the final details.
Add a Flower and Make it Pretty:

- Next, pipe three brown lines across the pumpkin making them cross in the center of the pumpkin so it’ll be a cute design under the flower.

- It’s time to pipe the black flower in the center where the lines meet.
- The black royal icing is thick and it’s placed in a tipless decorating bag with a #20-star tip.

- Hold the decorating bag straight up and down over the center of the cookie as you add a little pressure to the bag. Move the bag in a circular motion until you have a flower the size you need.

- Add the leave with the thick gree royal icing and the #67-Leaf Tip.
- Start at the base of the flower and slowly pull the bag away as you gently squeeze the icing and then push the bag back toward the flower. This will give your leaves a little wrinkly leaf look.

- Let your cookie dry completely.
How to Make Pretty White Pumpkin Cookies Video:
Watch the splatter happen here!

I hope you like these pretty little pumpkin cookies. You can use these for your fall hike or you can share with friends. One friend told me these would make a great wedding favor cookies and I didn’t think about that because the fall colors are calling and I was distracted by their beauty!
Whatever you use these cookies for I hope you enjoy them and celebrate the colors of fall.
Bear hugs,

Beautiful pumpkins! And your tip about wearing gloves is so true–I just splattered cookies this week and my hands are still a strange color!
These are beautiful and I have always wanted to know how to do the splattering on cookies! Thank you so much. I can’t wait to try these to go with my family Thanksgiving cookies!
Hi Lisa, I love your video tutorials. I hope you’re feeling well. May I ask where you got the pumpkin cookie cutter? I love the shape. Thanks for all that you do. You’re amazing.
Love the white pumpkins cookies…thank you so much. I hope to try these with my family and friends for Thanksgiving.
One question though, where can I fin the star tip #20 and the colors. Again, thank you!