Worm Royal Icing Transfers -I’ve Got Worms!
This post may contain affiliate links.
Can you believe it is time for school to start? I am shocked at how fast summer came and went. They say that is a sign of getting old. Well, if it is I am there baby! I am so old I want to sit on the bank of the lake and fish with these cute worm royal icing transfers. Isn’t that silly?

Well, since school is starting, I might just have to play hooky one day and go sit on the bank with a good book to read and see if these little guys try to crawl away. I think that little guy on the bottom knows he is about to be fish food. Look how red his eye is! I think he is worried.
Supplies for Worm Royal Icing Transfers:
(may include affiliate links)
Royal Icing Colors:
- Red Royal Icing in a piping bag fitted with #2 decorating tip
- Green Royal Icing in a piping bag fitted with #2 decorating tip
Royal Transfers:
Tools:
- Painters Tape
- Wax Paper
- Baking Sheet or flat surface so you can tape the pattern onto it.
Let’s do this!
Before you begin, you need to make some candy eyes. You will need one for each worm you pipe. I make several hundred of them at one time and keep them in jars so I never run out of them. They are great for adding eyes to almost any baked good.
The worm pattern has two eyes but I only made one. You can do whatever floats your boat!

- I learned the neatest little trick for making royal icing transfers. Callye at Sweet Sugar Belle used a baking sheet turned upside down to tape her pattern onto. It is a brilliant idea because you can stack the trays in a bun pan rack to let them dry. I often have 10 trays full on my bun rack.

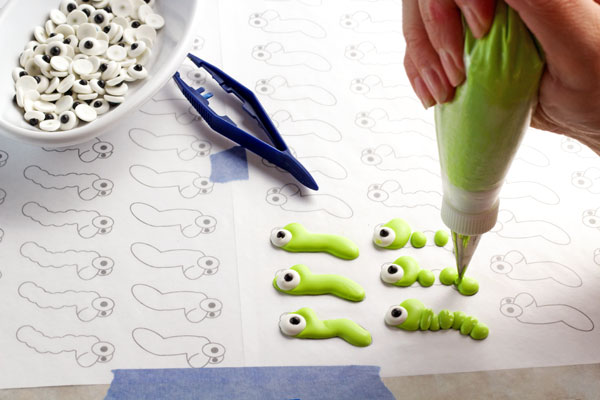
- Anyway, to make the royal icing transfers, print the pattern of the worms on any type of paper you want and trim it to fit the back of your baking sheet. It may fit without being trimmed but I don’t like the paper hanging off the edge. Then, tape it down with the painters tape.

- Next, cut a piece of wax paper to cover the worm royal icing transfer pattern. Tape it into place and make sure it is nice and smooth without wrinkles.
Let the piping begin!

- You can begin piping your little worms. You can pipe them all in one piece or you can make them in sections. If you want to make the body in sections, let the first sections dry for about 20 minutes before you add the next set,
Add the eye while the icing is wet.

- Feel free to make the worm royal icing transfers any color you want. I have a plan for these guys that I will share with you tomorrow. I knew I wanted them to be red and green.
- Let them dry completely. Since there are sections to some of them, I let them dry for 2 days before I tried to remove them. If you want to know a great way to remove them with little chance of breakage, you should click here.
Like I said before, I had a plan for these little creepy crawlers. Click here to see how to use these worms on some cute apple cookies. I promise it will help you get rid of your worms!
More Royal Icing Transfer Posts:
Goldfish
Ladybug
Bee
Spider
Royal Icing Transfers
Bear hugs,

These are seriously the cutest worms I’ve ever seen.
I have been making lots of RI transfers lately and cannot wait to make little worms – they are simply adorable!
Hello! Can you please, help me with the recipe? What I have it is too thick and very hard to pipe, I really need press very hard and I have a proble in my hands so after 4 or five transfers I am really in pain.
I want to make baby shower toppers, for my cupcakes, with border in white and filled inside with pink and blue.
Thank you for your time!
Ann.
Hi Ann,
Have you tried to thin your icing with a little water? The good thing about royal icing is you can easily thin it so you don’t have to squeeze the bag so hard. Just add a little water at a time until you get the consistency you want and that will pipe easily. Then piping should be fun and easy. 😉
Bear hugs,
Lisa