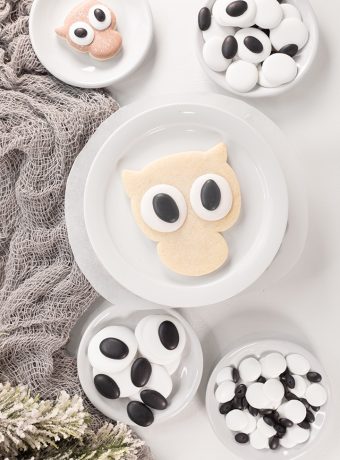
Bee Royal Icing Transfers

I have a love hate relationship with bees. For some reason, every time I go outside, a bee will fly in my face. I don’t like it at all. I do however, love the way bees pollinate everything. I know how important that is and have thought about becoming a beekeeper. I have looked at the supplies it takes to get started and I am almost ready to commit. I am still a little scared of getting stung so I wanted to start with some bees that were friendly and can’t hurt me so I made these bee royal icing transfers.  Bee Royal Icing Transfers by thebearfootbaker.com What I like most about these bee royal icing transfers are that they are made with only one color of royal icing. To make them you only need white RI and black and yellow sanding sugar. I wanted to create a design so the colors wouldn’t bleed together or on the cupcake icing. I really like the way they turned out all fuzzy and cute.

 Supplies for Bee Royal Icing Transfers:

White 15 Second Icing
Royal Icing Recipe or a Half Batch of Royal Icing
Black Sanding Sugar
Yellow Sanding Sugar
Food Marker or Paintbrush and Black AmeriColor or Wilton Gel
4mm Black Edible Pearls
Small Bee Template
Medium Bee Template
Large Bee Template
Wax Paper
Tape
#2 or #1.5 PME

Simple Bee Royal Icing Transfers by thebearfootbaker.com Begin by preparing your temples like we did here.

Easy Bee Royal Icing Transfers by thebearfootbaker.com Outline and flood the wings and the antenna areas with the white icing. Let it dry for about 20 minutes.
I want to show you how to paint the antenna and legs but I got my pictures a little out of order so pretend the next picture doesn’t have the fuzzy body yet.

Cute Bee Royal Icing Transfers thebearfootbaker.com For the antennas and legs, you can use Black AmeriColor Gel and a small paint brush to paint them on or you can use a food safe marker. I did it both ways and liked the food safe marker a little better. I had more control and wish I would have realized how much easier it was before I was almost done them. Oh well, live and learn.

Pretty Bee Royal Icing Transfers by Next, outline the head, tail and middle sections and immediately cover with the black sanding sugar then shake it off on a piece of parchment paper. I used 2 large pieces since we are shaking them off of a large baking sheet. You have to work fast so I suggest you only do 2 or 3 at a time.

Adorable Bee Royal Icing Transfers by thebearfootbaker.com Before you add the yellow sanding sugar, you might need to clean up the black sanding sugar a bit. This is reason 101 I love my Boo Boo Stick. All you have to do is use the edge and gently push the sanding sugar in a straight line. It really makes a big difference. You can also use it on the tail.
Once you are happy with the black sections, flood the other 2 sections and add the yellow sanding sugar.

Bee Royal Icing Transfers with thebearfootbaker.com To make the eyes, pipe 2 white dots and add a 4mm edible pearl to each one.

Bee Royal Icing Transfers with thebearfootbaker.com I have been talking about adding royal icing transfers to cupcakes so I wanted to finally show you one. These would be great with some fuzzy bee cookies. I hope you make some soon!

Happy Creating,

Ice Cream Cookies with a Cherry on Top

I am ready for summer. I want to swim, sit in the sun, pick some pretty flowers from my garden, and eat a lot of ice cream. If only we could find a way to enjoy ice cream without worrying about it melting in the heat. Guess what? We can enjoy them with worrying if we make ice cream cookies!

Ice Cream Cookies by thebearfootbaker.com  You can choose between sandwiches, single scoop cones, double scoop cones,  ice cream Sundays and Popsicles or enjoy them all.

Supplies for Ice Cream Cookies:

15 Second Icing in these colors:

  1. Tan (for the cone)
  2. White
  3. Pink
  4. Brown
  5. Red

Ice Cream Cookies thebearfootbaker.com I used a royal icing transfer for the cherry on top. To make them, follow this eye tutorial and use red icing and not white. With the white icing, pipe a line while the red is wet so the cherry will look shiny. You can make them a few weeks in advance and store them in a cool dry airtight container away from the sun.

Now for the cookies, begin by outlining the ice cream sections with the colors or flavors you want.
Then, flood each layer allowing dry time in between each.
While the brown icing is wet, add the sprinkles.
Outline and flood the cone with the tan icing and let it dry for about 30 minutes.
Next, and add the details to the cone following the picture.
Add the royal icing cherry to the top of the chocolate with a drop of red or brown icing.

Ice-Cream-Cookies-www.bearfootbaker.com You can stop there or use an airbrush gun to add some detail. I personally love how the airbrush changed the look of these. Carefully outline each color with the machine set on low. For the white, airbrush with brown or blue. For the pink, use red or pink. For the brown and tan, use brown.  For information on airbrushing, click here.

Ice Cream Sandwich Cookies:
Brown Cookie Dough
White Thick Icing
Star Tip

Ice Cream Cookies by thebearfootbaker.com Cookie decorating doesn’t get any easier than these. Once you make your cookie dough, add some Brown AmeriColor Gel and roll it out and cut it like you normally would. Polk a few holes in the unbaked cookies and then bake them. Once they are baked and cooled, pipe some thick white icing with the star tip and place another cookie on top.

These are super simple and will give your ice cream cookie platter a lot of variety and a 3D effect. Add some cute twine from Baker’s Stock and your guest will think you spent hours on these.

Popsicle Cookies:
Lila Loa did a guest post for me last year because she is a sweetheart. She made these Popsicle Cookies and they are my favorite Popsicle cookies ever. The tutorial is wonderful and the pictures are amazing. Thanks again Georgeanne for sharing your amazing talent with us. LilaLoa-Popsicles thebearfootbaker.com I know there are a lot of ice cream cookie tutorials out there on the web but, I wanted to share a few of my favorites with you.

Sweet Sugar Belle has really cute Ice Cream Cone Cookies that are a double scoop of goodness. She is so creative with her cookie cutters and I would love to borrow her brain for a few days. Paula from The Vanilla Bean Baker has a Decorating with Ice Cream Video that will show you step by step how to make her cute ice cream cookies. I love the gumball she uses for the cherry on top. Bridget Bake at 350 made some I Scream, You Scream Cookies with different sprinkles and I can’t decide which one I like best. These Ice Cream Cone  cookies from Tracy at Whisked Away Cookies are some of the cutest ice cream cookies I have ever seen. Her airbrushing really makes these cookies stand out! I also love the fun swirl she made.

Well, there you have it. Several ice cream cookie tutorials that will have your friends and family screaming for ice cream with out worrying about heat melting your yummy treat.

Happy Creating,

Superman Costume for a Toddler

Superman Costume for a Toddler by The Bearfoot Baker

I went to the movies a few months ago and saw the previews for the new Superman movie. I don't normally keep up with movie releases but, this one struck my creative side. The more I saw Superman flying around the big screen, the more I wanted to make a Superman costume for a toddler. The challenge is making a costume with a cape that doesn't tie … [Continue reading...]

Royal Icing Watermelons & Templates

Royal-Icing-Watermelon-Transfers www.thebearfootbaker.com

About a year ago, I made some Royal Icing Watermelons for some cupcakes I made. They were really cute and I couldn't wait to make some templates to share with you. I don't have pictures of my old cupcakes but, I tweaked the designs and now I want to have a watermelon themed party just so I can make watermelon cupcakes again. … [Continue reading...]