How to Make Delightful Dogwood Cookies for Spring
This post may contain affiliate links.
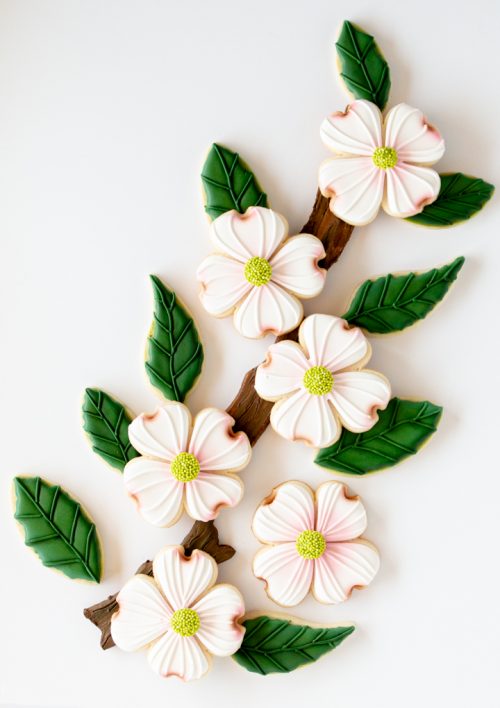
Do you like spring? I love all the little green leaves that start growing on the trees. It tells me that soon I’ll be able to go outside without a coat and that makes me happy. Watching all the flowers grow makes me even happier, so today I wanted to make some dogwood cookies with you so we can celebrate going outside.
These cookies are simple to make, even if you decide to make the sticks and leaves to add to your platter. It’s also a great set to ask your kiddos to help you make because each cookie is outlined, flooded, and has a few finishing touches. What do you say? Will you make some dogwood cookies with me today?
Supply List for Dogwood Cookies:
(may contain affiliate links)
Recipes:
Cookie Cutters:
- Easter Flower Cookie Cutter from The Sweet Design Shoppe– I bought the cutter that is Fast 4 1/4″ 4″ tall x 3/8″ wide, and I really like the size. I used this cutter to make
-
Sweet Sugar Belle Leaf Cutter-
- Stick Cookie Cutter from How Sweet is That
Royal Icing Colors:
For the white and green royal icing, I made both outline and flood consistency, but you can use a 15-second Icing to outline and flood.
For the brown, I used outline consistency.
Dogwood Flower:
Leaf:
Stick:
Airbrush System and Colors
Airbrush Colors:
- Ivory Towers- The Cookie Countess Airbrush Color
- Countess Pink- The Cookie Countess Airbrush Color
- Sunshine Yellow- The Cookie Countess Airbrush Color
- Totally Brown- The Cookie Countess Airbrush Color
- Forest Green- The Cookie Countess Airbrush Color
- Glowing Green- The Cookie Countess Airbrush Color
Tools:
- Straw to make the flower a dogwood flower
- Tipless Decorating Bags
- Turkey Lacer
Tutorials:
- How to Make Beautiful Billy Ball Royal Icing Transfers– Make green for the center of the dogwood cookies.
- DIY Airbrush Cleaning Pot– I use this every time I airbrush, and you probably have everything you need to make one.
- How to Use the DIY Cleaning Pot– This is how to use the DIY Airbrush Cleaning Pot.
Dogwood Cookies Video:
Enjoy the video!
Let’s Make Some Dogwood Cookies!

- Once you make your cookie dough, place it in the freezer for a few minutes.
- Cut out the flower shapes, but before you bake them, use a straw to cut out half a circle on the end of each flower petal.
Outline & Flood:

- Outline each petal with the white royal icing.
- You might be wondering why I’m piping lines in each petal with the outline consistency royal icing. Well, sometimes humidity will cause the royal icing to sink in the center as it dries, and the thick line of royal icing helps prevent that. Don’t you love thick royal icing!
- Flood each petal with the white flood royal icing.
- Let the icing dry until the surface crusts over.
- Pipe some lines on each pedal. I like giving them a little curve, but you can add them however you’d like.
- Let the icing dry for about thirty minutes before you airbrush.
Airbrush:

- Once the petals have dried, it’s time to airbrush. Add several drops of Ivory Tower Airbrush Color to the well of the airbrush gun. Then add one drop of the Countess Pink Airbrush Color. Put your finger over the tip of the airbrush gun and gently pull the trigger. That will mix the colors together, so a beautiful pink dogwood color will come out.
- Use a circular motion to spray the middle of the dogwood flower.
- Then, gently spray pink in the area where you cut it with the straw.
- Spray the same area (a little smaller spray) with the brown.
- Add a drop of the outline consistency of white royal icing to the center.
Time to add the Centers:

Add the Billy Ball Royal Icing Transfers and stand back and look at the beautiful dogwood cookie you made!
If you want to make the leaves and the stick, you can watch the video. They’re both very simple and fun. It’s another great way to get the kids in the kitchen baking with you!
Don’t you love spring? I do because flowers make the world a happy place. I hope you all have a great week that includes going outside to look at flowers!
Bear hugs,

What an elegant cookie set!!! Love it 🥰!!!
Thank you, Y. Quiles!