You Need to Know How to Make Blueberry Cookie Decorations
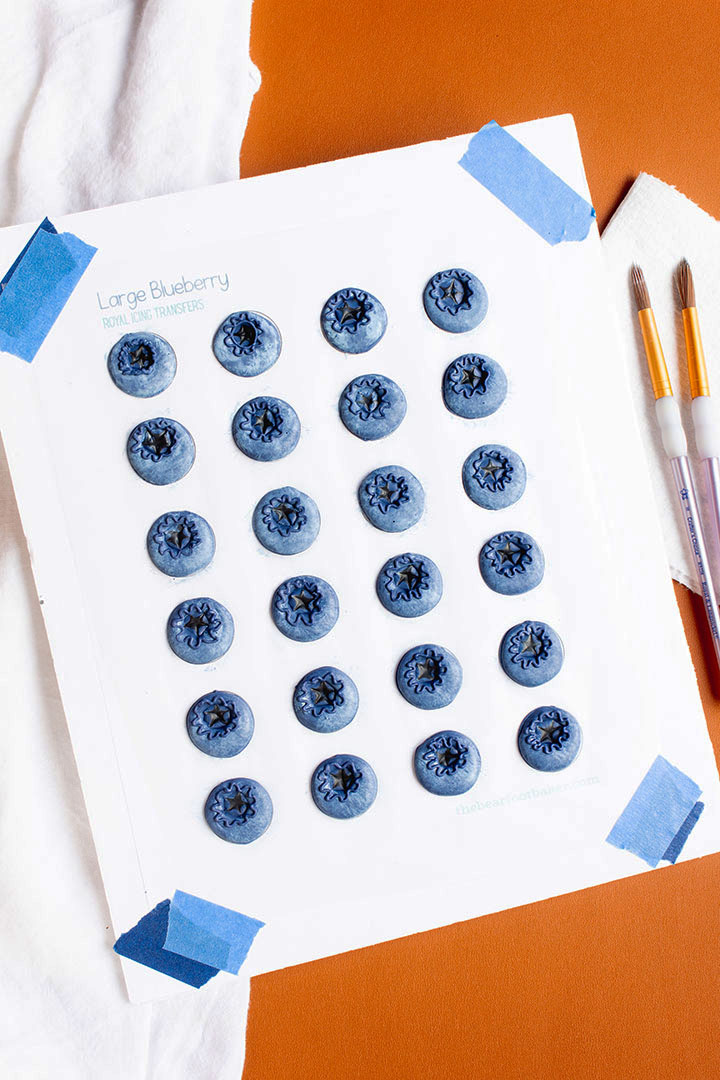
Are you ready for some blueberry cookie decorations? I hope so because these are really fun to make and they look realistic! However, I strongly suggest you make a lot of them in each size because they’re great little decorations to add to your sugar cookies.
By the way, if you want to make blueberry cookies you can repeat this process on round cookies. They’re adorable!
You Need to Know How to Make Blueberry Cookie Decorations
Supply List:
(may contain affiliate links)
Recipes:
Royal Icing Colors:
(Food Gel Colors)
- Blue-20- Second Consistency- You’ll need a dark blue- Americolor Royal Blue mixed with a little Storm Blue from The Cookie Countess for top circle and the body of the blueberry. You’ll also need Thick Consistency Icing for the outline and the wavy line around the top of the blueberry.
- Black- Outline Consistency
FREE Blueberry Royal Icing Patterns:
- Small Blueberry Royal Icing Cookie Decorations
- Medium Blueberry Royal Icing Cookie Decorations
- Large Blueberry Royal Icing Cookie Decorations
Tools:
- Turkey Lacer
- Tape- Painters tape works well because it’ll let go of the foam board easily without damaging your royal icing decorations.
- Wax Paper
- Foam Board
- White Food Gel Color- The Cookie Countess Gel Icing Color Whipped White
- 2 Food-Safe Brushes- Here are some from The Cookie Countess and some at The Flour Box You don’t have to have a specific brush for this project. You’ll just need one you that is good for tapping food gel onto your blueberries.
- Tipless decorating bags- The Cookie Countess or The Flour Box
Optional:
- If you like using Decorating tips for your piping bags here are my suggestions for the blueberries- for this project I used a PME #1.5 and PME #2 and you can find them at (Flour Box, The Cookie Countess, at Country Kitchen SweetArt). You don’t have to use PME Tips, but I think they’re worth the extra money. I’ve used mine for years and they still look new and do a great job.
Blueberry Royal Icing Decorations Video:
I hope you enjoy the video!
Let’s Get Started:
- Begin by printing the patterns. I usually print each size of the patterns and make them all so I’ll have them on hand for future use. Why not because you’ll already have the perfect royal icing colors so why not stock up on blueberries. It’ll kind of be like getting them on sale at the grocery store, but since you’re making them, they’re way cheaper!
- Once your patterns are printed, tape them to a flat surface so you can make your fruit. If you buy some foam boards (you can get them at the Dollar Tree for $1) you can cut them a little larger than the size of your paper and they make a great base for your royal icing transfers. They’re easy to store and you can use them over, and over, and over, and over… Can you tell I really like them? If you’d like to see how I make them you can watch this How to Make Royal Icing Eyes wit FREE Patterns Video on The CookieNetwork. You can see how I make the foam boards and you can get free patterns for your royal icing eyes. Okay, enough about that so let’s get back to the blueberries!
- After you tape the blueberry patterns to your flat surface, tape a piece of wax paper on top of the pattern. This is what you’ll pipe your berries on so you can easily remove them once they’ve completely dried.
Adding the Royal Icing:
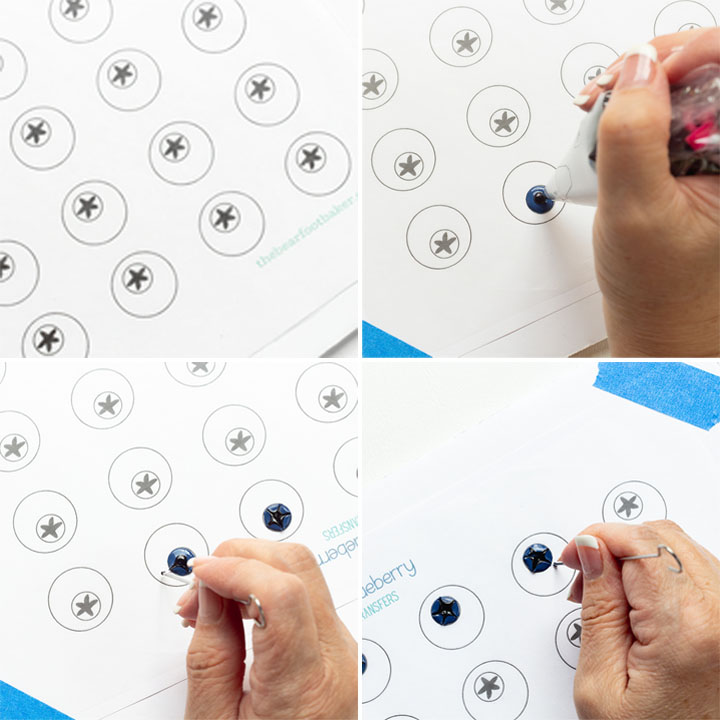
- Pipe the circle on the blueberry with the blue 20-Second Consistency Royal Icing.
- While it’s wet add one dot of the black outline consistency icing.
- Next, while both icings are wet, take the turkey lacer and pull the black icing to the outside of the blue circle five times to look like a star. Since the black icing is thicker than the blue icing it will kind of sink the blue icing a little. That is what will make it look like a real blueberry. Also, the star doesn’t have to be perfect so don’t stress out. If you want to see this in action be sure to check out the video.
- Let this dry for about twenty minutes before you move on to the next step.
FYI royal icing transfers can break because they’re just icing without the support of cookies and it’s totally normal. Don’t stress just be sure to make extra so you’ll have them when you need them.
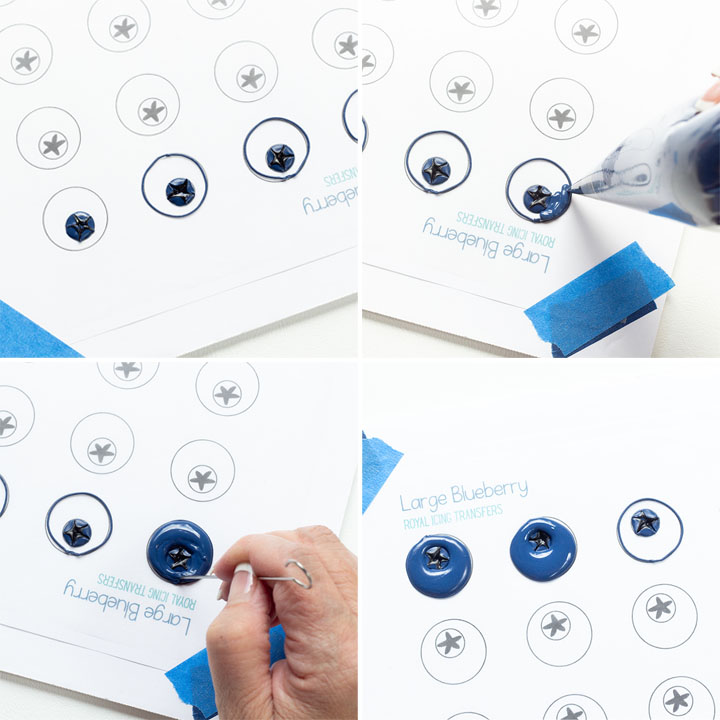
- After the top of the blueberries have dried for twenty minutes outline the body of the blueberry with the thick consistency of the blue royal icing,
- Next, flood the body of the blueberry with the blue royal icing.
- Use a turkey lacer to smooth it out.
- Let the blueberries dry completely before the next step.
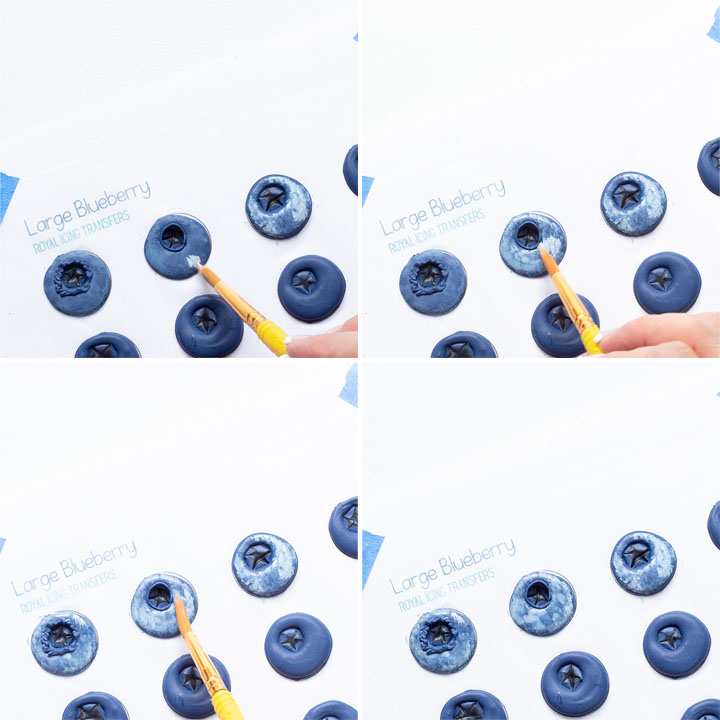
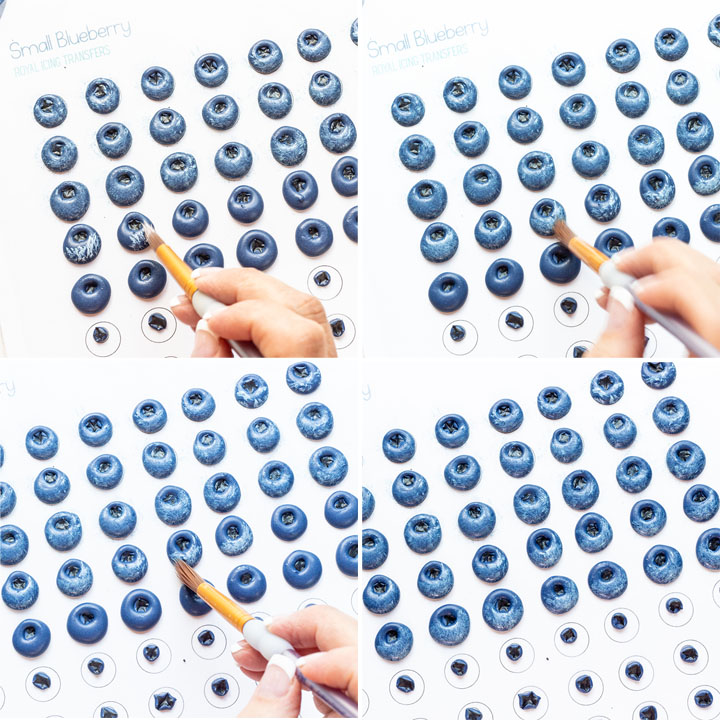
- Once your blueberries are dry, dip your brush into water and dab it on a paper towel to remove most of the water.
- Dip your damp brush into the white food gel color and dab it on a paper towel.
- Then, gently tap the end of the brush on a blueberry royal icing decoration. Do not stress! It is going to look really white at first, but that’s okay because we can make it look lighter in a second.
- Tap most of the blueberry so it will look cloudy.
- Then, dip the brush back into the water and rub it on the paper towel to remove most of the white gel.
- Tap the blueberry again and you’ll notice some of the white food gel color being removed from the berry.
- Repeat this step until you get the blueberry looking the way you’d like it to look, but be careful. Royal Icing doesn’t play well with water so be sure to remove as much of it as possible from the brush before you start tapping it.
Tips:
- Work with one blueberry at a time until you get the hang of it.
- You can add more white in certain areas to resemble real blueberries. Here is a photo of blueberries I found online that was a great guide to help me know where to add the color.
- Don’t get the white gel inside the top of the berry where you made the star. Keeping that area dark will help the blueberry royal icing decoration look more realistic.
- Once you feel comfortable adding the white food gel you can work on more than one berry at a time.
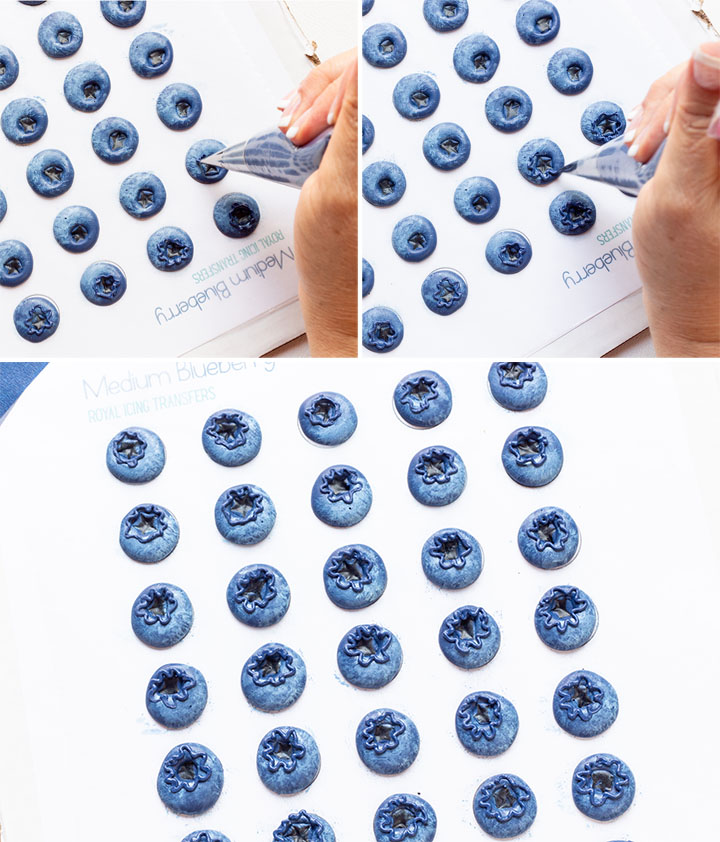
- Pipe a wavy circle with the thick blue icing around the top of the blueberry where you made the star. You need a small line so cut a very small amount off of the tip in your tipless decorating bag or use a small decorating tip. I used a PME #1.5 and it worked well with each of the free patterns.
- Let the berries dry completely before you remove them from the wax paper. Mine dried for two days and then I removed them and stored them in an airtight jar away from the sun. Now we can use blueberries on our cookies any time we feel like it.
I hope you’re enjoying the free patterns for all the fun cookie decorations and I hope you make some so you’ll be ready to decorate your cookies with a few cute and fun toppings. When you make them let me know so I can share them with everyone on my Instagram Stories!
Bear hugs,





Thank you so much Lisa, I really enjoyed your video. I can’t wait to try and make the blueberries. Charlie