How to Make Easter Egg Bunny Cookies
This post may contain affiliate links.
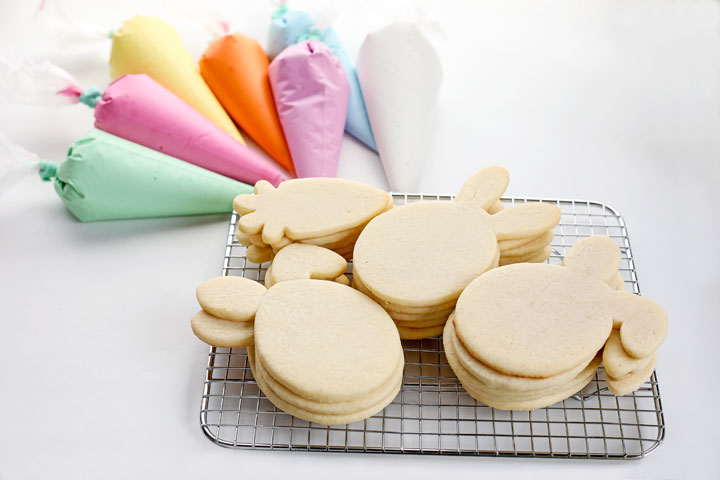
I told you all I’d make some Easter Bunny Cookies, but I chose to make Easter Egg Bunny Cookies instead! You can take an egg cookie cutter and a bunny head cookie cutter and turn it into a cute bunny cookie. It’s fun and I hope you try it. You may need to try it for a birthday or just for fun because I’m late for Easter. Sorry about that! “Bouncer” the Brain Tumor has my timing off. #ByeByeBouncer. Anyway, I hope you enjoy these bunnies!

One of the good things about making these cookies is you can make the bunny face or the back of the bunny with the cute little tail as I did with How to Make Simple Bunny Cookies.
I love the new gel colors from Hillary and Jon from The Cookie Countess. I’ll explain more in a minute, but I wanted you to see the beautiful colors that The Cookie Countess Gel Colors made. I’m a huge fan and can’t wait to make more colorful icing for fun, cute, and gorgeous icing colors!
Supplies for Easter Egg Bunny Cookies:
(may contain affiliate links)
Recipes:
Sugar Cookie Recipe
Royal Icing Recipe
Royal Icing Transfers:
(You’ll need to make these a few days ahead of time so they dry completely before you use them. Or you can buy some that are premade at a craft or bakery store.)
Royal Icing Candy Eye Tutorial with a Video on how to make them.
Medium Candy Eye Template
Large Candy Eye Template
Royal Icing Colors:
(These colors were made with The Countess Gel Colors)
True Blue Gel
Countess Pink Gel
Glowing Green Gel
Sunshine Yellow Gel
Whipped White Gel
Optional-Tuxedo Black Gel or you can use the Edibleart Decorative Paint with the Script Liner Brush 10/0.

The gel colors were a gift from Hillary and Jon at The Cookie Countess. They also sent other things I’ll introduce in future posts that are coming really soon. You’ll all find out what my biggest challenge is as a cookie decorator. Hillary and Jon sent something to help me fix it and I purchased another one from their shop because it was amazing. I can’t wait to share it with you!
If you click the name of the gel colors below, it will take you to The Cookie Countess and that color so you can order it if you want. I’ve always been an Americolor Gel user, but these Cookie Countess Gels are amazing! I’ll be using these often because I love them more than my cookie cutters! 😉
The Cookie Countess Gel Color Set:
True Blue Gel, Mermaid Teal Gel, Outrageously Orange Gel, Tuxedo Black Gel, Sunshine Yellow Gel, Gourmet Green Gel, Countess Pink Gel, Preppy Pink Gel, Whipped White Gel, Positively Purple Gel, Totally Brown Gel, and Royal Red Velvet Gel.
This is my favorite paintbrush to do detail work. It’s called a Script Liner 10/0. You can find it at Joann’s, Amazon, or Michael’s. The one at Michael’s isn’t a Princeton brand but it’s the same 10/0 and it’s very affordable. If you watch the video you’ll see how I use this with some of the bunny cookies.
 Here’s the link to Joann’s if you want to order it now. Princeton Script Liner Brush-Size 10/0
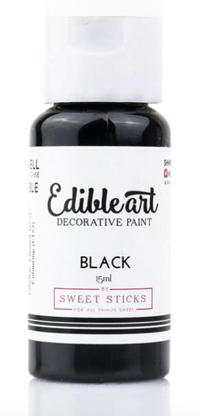
Paint Color:
Black Edible Art Edible Paint Black-This is the paint I used in the video with the paintbrush. I’m a huge fan of this paint and the brush. The difference between the Jet Black Edible Pen and the paint is if you use the paint, the royal icing doesn’t have to be completely dry. If you watch you’ll see I poke the royal icing too hard and poke a hole in the bunny’s face. I made sure I left that in the video so you could see it. If you use the brush with the paintbrush the correct way and not the handle to make dots, you don’t have to wait for the royal icing to completely dry.
Cookie Cutters:
Egg Cookie Cutter- There are so many egg cutters out there. Mine was about 3 1/2″ long. You don’t have to use this cutter. Find one that will work with the size of your bunny ears.
Meri Meri Bunny with Straight Ears
Bunny with one ear dropped
Tools:
Turkey Lacer
Wilton White Sparkling Sanding Sugar
Coffee Filter
Rainbow Dust Jet Black Double Sided Food Pen
Fondant Smoother to flatten the cookies as they come out of the oven.

- I’m eriously loving these cutters. They make really cute Easter Egg Bunny Cookies and you can use them as they were designed.

- Outline the bunny and the ears.
- Fill in the ears and let them dry for at least 20 minutes or you cha wait until the tail is done and then flood the ears. I recommend flooding the body first and making the tail so no sugar sprinkles end up in the bunny ears.
- If you waited for ears to dry for 20 minutes you need to flood the body. Let the body dry completely.
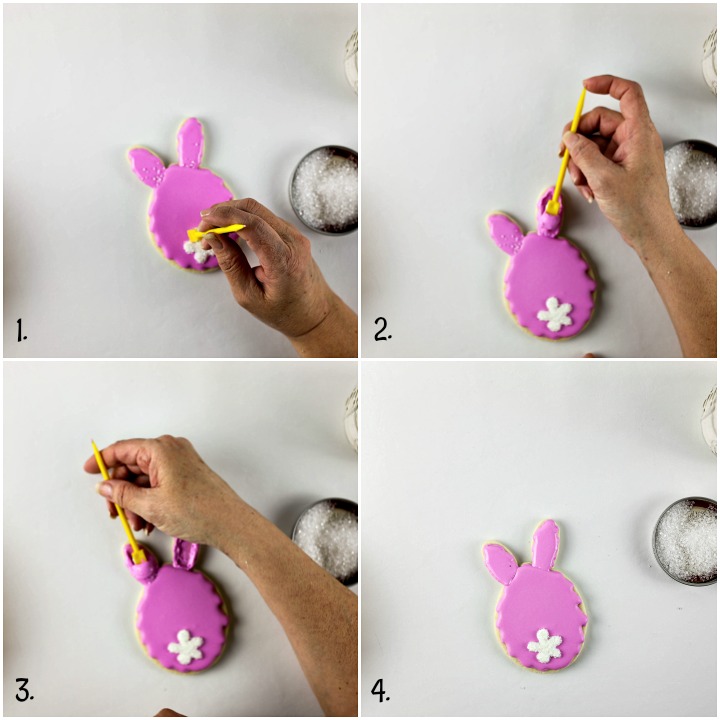
- As you can see I did the body first on the yellow bunnies. That’s because I got sparkling sanding sugar on the pink bunny ears. I’ll show you a picture of how I did that in a minute. As far as the yellow bunny goes, place it in a coffee filter and add five white dots to use as the points of the bunny tail.
- Connect the dots with white royal icing.
- Sprinkle the wet whitetail with sparkling sanding sugar. The coffee filter will catch the sprinkles and you can use it to put the excess back in the sprinkle container. The coffee filter tip came from Bridget Bake at 350° and it’s an amazing tip. Thanks, Bridget!
- I like to use the Boo Boo Stick to push the sprinkles into place. This will help the tail look neat and clean.
- Let the tail dry. If you haven’t flooded the ears yet now is the time to flood them.
- Let the royal icing dry completely. If you want your icing to dry with a bit of a shine, place it in front of a fan until the royal icing dries completely. If you don’t place them in front of a fan they will dry with a matt finish.
- If you get sanding sugar stuck in the royal icing on the ears, don’t give up on the cookie.
- Use the Boo Boo Stick to scrape off the icing.
- Scrape the icing off both ears. just keep in mind that it doesn’t have to be perfect. LOL
- Flood the ears and let the bunny cookie dry completely.
I told you I got sparkling sugar stuck in the bunny ears!
Now for the bunny with the face:
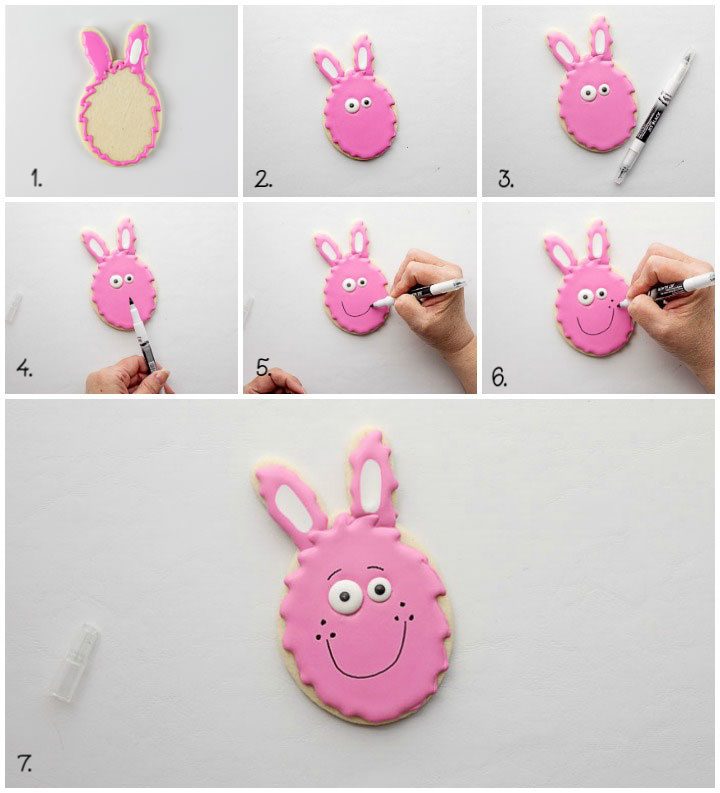
- Outline the bunny ears and face. Flood the ears with the pink royal icing and while the icing is wet, add white in the center to make it look like bunny ears. Let the royal icing dry for 10-20 minutes.
- Flood the rabbits face with the pink icing. While the icing is wet add the candy eyes. I like to use different sizes so it gives the bunny a little character. Let the royal icing dry completely. With the humidity where I live it takes all night with the cookies in front of a fan. The fan will help the icing dry with a shine and get your cookies ready for the final details.
- If your icing is completely dry you can use a Rainbow Dust Jet Black Double Sided Food Pen to make the face. In the video, my icing is a little damp so I used the Edible Art Decorative Paint and a Script Liner Paintbrush 10/0.
- Decide which side of the pen you want to use. One of them is a fine tip and the other it’s a little wider. I used the wider end but feel free to use whatever side you want.
- Once your royal icing on the Easter Egg Bunny is dry you can use your Rainbow Dust Jet Black Double Sided Food Pen to make a smile.
- Make the dots on the bunny face,
- Add the eyebrows.

- Add the nose with pink royal icing.
- Let the nose dry completely.

- What’s your favorite color? Blue, yellow, pink, green, or lavender?
- Do you like straight ears or the one with the curved ear?
- I kinda like them all.
How to Make Easter Egg Bunny Cookies Video:
I hope you like the video!

Sorry, these little guys took longer to make, but I’m back in the kitchen and it feels good! Thank you all for the support, love, prayers, and donations you all sent. You’ll never know how much you all mean to me!
I’m working on thank you notes and cards but I’m a little slow at it. I’ve got a tutorial coming up to show you all what you mean to me. Not sure when I’ll have it done but now that I’m back I’m working hard with a heart full of love!
Big bear hugs to all of you,

To see your post. You’re on my heart. Hug and prayers
Kathy Pedley
Thank you, Kathy! You all are in my prayers. I’m so thankful God used them to make me better. You will never know how grateful I am. I’m thanking God now for all of you who prayed, cared, loved, donated, and sent bear hugs!
I love you all!!!!!!
It is so great to see this post! I am so glad you are back to creating. I pray your recovery continues to go well!
SO cute, and I LOVE the colors!