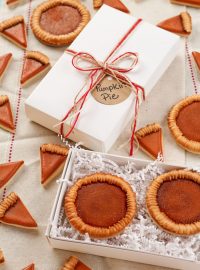
How to Make a Simple and Adorable Pie Cookie
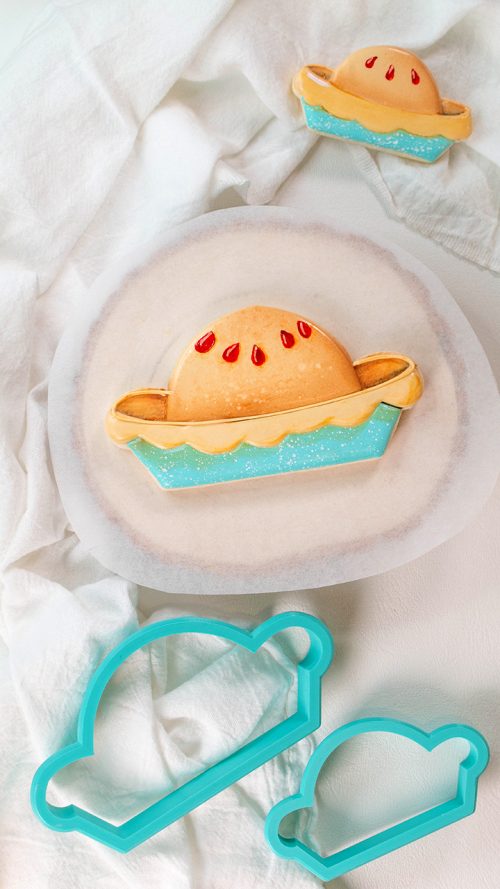
Do you look forward to eating turkey on Thanksgiving? What about pie? Turkey is great and the dressing is amazing, but I have to admit, I love a slice of pie and a simple and adorable pie cookie with my after-dinner coffee. Some sugar cookies are super easy to make and some take a little more detail, but they are all incredible and I can’t wait to eat one.
These pie cookies are pretty simple, but if you don’t airbrush them they’ll be super, super simple. I like the airbrushed look and it’s not hard so we’ll decorate them together. We can enjoy pie all year so dive into this tutorial and have fun. You’ll also see a few mistakes I made while making them. They worked out, but I want to share them to show you how a mistake may not look the way we want, but it can still look good and taste delicious.
Supply List:
(affiliate contain affiliate links)
Recipes:
Cookie Cutter:
Royal Icing Colors:
- Turquoise by AmeriColor– Outline and flood consistency. Add a tiny amount of turquoise food-gel color to the white royal icing and mix well.
- Ivory by AmeriColor– Outline and flood consistency
- Tulip Red by AmeriColor for painting the drops on the top of the pie. You don’t need icing for this. You only need the food-gel color.
- Bright White by AmeriColor for the highlights on the red drops you painted. Again, you don’t need royal icing for this step. But you will need to make some to splatter the pie dish. Just, mix it with a little water and use it as the splatter on the pie dish. Also, a fan brush works great for this step.
Airbrush System and Colors Used:
- Cookie Countess Royale Mini Airbrush System
- Cookie Countess – Totally Brown edible airbrush color 2oz
Tools:
- Turkey Lacer or Scribe Tool
- Food-Safe Paintbrushes– one for details, one for splattering the white on the pie plate, and one for blending the food gel color on the cookie.
- Food-Safe Marker
- Piping Bags
- #1.5 and #2 PME Decorating Tips: I like decorating tips but these days most people cut the tip off the disposable piping bag and work their magic. I do that occasionally, but sometimes a tip makes me feel better.
Adorable Pie Cookie Video:
Enjoy the video!
Let’s get started!
Pie dish:
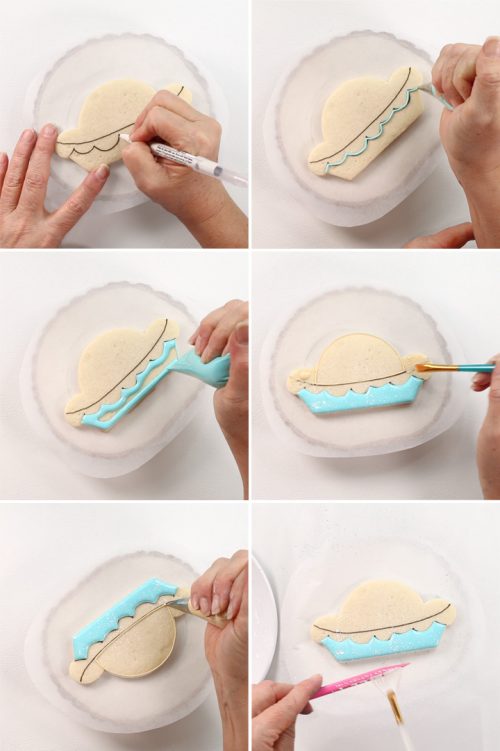
- Begin by drawing your design with a food-safe marker.
- Next, use the turquoise outline consistency royal icing to outline the pie dish.
- Flood the pie dish with the flood consistency of turquoise royal icing and use the turkey lacer to smooth it out and to pop the air bubbles.
- Pipe a little of the ivory color on the sides of the pie and spread it out with a paintbrush. You want this part to be flat on the cookie. It’ll give your cookie depth.
- Use the white food-gel color mixed with a little water to splatter it on the pie dish. I love using a fan brush and a scribe tool for this. Just flick the watered-down food gel on the cookie. The video will show you if you want a visual.
Time to add a little airbrushing to our pie:
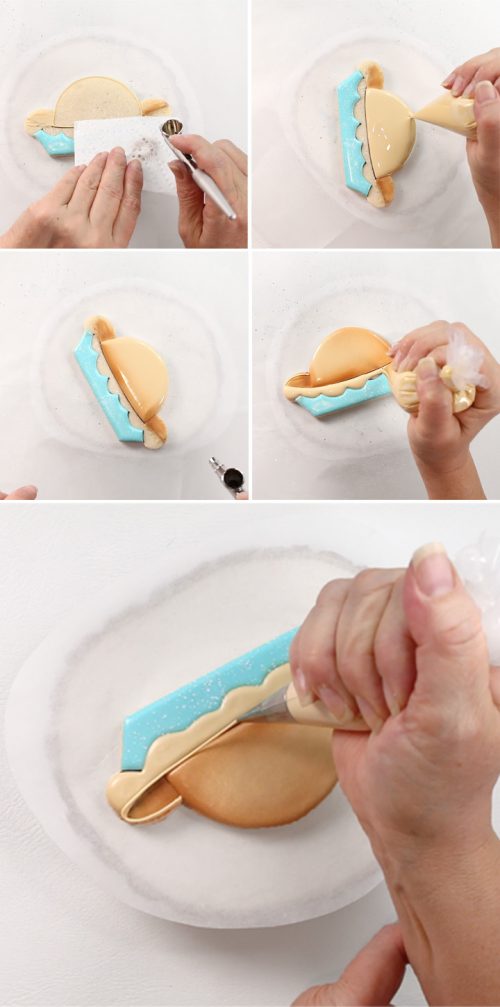
- I didn’t add this to the supply list, but a small paper towel will help you control where the airbrush spray will go. Cut it into a small piece so it’s manageable.
- Spray both sides of the flat ivory color with the Totally Brown Airbrush Color and use the paper towel to protect the pie dish. Again, the video will help show you how simple this is.
- Outline and flood the top of the pie with the ivory-colored royal icing.
- Here is the fun part. You can airbrush the top of the pie with the Totally Brown Edible Airbrush Color from The Cookie Countess. The fun part is you can airbrush while the icing is wet. Just be careful and don’t pull the trigger all the way to the back of the airbrush gun and don’t hold the tip too close to the wet icing. The air will push the icing and that is what makes it fun, but that is what can mess up your icing. Airbrush the bottom and the sides. I like to spay the top as well. It makes the pie look nice and baked. If you don’t want to airbrush it while the icing is wet let it dry and then add the airbrush color.
- Once you get the airbrush color the way you want let it dry for a while and then add the border of the pie crust and let it dry for a a little while.
- Add an outline to separate the top of the pie and the border of the crust.
Time to make this a cherry pie:
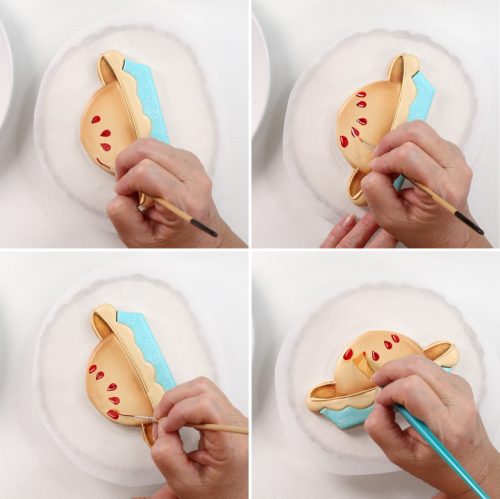
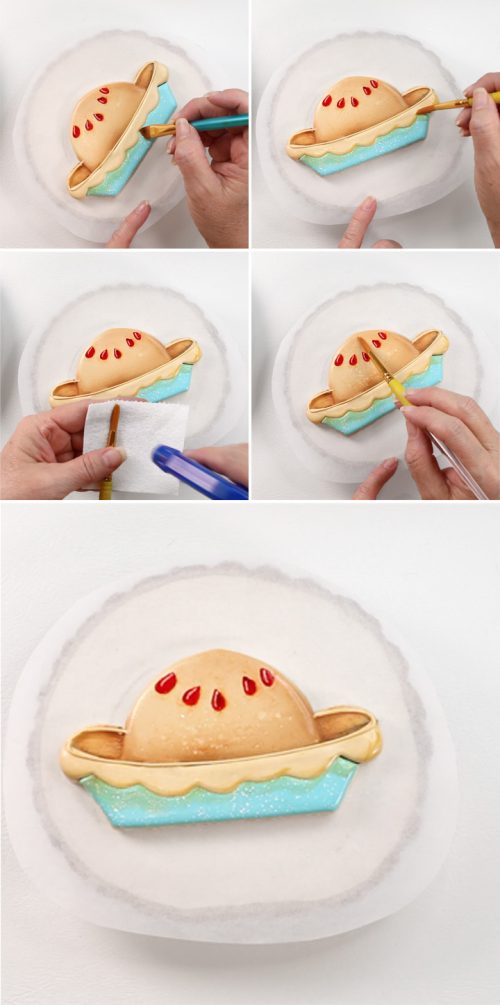
- Use a detail paintbrush to paint some drops on the top of the pie crust with the Tulip Red food-gel color. I told you I’d tell you about my mistakes. This was one of them. The next time I make a pie with drop shapes at the top the drops will be royal icing transfers. I’ll add them to the blog soon so you won’t have to paint this step. All you’ll have to do is pipe the drops, wait for them to dry, and then add them to your pie crust. I promise I’ll add them to the blog soon.
- Once you add the red you need to add a white line with the Bright White food-gel color. This will be the highlight detail.
Here is another mistake I made.
- I used a detail brush to paint the ivory food-gel color mixed with a little water around the red drops. Not a problem but I didn’t do a great job of painting. I used a damp brush to blend the ivory color and it worked.
- Then I intended to add a little turquoise food-gel color to the top of the pie dish and I ended up using the ivory color. It was alright but I’m going to make this cookie again with the royal icing drops and then add the correct airbrush colors to all the right places.
- Another mistake I made was trying to add a little water to the paintbrush while the brush and paper towel were over the cookie. I tried to video the process and ended up spraying my cookie. When you’ve added airbrush color to the cookie it isn’t a good idea to add water. It makes a splatter effect which ended up working for this cookie, but again, not what I had planned.
All’s well that ends well:
If you take a close look you can see the splatter on top of the pie crust which kind of makes it look a little realistic. I like it. However, I do wish I’d have used the blue food gel color on the pie dish. oh well, it’s still a simple and adorable pie cookie and it was delicious! I hope you enjoy some turkey, a slice of pie, and a pie cookie this Thanksgiving. I’ll be back soon with more cookies.
Bear hugs,

