Simple Christmas Cookies with an Owl Cutter
This post may contain affiliate links.
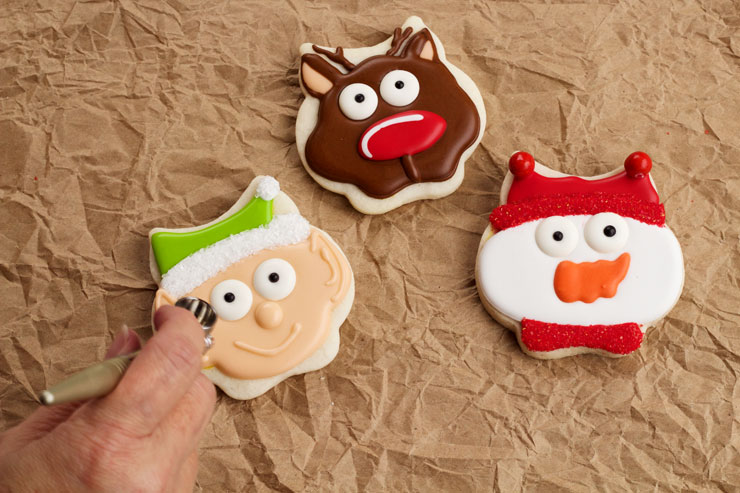
Did you know you can make simple Christmas Cookies with an owl cookie cutter? Well, you can! I made three last night and wanted to share them with you today. These guys are ready for Christmas and you won’t believe how easy they are to make. 
I think they are all a little scared since it is December 1st. Think about how much stuff we need to do before the big day. Can you imagine how much work these guys are doing? What about that poor little reindeer? He is terrified because he has to pull the sleigh while it is loaded with toys for all the good boys and girls. Don’t forget the big guy! I saw him in Pigeon Forge the other day and he looked like he had been eating some Christmas cookies. Poor Rudolph!
Supply List:
(may contain affiliate links)
Recipes:
- Sugar Cookie Recipe, Chocolate Roll Out Recipe or Gingerbread Cookie Recipe
- Royal Icing Recipe-Royal Icing Recipe or Half a Batch of Royal Icing Recipe
Cookie Cutter:
Royal Icing:
15 Second Royal Icing in a piping bag fitted with a #2 decorating tip in the following colors:
Royal Icing Transfers:
- Carrot Royal Icing Transfers
- Candy Eyes (also known as Royal Icing Eyes)-or you can buy them at local craft stores or grocery stores. You will need 2 per cookie.
Tools:
- Sprinkles-White and Red
- Ruby Red Pearl Dust or Airbrush Gun with AmeriMist Deep Pink Color and Pink Sheen Airbrush Color
Simple Christmas Cookies with an Owl Cookie Cutter Video:
Ya’ll know how much I like making videos for you so here is one on how to make these simple Christmas cookies with an owl cookie cutter.
Let’s do this!

- Before I started making these cookies, I drew out the patterns on a piece of paper to make sure my idea would work. I don’t like going all free Willie on a pattern before I have some kind of idea it will work. It’s worth taking the time to trace the cutter and draw the faces to make the project more fun and stress-free. Sometimes you will get more patterns than you thought. I only saw the reindeer in the cutter until I started drawing and then I saw the elf and snowman. Who knew?
- Then, use a food-safe marker to draw the pattern onto the cookies. If you use a darker-colored marker like brown or black, it might bleed through your icing so the lighter you go the better.

- Outline the reindeer’s face and ears with the brown icing.
- Fill in the inside of the ears with the ivory-colored icing.
- Flood the face and outside of the ears with the brown icing.
- While the face is wet, add the eyes to the deer.
- Next pipe the antlers. It is easier to pipe if you turn the cookie upside down.
- Let it dry for at least 20 minutes before you add the nose.
- Let it dry completely before you package it or stack it.
Where’s the elf? Here he is!

- Outline and flood the elf’s face with the ivory icing.
- While the icing is wet, add the royal icing eyes.
- Pipe the hat green and let the cookie dry for several hours.
- After the hat and face have dried for a while, pipe the white trim on the hat.
- While the icing is wet, place the cookie into a coffee filter and add the white sprinkles. The coffee filter will help contain the sprinkles and allow you to easily transfer the excess back into the sprinkle container.
- If the sprinkles don’t come off the face or top of the hat easily, use a paintbrush or other tool to gently remove them.
- Next, add the white ball to the top of the hat. Sorry, I forgot to take a photo of that for you.
- With the ivory-colored icing pipe the nose and add the outline for the ears and mouth.
- Let it dry completely.
It’s snowman time!

- Outline and flood the snowman’s head with the white icing.
- While the icing is wet, add the candy eyes and the carrot nose.
- Turn the snowman upside down and outline and flood the top of the hat with the red icing.
- Let the cookie dry for several hours before adding the trim on the hat and the scarf.
- Outline and flood the trim on the hat and the scarf with the red icing.
- While the icing is wet, place them in a coffee filter and cover them with the red sprinkles.
- Gently shake off the extra sprinkles.
- Pipe two red icing dots on the top of the hats and add 2 red Sixlets or you can cover them with the red sprinkles also.
- Let the cookies dry completely.
Let’s add some airbrush color.
- Now it is time to add a little color to their cheeks. You don’t have to do this step but I think it makes a big difference. You can do this one of two ways. You can apply a little Ruby Red Pearl Dust with a dry paint brush or you can use your airbrush gun with AmeriColor Pink Sheen Airbrush Color and AmeriMist Deep Pink Airbrush Color.

Tis the season for simple Christmas cookies. I’ve waited all year for December to arrive and I am glad it is here! I can’t wait to make more cookies with you!
More Simple Christmas Cookies for You to Enjoy:
Christmas Light Cookies with a Santa Hat
Reindeer Head Cookies for Christmas
Christmas in July Cookie Collage
Snow Globe Cookies
Christmas Cookies for Santa
Bear hugs,

OH MY GOODNESS….I love them, once again you amaze me, so cute. XX
Thank you Claire! Hugs!!
How did I never see these adorable cookies made from an owl cutter? I can do this! 🙂