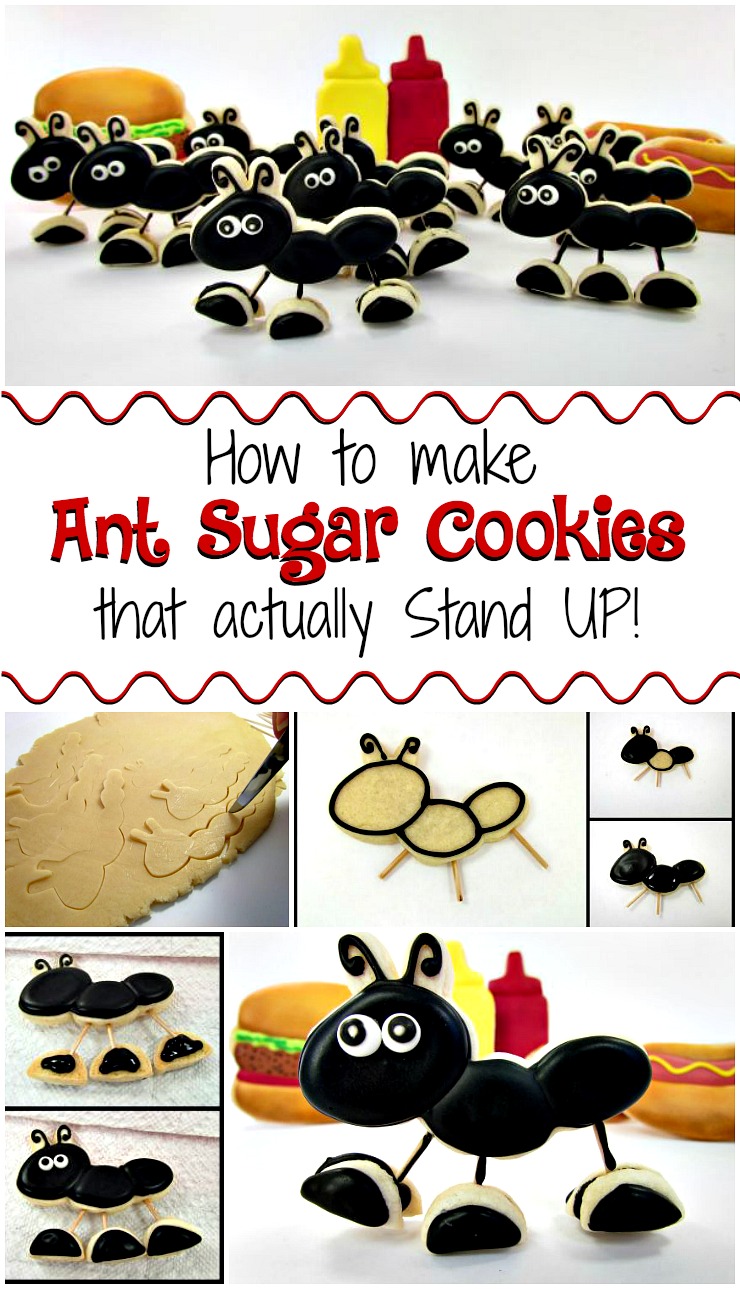
Ant Cookies That Stand up!
I love ants! They are small but super strong! I want to be like an ant! Small and powerful! I want to have the power to make cute little ant cookies that stand up all by themselves! Hey! Wait a minute!!! We Do have the power to make ant cookies that stand up all by themselves! Don’t you just love making cookies? You can make frogs, simple pretty flowers, snowmen or even ants that stand up all by themselves!!! It is great to live in my cookie world!

Before I posted the Picnik is Closing cookies, a few friends asked me how they could make these ants so, I thought you might have fun making some. It is even more fun to watch the people playing with them! Since they stand, people pretend to make them walk around! Fun times:) Well, let’s make some cookies!
Supplies:
Black Outline and Flood Icing
White Outline Icing
Toothpicks
Caterpillar Cutter (one with antennas)
Knife

You can find a caterpillar cookie cutter here.
Lesson Number 1: When you use your cookie cutters, now matter how tired you are, don’t leave them soaking in dishwater all night long or they will get rusty like my sad little guy! Poor thing!

To begin, start with some really cold dough. I rolled out my dough and placed it in the freezer for about 20 minutes before I begin to cut out the cute little ants/caterpillars.
Did you know ants have 3 main body parts? They have a head, a thorax (middle section) and an abdomen (rear section) so cut off all the extra parts.

Next, with your fingers, shape the end that you cut off. It should be a smooth oval shape. An ant with a sharp abdomen would look like a bee!

Once you have your ant shaped the way you want, add the legs. Break some toothpicks in half and insert them into the body. I added 2 in the thorax and one in the abdomen. (I thought about using cake pop sticks for the legs but, I was afraid they were too thick so I stuck with the toothpicks.)
You will add the feet after the cookie is baked.
Each toothpick needs to be about the same length so the ant will stand up properly when you add the feet. If one leg is longer, it will fall down just like you would with one long leg!.

Remember the medicine measuring cup I used to make my favorite snowman? Well, it makes snowman feet and it makes ant feet. Squeeze the sides of the cup and cut the edge of the dough. Then, with the knife, cut the bottoms nice and straight. You need 6 feet per ant.

Once your cookies are baked, with the black outline icing, make the antennas and outline the ant’s body.
With the black flood icing, flood the head and the abdomen. Let it dry for about 20 minutes then flood the center. Let this dry overnight. But before you go to bed, you have to make the feet and the eyes.

Next, with the black outline icing, outline the feet.
With the black flood icing, flood the feet. Let this dry overnight but you have to make the eyes first.

I love Royal Icing Transfer eyes because you can make a bunch of them and keep them in a little jar. On a piece of wax paper, make some white dots with your outline icing.
Then, add a black dot with your black outline icing and let them dry overnight. When they dry, they will pop right off the wax paper. Here is a free template and candy eye tutorial for you. I think you should make lots and lots of eyes because you can use them on almost anything.

Here is the handy dandy ant stander upper maker. (I bet my high school English teacher, Mrs. Elliott, just had a cow from that sentence!! hehehe) Anyway, to make the ants stand up you will need a surface that is semi-solid. Each iced cookie may not be the same width so a folded towel on a bakers rack will help you make the necessary adjustments. I will show you.

I like to cover my dish towel with a paper towel so no little fuzzy things will get on my cookies.
To make the ants stand, you need to place a foot under each toothpick leg. You may have to adjust the towel under the cookie so the ant will not move and fall off the feet.
Once the ant and feet are stable, apply some black outline icing on each foot and toothpick. Immediately place another foot cookie on the icing.
Important: Make sure the feet are almost level on the bottom! If one is longer than the other, it will not stand up! I adjusted them a little after I applied the second cookie to each leg. It was easier that way.

Now for the eyes. With your white outline icing, place little two little dots and add a Royal Icing eye and be careful not to bump the feet.

Now for the last step. With the black outline icing, pipe a line on each toothpick for the legs.
Important: Be sure to tell whoever is eating these cookies that the legs are toothpicks!!! You don’t want someone to eat them unless you are feeding them to a beaver!
Let them dry overnight and tomorrow you will have a little ant army of your own!

Aren’t they cute!!!! Don’t you want to be a super cute and super strong ant? I do:)
Bear hugs,


… Sigh … your ants warm my heart!
You are cute Jill:)
These would be awesome to take to a picnic! Thanks so much!
These cookies are adorable. Thank you for sharing your tutorial
These are amazing and what patience you exhibit in making them. Job well done!
These are the cutest little things!!!! Thanks for posting the tutorial.
Smiling! Love this whole set-up. So, so very clever. Kuddos to you!
I’ve never seen CUTER ants, and I’m sure I never will! 🙂 Thanks for the tutorial!
This is such a great idea and I love that you used a caterpillar cutter!
They are so cute!
These are AMAZING! I too, want to be an ant… and go to a picnic in the Smokey Mountains with my friends!… Do ants eat S’Mores?? I do!!
All camp ants eat S’mores Bea so come on down:) I love ya:)
These are soooo cute!!!!!!!!!!!!!! Thanks for sharing.
I would make some red here in Arizona, we have these red ones everywhere and they are so obnoxious!
You are so talented, I love your blog, photos & everything you do here!
We have the red ones too!!! And I hate them!! They hurt!!!
These are absolutely AH-Mazing! You are uber talented.
Uauuuuu! So amazing!!!! Congratulations from Barcelona
These are the ONLY ants allowed in my home:) Too cute…as always!
Lisa:
You are just about the clever-ist person I know!!!
These guys are SO STINKING cute!!! I am so glad you showed us how to make them. My little boy is going to be beyond excited when I make some for him!!!
Awww Lisa……you are super cookier. These ants couldn’t be cuter…..and you couldn’t be more brilliant. Thanks for sharing. (And I want to join you and Bea….in the Smoky Mountains……with Smores and Ants. ;))
Unless you are feeding them to a beaver! Bahahaha! Love it! I love these ants! Brilliant 🙂
What a fabulous idea. They are so cute…and I never thought ants could be cute :o)
These are acceptable ants! I LOVE THEM!!!
These are so stinkin cute Lisa! How on earth did you get this creative? You always amaze me and fill my heart!
Cutest ant cookies ever! I love that they stand up and could be placed all over a picnic table as decorations that can be eaten. So clever.
Oh my goodness your cookies are AMAZING! I would LOVE it if you would share some posts on my new link party at http://www.michellestastycreations.blogspot.com. I found you over at Sundae Scoop and will now be following your blog. Have a great week.
Hugs,
Michelle
Lisa,
Thanks for linking up this week. Hope to see you back every week.
Hugs,
Michelle
These are so stinkin’ cute!
You are so creative. These are the best.
Love the cookies. So creative and cute !!!
I can not get my icing that black. How do you get such a pretty black?
Thanks! I add the black color to my icing the night before. When I am ready to decorate, it is nice and dark. I know some people who mix brown and then add a touch of black so it doesn’t get the weird bitter taste. Hope this helps:)
Love them – these are the ants I would want in the house, they are so cute.
These are the cutest! I am a preschool teacher and we are the ‘amazing ants’! These would be so perfect 🙂
very clever ^^
Do you have your cookie recipe in blog?
Whenever I do my cookies it’s always to hard..
Thanks n I just love your creations
Hi yogi,
Here is a link to my cookie recipes: http://thebearfootbaker.com/2016/01/simple-sugar-cookie-recipe/
Here is a link to the royal icing: http://thebearfootbaker.com/2011/12/antonis-royal-icing/