Live Laugh Love Cookies
I have a confession to make. I don’t like writing on cookies. There. I said it. It is my least favorite part of decorating. I can do it with the use of my KopyKake but, I don’t want to drag it out every time I need a few words on a cookie. That is why I am falling in love with stencils like thie live laugh love stencil I got from Hillary over at The Cookie Countess. It makes writing a breeze.

Not only did I get the live laugh love stencil from her, I also got the really cool capricious one as well. If you are looking for an easy way to add writing and details, then stick around. This tutorial is for you.
Supplies for Live Laugh Love Cookies:
3 Different Sized Heart Cookie Cutters
Red Icing-15 Second
White Icing-15 Second
Live Laugh Love Stencil
Capricious Stencil 6 x 6
gingerbread cookie recipe
Royal Icing Recipe
 To make these cookies you first need to decide what size heart you want for the top. If you use a medium sized heart, you should only need 2 cookies for the base depending on the thickness of your cookies. If you like them thin, you may need more. If you use a large heart for the top cookies, you will need three cookies for the base so it won’t tip over.
 When you take the cookies out of the oven, immediately use a cookie pop stick to make a hole in the center. Firmly press straight down in the center of the cookie and remove the stick.
 Repeat this for all the base cookies and let them cool.
 Once they are cool you can see where you poked the hole. Well, it is almost a hole.
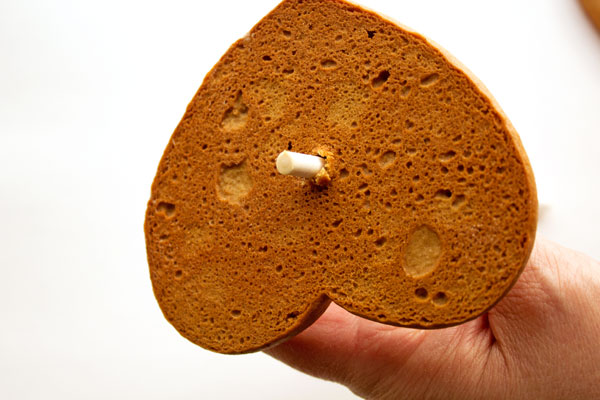 Use the cookie pop stick to finish the job. Go slow and be gentle so the back of the cookie won’t break or knock off big chunks.
 Repeat this for all the base cookies.
 Once all your cookies have holes in them, outline around the hole and the edge of each cookie. You need to decide what color you want for the top of the base and alternate the colors.
 Next, flood the cookies and let them dry overnight. I didn’t take a picture of the top cookie on a stick but, flood it also.
 Thank you so much Callye and Kim for teaching us how to use magnets to hold our stencils. You girls are genius!! The white cookies are airbrushed with Tulip Red Airbrush AmeriColor and the red cookies are airbrushed with AmeriColor Warm Brown.
 To stack the base cookies, add a little icing to the top of the large cookie and place the medium cookie on top. Use the cookie pop stick to line up the holes.
Repeat for the smaller cookie. Once you have all the cookies on top of each other, place the cookie pop stick in the holes while it dries.
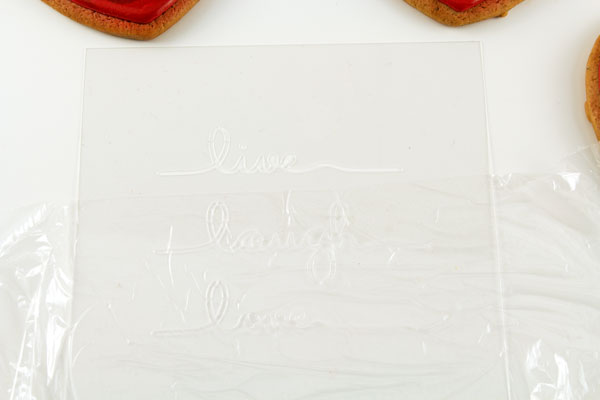 Since there are three words on this stencil we need to cover two of the words with plastic wrap. Add the plastic wrap to the back so it doesn’t accidentally move while you pull the icing over the stencil.
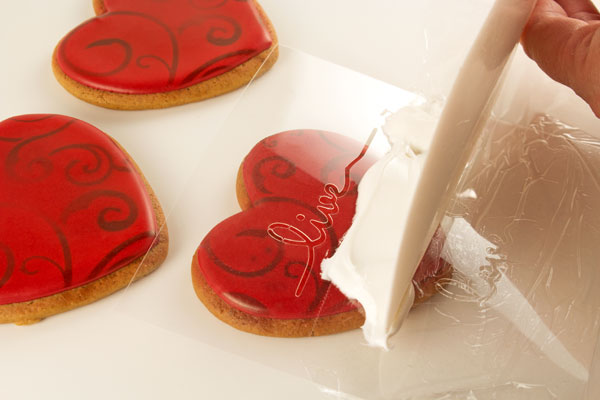 Then, use a stiff spatula like this Ateco 10″ Bowl Scraper/Spatula to apply a line of icing above or below the word.
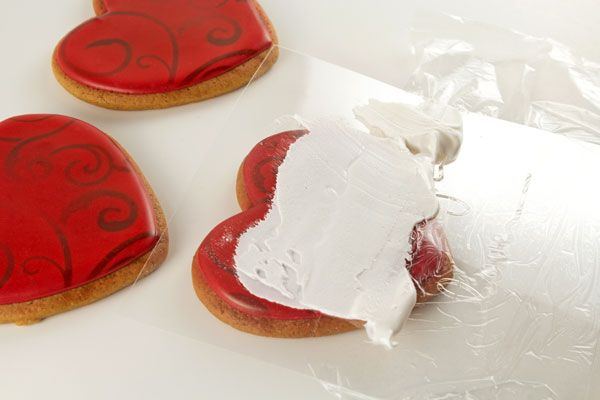 Gently pull the icing over the word with the spatula and then lift the stencil straight up off of the cookie. Don’t let the icing dry because it will not look good. Trust me!
 See. I didn’t do so well on this part. Next time I will enlist a helper because I had a hard time working the camera, stencil and the spatula. That’s ok because you always need to have a “Plan B” in case something goes wrong.
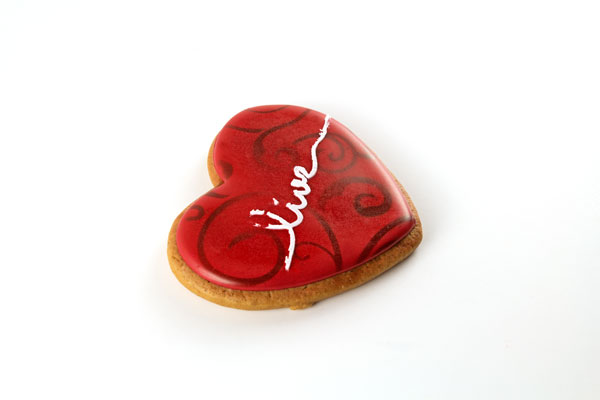
“Plan B” for these was to trace over the word with a food safe marker and then pipe over it. There is more than one way to use a stencil. I will find a helper soon and show you how to stencil with icing. Until then, “Live, Laugh and Love.”
Bear hugs,


These are so cute! They would be so fun at a Valentine’s Day party!
I used to avoid writing at any cost! Seriously, gave me anxiety the minute a customer asked for it. I stuck with it, and don’t mind at all anymore! I do use my KK for it though…as much for placement on the cookie as anything. Thankfully, my KK is always set up in my craft room because I would not like having to set it up every time I use it!
Stenciling…now that is a whole different thing for me! Whether it be with icing or airbrush, still makes me crazy! I really need to just make myself practice more! Your detailing is always so “crisp”…perfection every time!
Thanks Terri. I really don’t mind writing on cookies with the KK. You are so right about practicing. I need to make a big batch and practice writing without it.
Maybe we can partner up and coach each other I will be your cheerleader for stenciling and you can be mine for writing without my KK! LOL
Lisa, these are perfect. I know a few people that’d love to get one of these. Thanks for sharing another yet again wonderful tutorial with us!!
Thank you Sharon. You are so sweet!!
I love these! Beautiful set!
Thanks Glory! 🙂
This is just a warning. I am going to plagiarize this idea like crazy! I mean really……the cookie stand idea is freaking amazing for cookie table placecards for holidays, birthday parties, and whatever! YOU are full of it Lisa! It being brilliance and creativity and talent that is.
I am laughing out loud Anita!! You plagiarize this idea all you want! LOL I can’t wait to see what amazing things you do with it. I might have to plagiarize you right back! Bahahahahaha
SUCH a good idea to use the stencil & a food marker! Brilliant use, Lisa!
Thanks Gail! Food markers make me very happy! LOL
Lisa, I love everything about these – especially the lettering, beautiful. Oh, and the stenciling and the cookies, the smooth royal icing…I could go on and on!
Thanks Kim. You always make me feel wonderful! SMOOCH!
These cookies are so pretty. I love stencil you used and the fact that you turned a few cookies into a 3D cookie stand. Very clever!
Thanks Beth! Why not have an edible stand! LOL
Lisa! These are SO BEAUTIFUL!!!! I just love them! Thanks for making my stencils look so good. 🙂
UM, excuse me! YOUR stencile made my cookies look good!! You are the rock star here Hillary!!! 😉
I love this idea!!! Makes the whole thing edible!! Woohoo!! Thanks–Katy
Thank you Katy! Happy Valentine’s Day!
I am in love this cookies. This are the best ones for upcoming valentine. I will make it and present them to some on special for me 🙂 🙂
Thanks Aleesha! I hope you have a great Valentine’s Day!
Great idea, Lisa!! I’m not a fan of my penmanship. It’s definitely gotten sloppier over the years. haha. You’re cookies look wonderful. I love the whole look of the display– from the bases to the words!
Thanks Mike! I am going to work hard and someday write on a cookie without worrying but, in the meantime, I love stencils. They are very fast and easy!
Hi,
Thanks so much for this awesome post! I have the same stencil from the cookie countess and I needed it for cupcake toppers for this weekend.
Today was my first time stencilling and it just was not working out. I was at my wits end.
After reading your blog and the links to other blogs for tips. I finally got it to work! Yay!
Thank you!
Hi Katie!
I am so glad you got it to work. I love stenciling and the Cookie Countess is wonderful. She has so many neat stencils and she is very good to work with. Let me know if you ever need anything. I am here to help!