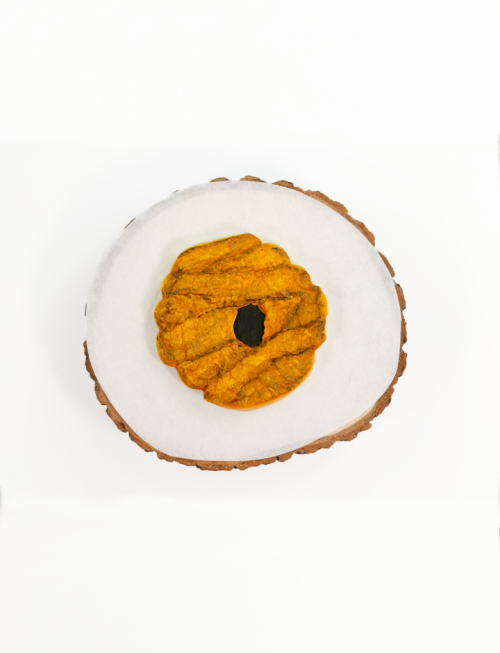
How to Make a Beehive Cookie with Royal Icing
Have you ever seen a beehive in real life? I don’t ever want to get near one and I don’t want you to either! Bee stings hurt and I want you to be safe! The good thing about bees and beehives is we can create them with sugar cookies and royal icing. This tutorial will show you exactly how to make them. They’re super cute and super fun and no one will get stung!
Let’s get started.
Supply List:
(may contain affiliate links)
Recipes:
Cookie Cutter:
Royal Icing Color:
- Tuxedo Black Food Gel Color – You will only need a little black royal icing for the hole in the nest.
- Sunshine Yellow Food Gel Color
Airbrush System:
Airbrush Colors:
Tools:
- Tipless Piping bags
- PME #2 decorating tip. You might be one of those people who snip off the tip of the piping bag and that makes me super happy for you. Unfortunately, I’m not one of those people. I can cut the tip and flood a cookie but I feel like I have more control outlining with a tip. I just wanted to share this link in case you were looking for a tip.
- Turkey Lacer
- Paintbrush (new and clean) or you can use a scribe tool.
- Sweet Sugarbelle Food-Safe Marker or Black Fine Tip Food Marker
How to Make a Beehive Sugar Cookie with Royal Icing Video:
Enjoy the video!
Let the decorating begin!
- Once you’ve baked your sugar cookies and made your royal icing you’ll need to gather a few things before you decorate. Grab a piece of parchment paper, a food-safe marker, and a paintbrush for food.
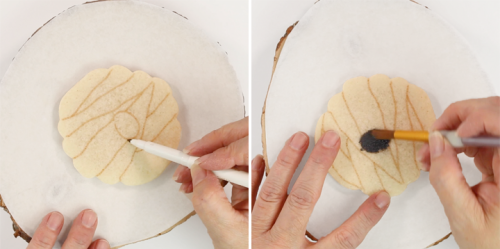
- Begin by drawing the hole and the lines on your beehive with a food-safe marker.
- Next, squeeze a bit of back royal icing on the oval you drew for the hole.
- Add a little water to your paintbrush and smooth the black icing out. This will help give the cookie more of a 3D look. Since the hole is flat it will make the icing a little more raised on the cookie.
Grab your piping bag and let’s get started:
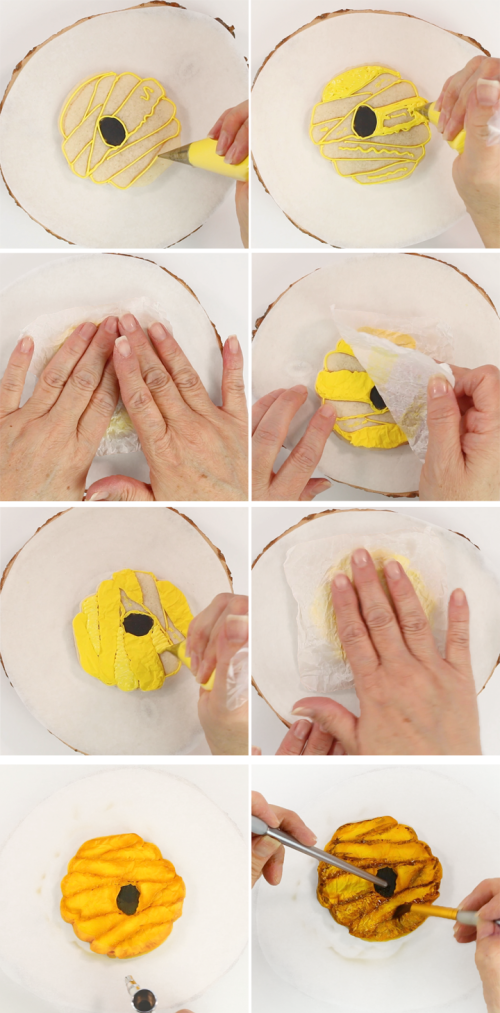
- Pipe over the lines you drew on the cookie with the yellow royal icing. This icing is super thick and it worked well for the texture I was trying to achieve.
- Next, flood every other section with the thick yellow royal icing. Use a turkey lacer to push the icing against the lines you pipped.
- Take a piece of parchment that’s larger than your cookie and crinkle it up. Open it and smooth it out and then crinkle it up again.
- Place it on the wet icing on the beehive cookie and gently smooth it out.
- Let it dry for a little while. You want the icing to be dry enough not to break because you are about to repeat the process.
Let’s do it again:
- After the icing had dried for a while remove the parchment paper.
- Grab the super thick yellow icing and flood the rest of the sections.
- Cover the wet icing with the crinkled parchment paper and let the icing dry completely.
Time to add some color:
- Remove the parchment paper and get ready to add some color.
- Airbrushing is a fun way to add character and depth to your cookies. I chose to add a golden yellow and totally brown color first. Airbrush in between the sections of the beehive cookie and round the hole.
- Add some totally brown to your airbrush gun and spray in between the sections again.
Hold on. We’re not done yet!
- Grab your paintbrush and paint some totally brown food gel (not airbrush color) in the sections of the beehive cookie. You’ll need some water to help blend things together. If you watch the video you’ll see what I’m talking about.
- Continue this until you have all the sections blended.
Now step back and look at your super cute beehive sugar cookie! Wasn’t that fun? Don’t you love how all the airbrush and food gel colors blended to make it look like a really cool beehive cookie? I want to make some more and give them as gifts. Wouldn’t they be cute with some little bee cookies? Let me work on some bees for ya.
Bear hugs,

