How to Make Adorable Beehive Royal Icing Transfers
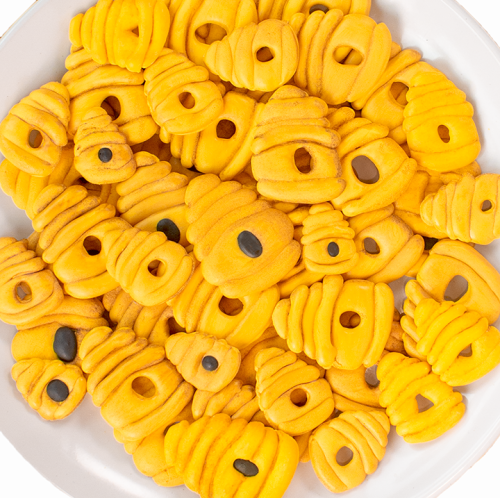
Hello! I hope you’re ready for some fun and free beehive royal icing patterns because that is what we’re making today! Royal icing transfers are great cookie tools because you can make them ahead of time for your cookies or use them as soon as they dry.
If you don’t use them now you can let them dry completely and store them in an airtight container away from the sun. They’ll last a long time and will be ready to use on your cookies when you need them.
You’ll find three different sizes below along with instructions and a video to help you make these adorable beehive royal icing transfers. Let the fun begin!
Supply List:
(may contain affiliate links)
Recipes:
Royal Icing Colors:
- Americolor Lemon Yellow 13.5 oz or Americolor Lemon Yellow .75 oz and Americolor Ivory 13.5 oz or Americolor Ivory .75 oz– Americolor Gold 4.5 oz or Americolor Gold .75 oz– I mixed these three colors to get the beehive color I liked. Just add a little of each color to your royal icing and mix until you get the color you like. Add more if needed.
- Americolor Super Black 13.5 oz or Americolor Super Black .75 oz
Beehive Royal Icing Transfers:
- Small Beehive Royal Icing Transfers | The Bearfoot Baker
- Medium Beehive Royal Icing Transfers | The Bearfoot Baker
- Large Beehive Royal Icing Transfers | The Bearfoot Baker
Tools:
- Tipless Piping Bags
- Super Clear Cello Bags 5.0″ x 7.0″– I use these bags to tape over the beehive patterns. Just cut them at the seams and tape them over the transfer patterns. When you let the icing dry completely the royal icing beehives will let go of the bags and you can use them now or store them for later use.
- Turkey Lacer
- Paint brushes- Use one to add the brown food gel color for shading and one to blend it in.
- Totally Brown Food Gel Color by The Cookie Countess– This is the color I used to shade the beehives. Mix with a little water and you’re ready to go!
How to Make Beehive Royal Icing Transfers Video:
Enjoy the video!
Let’s do this!
- Begin by printing your patterns from the supply list above.
- The paper isn’t strong enough for you to pipe the royal icing and then lift it to another location. You’ll need to tape the pattern to something so you can move them. Foam boards from the Dollar Tree work really well for this and they only cost $1.25. How great is that?
- All you need to do is cut them a little larger than the paper, tape the pattern to the board, and then tape the super clear cello bags on top. Now you’re ready to start piping.
- Here is a post I did that will show you how to cut the foam boards “How to Make Pretty Royal Icing Toothpick Roses.”
- If you watch the video above you will see how simple and fun it is to make them.
Let the piping begin!
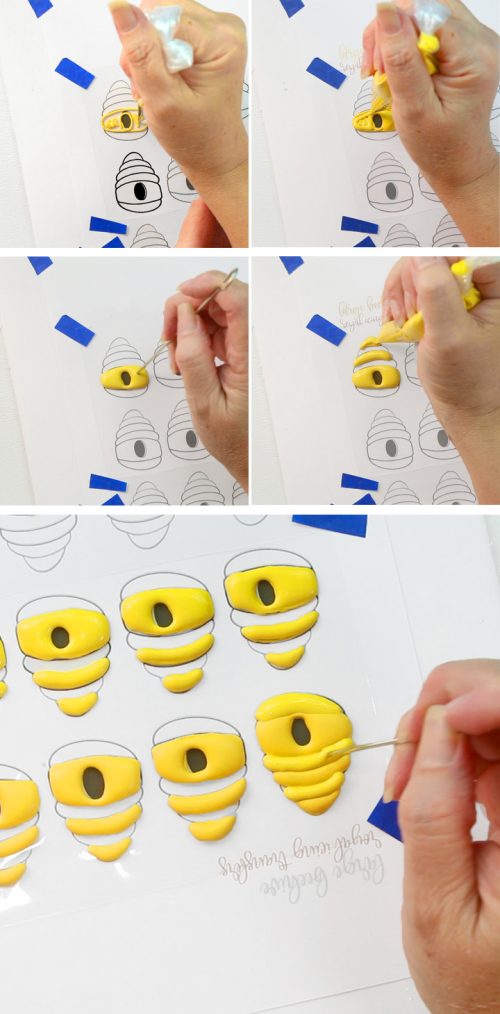
- I like to use two different consistencies of royal icing. One for outlining that’s a little on the ticker side and one for flooding which is about a 15 Second Consistency.
- Begin by outlining every other section of the beehive with the outline consistency. You can add a little icing in the center so the flood icing won’t sink as it dries.
- Next, fill the outlines with the flood consistency.
- Let them dry for at least ten to fifteen minutes before you outline and flood the other sections.
Time to add some shading:
- Make sure the beehives are 100% dry before you start shading.
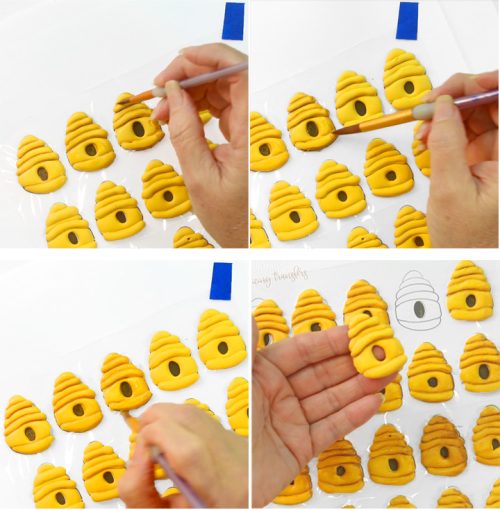
- If you have an airbrush gun you can use it to add a little shading in between each section of the beehives. If you don’t have an airbrush gun you can use a paintbrush and some brown food gel color. Just mix a little water with the food gel color and add it to the sections of the beehive.
- Next, use a damp paintbrush to spread the food gel color.
- Let them dry completely before you remove them from the cello bags.
Now that you’ve made some beehive royal icing transfers you can use them on your cookies now or you can store them in an airtight container or storage bag. I have a plan for these and will share it with you soon. Let me know what other royal icing transfers you’d like to have. I’d be happy to make them for you.
Bear hugs,

