DIY Royal Icing Transfers with a Stencil
This post may contain affiliate links.
Royal icing transfers are one of my favorite decorating tools. I like them because they are easy to make and even easier use. I have not made any to share with you lately because, well, I got a new computer. I do not have access to the program that I used to make them in the past but, I think I have found one that is affordable and user friendly. In the meantime, I have a few transfers to share that weren’t made on the computer. Did you know that you can make DIY royal icing transfers with a stencil?

They say that “necessity is the mother of invention” and I have to agree. When I get desperate, I get creative. When I get creative, I do things like use stencils to make cute royal icing transfers. And thanks to Hillary over at The Cookie Countess there are many, many cute stencils we can use to DIY royal icing transfers. Today we have sleigh transfers and later this week, I will add a few more from her stencil designs. Thank Hillary for making life easier!
Supplies for DIY Royal Icing Transfers made with a Stencil:
Sleigh Stencil from The Cookie Countess
Yellow 15 Second Icing
Red 15 Second Icing
Airbrush System or a pencil
Masking Tape
Wax Paper
Piece of paper to copy the stencil pattern
 To begin, head over to The Cookie Countess and buy yourself some cookie stencils that you think would make really cute royal icing transfers. Today, we will make a sleigh.
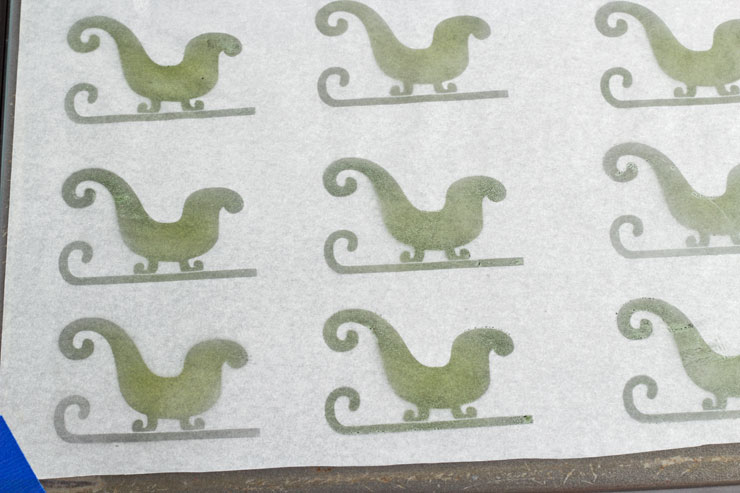 There are a few ways to use the stencil to make a royal icing transfer pattern. The first is to airbrush the pattern onto a piece of paper. I like parchment paper because I can cut to the size I need to fit over the back of my baking sheet. Move the stencil and airbrush the sleigh in rows onto the paper. The airbrush color will remain wet for a few minutes so start in the upper left corner, move to the upper right corner, and then move to the lower left corner so you don’t have to wait for the color to dry. By the time you make the center pattern on the top row, the upper left and right sleighs should be dry.
If you don’t have an airbrush system, just use a pencil to draw inside the stencil. Easy! Next, tape the pattern to the back of a baking sheet using masking tape.
Then, cover it by taping wax paper over the entire pattern. Make sure there aren’t any wrinkles or it could mess up your sleigh.
Pipe all of the rails on the sleigh with yellow or brown icing. If you want them to be a little shiny, you can airbrush them like in the picture above.
Let the icing dry overnight before you outline and flood the sleigh with the red icing. Let it dry completely. I let these dry for about 2 days to make sure they were completely dry.
 Before you remove the sleighs from the wax paper, you can airbrush the bottom side of the sleighs with brown airbrush color.
 This is the easiest royal icing pattern I have ever made. And look at those cute sleigh royal icing transfers.
 Since the rail on the sleigh is a bit delicate, cut the wax paper around the squares so you can focus on removing one at a time without worrying about breaking others in the process.
 Now another favorite tool, the bench scraper. It makes removing royal icing transfers simple since it has a nice edge and it fits in your hand.
Slowly slide the wax paper under the bench scraper while allowing the transfer to slide off of the side. You will probably have a few that break and it is alright. Always make extra when planning to use transfers.
 As the transfers eases off the wax paper and bench scraper, use your hand to support it so it doesn’t fall on the table and break.
 I always test my transfers on a naked cookie to see where I want to place it and how it will look before I make a big old mess when decorating. This one fits nicely.
 Next, outline and flood your cookie. While the icing is wet, drop the DIY royal icing transfer into place.
 I love the airbrushed sleigh with the chocolate cookie and the simple white icing. It worked well with this set of cookies for Santa.
I really like using stencils for patterns. It is fast, fun and there are a lot of options to choose from. I need to go now and look through all of my stencils to see how many royal icing transfers I can make.
More Christmas Cookies and Royal Icing Transfers:
Simple Owl Cookies
Simple Reindeer Cookies
Polar Bear Cookies
I want a Hippopotamus for Christmas Cookies
Merry Christmas,

Oh my goodness! Lisa, that is absolutely genius! I cannot wait to bust out my stencils. Thanks for being so creative!
Shut the front door!!! Pure. Genius.
You are incredible!!!!!!!! I just got 9 new stencils yesterday. I can’t wait to play. You’re a genius!!!!! Thanks so much. Merry Christmas.
I always learn something great in your tutorials! I really like the stencil/royal icing transfer idea! Thank you for sharing!
You are such a smartie … in a good way! Love the use of the bench scraper … especially with those delicate parts 🙂
Lisa, this is seriously genius! I don’t really use stencils, but now I will 🙂 pinned!
These are cuter than cute can be – I love (thanks to you) making royal icing transfers!
These look great and I just love that set!
As always, you make my chest feel tight with the cuteness of your ideas. Love! <3
Hi. I’m new to icing cookies, and I’m having a problem with “dots” on “wet on wet” flooding technique. They seem to run and don’t keep their shape. What am I doing wrong?
Hi Debbie,
Try making your icing a little thicker. If it is thin, it can run and lose the shape. If it is thicker, it will stay in place and make a perfect circle.
Hope this helps,
Lisa
Thank you. I will try that next time.
Debbie
Hi Lisa!
Love this tutorial. Do you ever have bleeding issues when your icing transfer is dark and your background is white? Your red sleigh/white background is a perfect example! I have a large order with black on white and transfers would save me a lot of hassle!
Hi Rachel,
I have noticed when I rush and place “fresh” royal icing transfer (one that is a few days to a week old) onto a cookie with wet icing, bleeding can occur. If you let the royal icing transfer dry for a few weeks or longer, the chances of it bleeding are rare.
Humidity is what causes the colors to bleed so when you place a royal icing transfer onto a cookie, make sure the transfer has had a long time to dry completely. If there is any moisture in your transfer, you could have a bleeding issue. The dryer the better!
I place the transfers in front of a fan as soon as I pipe them. I will let the fan dry them for a couple of days and then move them to an out of the way location to let them dry longer. You can store them in an airtight container away from the sun (the sun will make the colors fade) for months and months an months. That is why I think they are the perfect decorations for cookies.
When is the event with the black and white cookies? Do you have time to start the transfers now? If not, email me at lisa@thebearfootbaker.com and I will give you a few more suggestions.
Bear hugs!
This is pure genius!! I was wondering, do you think this is possible to do and attach to a decorated cake? I hate fondant and refuse to work with it, so I’m looking for other decorations for my cakes. Thank you for your tutorial!
Hi Autumn,
I have used royal icing transfers on cakes and cookies but to be 100% honest, royal icing is tricky. Sometimes it behaves very well while other times it has a tendency to “melt” if the cake icing is moist or if it is really humid. When I use royal icing transfers on cakes or cupcakes, I add them at the last possible minute. If it is birthday or wedding shower, that is the last thing I do before the sweet treats are served. If you add them the night before, the royal icing may decide to melt and make your life really hard! LOL
So the short answer is yes you can use them on cakes, but add them at the last possible second or you will need to something else like chocolate or fondant for a longer lasting result. 😉
Do not put cake with icing in the fridge, because this way it becomes matte! You should know that the cake with icing retain moisture longer.
Good point Dorota! Thanks for the tip!