How to Use an Airbrush Gun
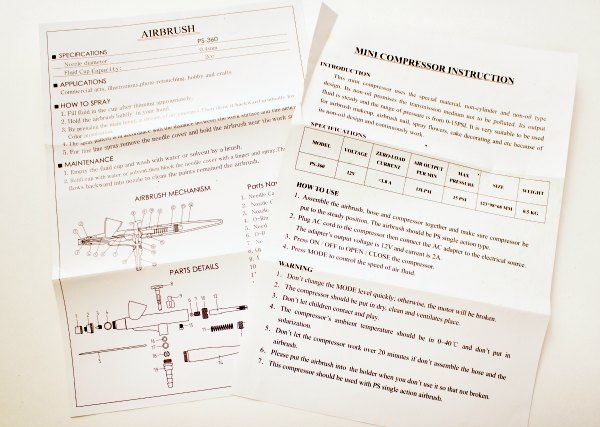
I wrote a post a while back about Airbrush 101 but, I wanted to do a post on how to use an airbrush gun. When I bought mine, the first thing I did was take it out of the box and grab the instructions only to find, the instructions seemed to be missing. I am in Salt Lake City, Utah at Cookie Con and and wanted to share some of information on a presentation I did on how to use an airbrush gun.
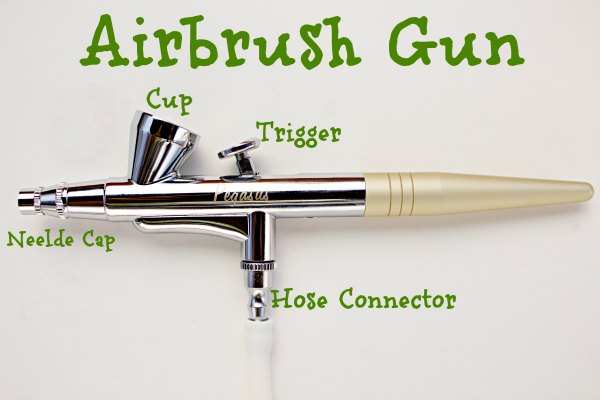
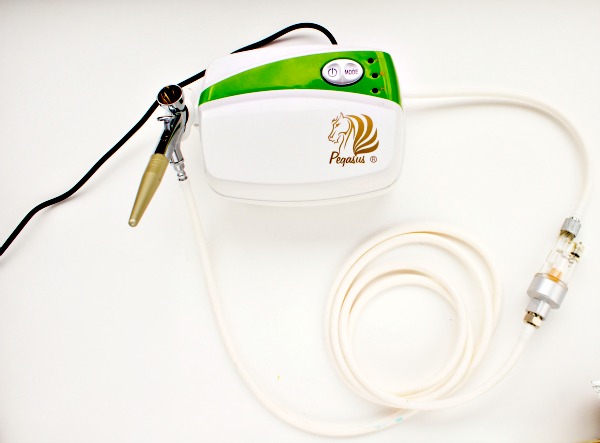
This is “Wendy” my airbrush gun. I like using her on cookies but, I try not to use it too much on the blog because everyone doesn’t have one. If you are planning on purchasing one in the future, you can get it here. I will try to answer the questions and my friends and I had when we got ours but, if I miss something, feel free to email me. If I don’t know the answer, I will try to find it for you.
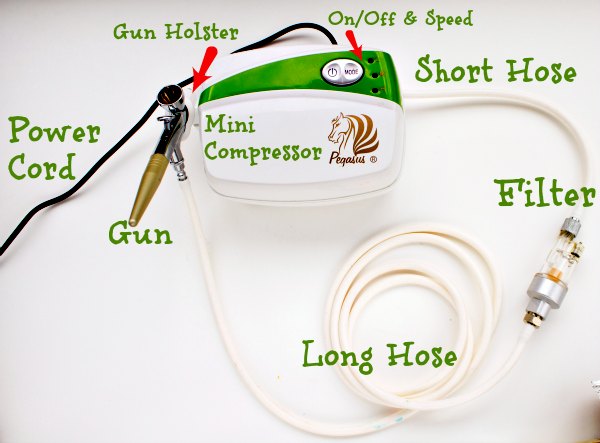
- Attach the power cord to the mini compressor and plug it into an outlet.
- Connect the gun holster to the mini compressor.
- Connect the short hose to the mini compressor.
- Connect the other end of the short hose into the filter.
- Attach the filter to one end of the long hose.
- Connect the other end of the long hose to the airbrush gun.
It makes me want to sing the song, “My toe bone’s connected to my ankle bone, my ankle’s bone’s connected to My knee bone, my knee bone’s connected to my hip bone….” I will try to resist so that song doesn’t get stuck in your head. Hehehe
A few things you need to keep in mind, don’t change speeds quickly. You need to go slow because the instructions say so. And Don’t run it for over 20 minutes straight because the instructions say so. 😉
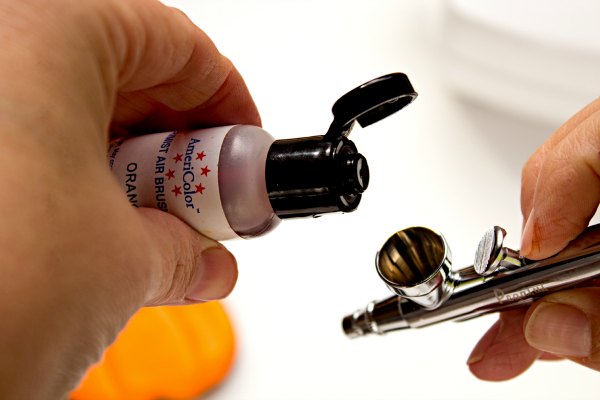
Add a drop at a time to your cup. I love these bottles because it is easy to control how much you add. You only need a drop to airbrush a several cookies.
Also, if you are going to airbrush with several colors, you will save some cleaning time by using light colors to darker colors. I personally clean in between each color so my colors are true.
Once you are “Locked and Loaded” ( have your hosed attached and your drop of color) you are ready to begin. This airbrush has 3 speeds, high, medium and low. The speed will determine how fast the air comes out of the tip of the gun. 90% of the time I use low because I like outlining an individual area on my cookie. I also LOVE SPEED so the other 10% I am wide open on high. You should pick the speed that is best for your project.
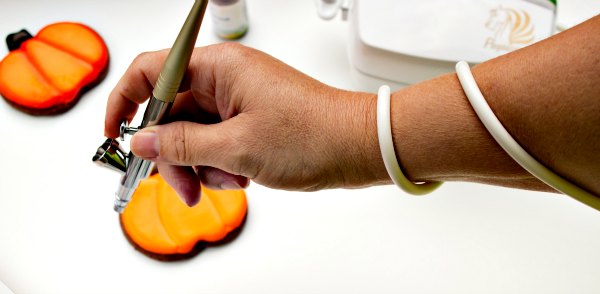

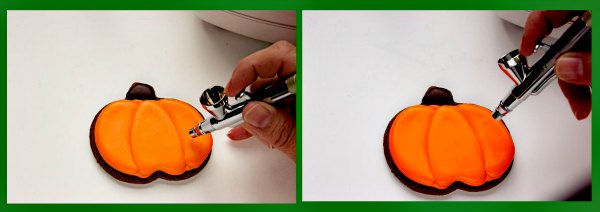
For detailed spraying you would hold the gun pretty close to your cookie and get a defined dark line. To get a larger area covered, you would hold the gun farther away and get a lighter spray that covers a wider area of the cookie.
I think that about covers it except for the cleaning. That post will be here in the next few day. I will show you how to do a little troubleshooting if your gun doesn’t spray correctly.
Remember, if you have any questions, feel free to email me at lisa@thebearfootbaker.com.
More on Airbrush Guns:
Airbrush 101
How to Clean an Airbrush Gun
Bear hugs,






How do you “hit” a specific interior part of the cookie (one that is not along the edge of the cookie) without it getting an initial burst of color in one spot?
I haven’t tried this myself yet but could you hold a piece of wax or parchment over the cookie, start spraying on that then move the paper away so you can spray the area of cookie that you want? I’m not sure how well that would work…or if you’d have enough hands to control everything!
Yes you can. I use a paper towel and use my gun on low so it is easier to control and hold things. 🙂
Jill, I lay a paper towel on the edge of the cookie if I don’t want the airbrush color to hit it. I will try to take a picture and add it when I get home!
Great idea!
(((HUGS))) Jill!! I miss you and hope now that I have you added to my Facebook Interest Group, I will be able to see you more. I don’t think FB wanted us to be friends anymore but, they can’t stop us!
I’m star-struck!!! I still can’t believe I actually got to meet you in person and see your demo live. You are even more fun in real life (if that’s possible) than you sound on your blog. I am totally loving CookieCon!
I LOVE all my new friends!! I am so honored Karen asked me to be part of CookieCon. You ALL ARE AMAZING and I am having the time of my life!!! You are a doll!
Hi Lisa,
Thanks so much for providing this tutorial for the airbrush gun. I have wanted to get one but did not know what to buy or which brand. I’m happy that you indicated the make that you and other cookiers use. I also reviewed your previous post and saw that there was a 20% discount if purchased from Karen’s Cookies based on your referral. Is this discount still available? I look forward to your next post on cleaning and troubleshooting.
By the way, I love you blog and your cookies are out of this world!!
I am so glad you feel comfortable enough to use an airbrush now. Unfortunately, the code for KarensCookies.net has expired. Once you buy the airbrush gun, let me know if you have an questions. Have fun spraying!!!
Great tips Lisa!! I do have an airbrush gun, but have only used it a few times. I have not had much success, which leads to a little intimidation. I am sure with everything else it just takes practice. My biggest problem is trying to figure out what color… 🙁 I would have loved to have gone to CC. Sounds like everyone had a fabulous time. Next time for sure! I feel this urgent need to meet my enablers 🙂 hahaha
I wish I could have met you! I have a little tip for you. Make a few extra cookies when you bake and decorate to use as practice for the airbrush gun. You can use the same color as your icing to shade or go for the next shade darker. I will do a few more airbrush post before the holidays are over. You will be a pro with a little practice:)
Awesome tutorial Lisa – I’ve finished my first airbrushed buttercream cookies!! It was so fun, I wanted to spray all over the kitchen when I ran out of cookies! 🙂
LOL! I tell everyone at my house if it doesn’t move, I will paint it then, I got the airbrush gun and NOW they believe me! Hahahaha I am glad you had fun Kim. Did you airbrush while riding your unicycle?
Great tutorial, Lisa! At CookieCon you were talking about how to avoid the clogging while using sheen or gold by using Everclear. I didn’t hear the proportions used with the Americolor gels because ^^^Kim (The Partiologist) was distracting me 🙂 Also, you mentioned soaking it overnight if it gets clogged?
Hi Tricia, I am so happy I got to see you again! You are so sweet and I love ya to pieces!! I am still traveling and I will do the Pearl Sheen and Gold post with the amounts when I get home and convince someone to buy me some Everclear! LOL (((HUGS))))
I think I know what to ask for as my anniversary/birthday/Christmas gift, which all fall in Nov. and Dec. Thanks for the tutorial, Lisa!
Thank you so very much for this and the cleaning post. I recently purchased an airbrush and this has been extremely helpful.
if my airbrush gun fell, is it damaged?
Have you tried to use it since it fell? If you have tried to use it and it doesn’t now work, I recommend you call the company that makes the machine and talk to them. They will be able to help determine what is wrong.
@Lisa – agreed – is it under warranty?
I bought an airbrush awhile back and finally decided to take the plunge tonight (Duff airbrush system). When I connected all the parts and put my airbrush color in nothing came out. The air comes out continuously even when the trigger is not pulled and then when you do pull the trigger no color is coming out and when I tried putting water in to clean it no water came through either. Do you think I have a defective airbrush or is it something I am doing? I appreciate if you can help!!
Kristi
Hi Kristi,
I think you have a bad machine. I hope you saved the receipt so you can take it back. It sounds like the compressor is good but the gun is bad. Let me know what happens.
Thank you. That’s what I was afraid of. Miraculously I found the receipt but I had read reviews that Michaels wouldn’t take them back and you had to go through the manufacturer so I will see what happens.
Thanks again. I was able to return it for a working one. I have been using it to airbrush with stencils and am loving it!
Hi Lisa,
first of all I want to say that you are amazing! I love your cookies and your blog… I’m such a fan and you are a great inspiration! Now with the airbrush-related comment/question… I’m about to buy an airbrush gun! I’m kinda obsessing over it… Every cookies I see right are airbrushed… I can’t wait!
Your model of airbrush gun, Wendy, is it a single or double action airbrush??? I read a lot about them and I wanted to know your opinion – since your such an expert in this matter – about the best type to buy!
I want something simple to use because it would be my first one… also because my cookies are an hobby!
Thanks in advance for the advice and again compliments about your everything… and also about the book! I think it will be the only cookies book I’ll buy!
Have a nice day!
Jenny
Hey Jenny,
I emailed you a note. 🙂
Yes, Thank you! I saw it and I reply!
Many years ago I worked in a graphic arts studio and was required to purchase an airbrush gun to retouch photos. I haven’t used it in a long time. It was thoroughly cleaned and is stored in the wooden box in which it came. I do not have a compressor. My question is: Can I use this airbrush for cookie decorating so I don’t have to purchase another one (it was pretty pricey)? Also what type of compressor do you recommend? Thanking you in advance for any advice you can give.
Claire
Hi Claire,
I am not sure about your airbrush gun. I feel better directing you to Edward. He is my airbrush master and will probably be able to help you. His email address id info@thesugarart.com. If you would like to talk to him on the phone, email me at lisa@thebearfootbaker.com and I will give you his phone number.
Hello,
My mom had bought me a Cake boss air brush for an early Christmas gift. I got it out the box and hooked it up just to see how it works with water. Is air suppose to come out as soon as I power it on? Water wasn’t coming out the nozzle till I pushed the trigger. I didn’t know of its normal for air to blow all the time? Thanks for your time!
Hi Missy,
It depends on the type of airbrush gun you have.
It does blow all the time on a Single Action Airbrush Gun.
It doesn’t flow all the time on a Dual Action Airbrush Gun. It will flow when you pull the trigger.
Here is tutorial that might help you see the difference: http://thebearfootbaker.com/2015/10/airbrush-gun-replacement/
Hope this helps!
I have an airbrush question for you – do airbrush colors go bad? By that I mean can they get so old that they won’t stay mixed? I received a brand new, high-quality airbrush as an early Christmas present and the spray is really ‘spotty’ so everything has a speckled look to it. The owner of the company (Shannon from Artfully Designed Creations) replaced the gun for me but I am having the same troubles. What makes me think my colors are bad (they are 2 years old) is that I found one color in the set that produced an even spray – the rest varied from slightly spotty to leaving big water-looking splotches. Thank you for any information you can give me!
I am having the same issue with speckles and spots. And it is only with one particular color. So I am guessing the same as you, that my color is bad (even though I just bought it a couple months ago.) I poured some into a little vial to mix with a pearl sheen and there were little chunks in it.
hello lisa,
Thanks for your nice article.Just i love this.Your air brush 101 is excillent.I want to know its prices.Are you tell me this price?
Recently i read another blog, check here,the explain another air brush thats also good.But i like your air brush .
Hi Hafiza,
There are a lot of great airbrush systems on the market but the two I use are
The Cookie Countess https://www.thecookiecountess.com/products/cookie-countess-airbrush-system
Artfully Designed System https://www.artfullydesignedcreations.com/product/adc-airbrush-system/
If you follow the links you can find all the information you need on them. 😉