Turkey Nugget Cookies-Poor Turkeys!

Aren’t you glad you are not a turkey? If they didn’t have enough to worry about with Thanksgiving 18 days away, now they have to worry about fast food restaurants serving them up as a turkey nugget. Well, at least for now the poor guys only have to worry about turkey nugget cookies.

Look at those poor turkeys! They are scared half to death. They’re afraid they will end up at your house on the table for Thanksgiving or worse, in a fast-food box with other turkey nuggets and ketchup on their heads! Poor little guys!
Supplies for Turkey Nugget Cookies:
(may contain affiliate links)
Brown Icing
Yellow Icing
White Icing
Red Icing
Colors of icing for the feathers
Small Edible Black beads and these 4mm Black Nonpareils
All Turkey Nugget Eyes Template
Half Oval Turkey Nugget Eyes Template
Round Turkey Nugget Eyes Template
Scared Wonky Turkey Nugget Eyes Template
Worried Turkey Nugget Eyes Template
Turkey Eyes:

Begin by printing and making the royal icing eyes and face a few days before you make the cookies. Let them dry completely.
Click here for more information on how to make royal icing templates. Feel free to resize them depending on the size of your cookies.
Turkey Time:

For the bodies use a circle, square and a triangle. My poor circle cutter will never be the same. LOL
To make the tail feathers, stretch the flower cutter on all sides. Then, cut your shapes and add 3 flower petals for the tail and one for the head. Use the picture below as a guide

Work fast on the feather. Outline a feather with yellow icing and flood it immediately. To make the feathers, use the wet on wet technique which means you pipe wet icing onto wet icing. Add stripes with the colors you want. Start at the top of the feather and pull a toothpick, turkey lacer, or a BooBoo stick through the center to the bottom. Let it dry for about 30 minutes. Make the lines of the feathers as thin or thick as you want.
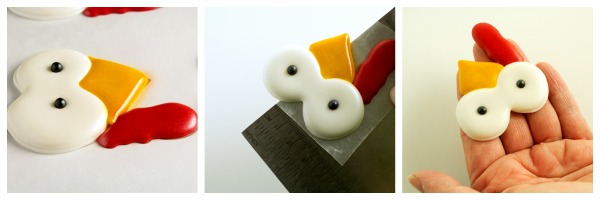 While you are waiting, remove the royal icing eye transfers from the wax paper with a bench scraper or a sharp edge. Pull the wax paper under the scrapper and the transfer will slide off into your hand.

Next, outline the body with the brown icing making zigzag lines so the little guy looks terrified.

Flood the body with the brown icing.
Let’s Put it All Together:

Add the royal icing eyes to the turkey nugget cookie while the body is still wet.

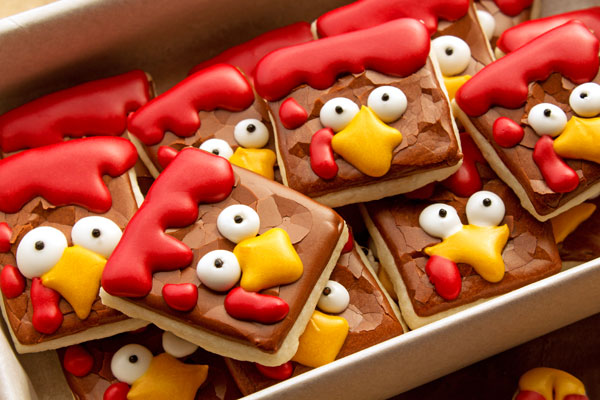
Now for the poor little fellows that are in the box. I didn’t have a cutter for this so I used the bench scraper to cut some small squares and rectangles.
Outline and flood with the brown icing. Let it dry for 30 minutes to an hour. Use your fingers to smash the icing like these cookies. Add red icing to the head to look like ketchup.

Add a cute little face and stick them in a box when they are dry.
I don’t know about you but, I would totally eat a turkey nugget…as long as it is a cookie.
If you are looking for more fun Thanksgiving treats, follow the links below.
- Decorated Turkey Face Cookies Sweet Sugar Belle
- Turkey Brownies
- Mini Turkey Cookies for Thanksgiving by LilaLoa
- Fall Leaves and Airbrushed Acorns
- Easy Turkey Platter by Sweet Sugar Belle
- For information on how to store royal icing transfers, click here.
Bear hugs,


Super cute! I love the fun colors and patterns for the feathers!
Thanks Glory! I had fun with them.
Oh they’re adorable and I love a design that works on so many different shapes!
Thanks Michelle! I was lazy and grabbed cutters I already had out. LOL
How cute are these? I love them! Thank you!
I am glad you like them Traci! 😉
These are just PRECIOUS!!!!!!!!!!
SMOOCH!!
Ah-dor-a-ble! Those are some really cool royal icing transfers. Love the worried turkey ball in your example and the feathers are so awesomely colorful!
Thanks Mike! I am a Royal Icing Transfer Junkie!!!!!!
Oh my goodness – Lisa – you always come up with the cutest cookies! I love everything about these cookies, the shapes, the expressions, the feather details…all fabulous!
Thanks Kristina! You just made my day!!
Lisa, these are so cute!!! I cracked up at your instruction of making zigzag lines so the little guy looks terrified!!! So funny 🙂
Hahahah Tricia! All I could think about when piping them was, “Shake Ya Tail Feathers!” Hahahaha It has been stuck in my head for days.
These are so adorable!!!
Thanks Karen! I really like your In Flanders Field–in cookie Post. Thanks for sharing that with us.
Wonderful cookies! I love all the different colors you added in the feathers. It really perks up your typical brown, red, orange, yellow thanksgiving cookies!!!
Thanks Jennifer!
These are super cute!!
Thanks!!!
Too cute!! I love the cracked look! I accidentally cracked a spot in a plaque cookie I really needed. Remembered this technique and cracked the entire cookie. “Antiqued” it then piped a cornucopia with fruit on top! Looks like that was how I planned it all along! Thaanks for the templates!
This technique has saved me many times CHerryleigh. I get in a hurry and poke my big old finger right in the wet icing. I am glad we have a Plan B incase we need it!
They do look frightened and darn cute. Smashing the royal icing to give the turkey’s texture was such a fun idea. Pinning.
Thanks Beth for Pinning!!!
I didn’t know that turkeys had nuggets!!! I love them and must pin them!
Bahahahahahahahahahahaha Brenda!! You made me laugh so hard! Thanks for pinning 😉
Oh My Goodness! Soooo darn cute! I just love their expressions. BTW: I’ll try and get an email to you this week but looks like good chance I’ll be seeing you in Mid May???? That’s the plans at this moment. Fingers and toes crossed.
NO WAY!!! Finally!! I get to see you in real life!!! I need to lie down because I am so excited I might faint!!
Eeeek! Lisa, These are so, so, SO CUTE!!!
Thanks Sue!!!
These are hilarious and too stinkin’ cute! Love how you “smashed” the icing…brilliant for these!
Thanks Terri! I thought they needed to look a little rough! LOL
Oh Lisa, your little gobblers are too cute – I love how you roughed a few of them up!
Lisa you are so hilarious, I love these!!
Thank you so much for this creative idea and the templates. I made my transfers 2 days ago and baked the cookies last night. Am ready to put them together tonight! One concern I have is the white portion of the transfer taking in the brown from the body. I ruined some snowflakes last year using white transfers on a blue base. But your turkey eyes aren’t discolored, so I’m going to hold my breath and hope for the best! I love coming to your site and finding such neat cookies, PLUS instructions on how to recreate them. Thanks again!
I worry constantly about the colors bleeding together. There are a few things you can do. Don’t make them really far in advance. The longer they sit around the more chance the color will bleed. Use a fan to dry them like Sweet Sugar Belle suggests.
Another thing I am going to try soon (if you try let me know how it works), I want to pipe the transfer colors on the base where the transfer will be placed so it will be the same color and hopefully reduce the amount of bleeding. You will need to work fast and it should look like a wet on wet technique.
These little nuggets are the cutest! Thanks so much for stopping by too! Love all your gorgeous cookie creations!
How did I miss these???? They are totally adorable Lisa and YOU are aMAZing!
FYI, that sentence could be exchanged anyway around and still work, i.e. the cookies are aMazing and YOU are totally adorable! See what I mean?
I put the cookies together last night and had no color bleeding! I considered using the flooding method you described, but decided that would require too much precision for me. 🙂 So I just put a layer of white on the back of the eyes and then stuck it on the brown body. Worked like a charm. I adore these cookies!
Karla
Cookies are too cute! So fun to see all your ideas!
Haha – poor turkeys!!
I love these so so so much! Showing them a little link love in my post today!!
I LOVE these! I tried them for our family Thanksgiving and they were a hit! Thank you for the great idea!